To
Part Two
To Part Three
After damaging and losing my sailboat in the tumultuous 2009
Texas 200, I returned home and began searching for a replacement
boat. I spent some time looking at ads for plastic production
boats and found plenty of good, proven designs out there. But
a decade of sailing in windy Oklahoma and Texas has rearranged
my thinking about desirable sailboat characteristics and forced
me off the mainstream boat-buyer's path. There are some sailboat
design features that prove advantageous around here and still
others that prove disadvantageous and I'm steadily figuring all
this out the hard way. I've always owned sloops, but here where
I sail, the boats that seem to perform best in these shallow,
windy cruising grounds sport the twin spars and smallish sails
of ketches, yawls and the occasional schooner. The problem is
that there just aren't many non-sloop plastic trailer sailers
out there to be had.
After a few months of internet searching, I had to make a decision.
Either I'd compromise and pick up a production fiberglass sloop
or I'd build a boat to my liking. After talking it over with sailing
friends and builders, I decided to bite the bullet and build.
Unlike many builders, I didn't really have a strong urge to build
a boat. (I know, I know. That's blasphemy.) I admire the "serial
builders" I know; the guys who crank out boat after boat.
But, that's just not my thing. My goal was simply to produce a
boat that I couldn't buy off-the-rack.
The Hunt
My research process produced a moderate list of design features
that I'd sorted into "must have" and "nice to have"
categories. So, I began looking at boat plans. (Many of you just
smiled.) Hunting for the perfect small boat plans can be somewhat
addictive. There must be hundreds of sailboat plans out there.
Thousands? But, my "must have" feature list quickly
pared down a giant list into a moderately-long list. My list particulars
changed over time, but six parameters were set in stone. My future
boat would have to have the following:
- A split rig
- Speed
- Shallow draft
- Decent freeboard
- Easily reefed sails
- Beauty
Design feature #6, beauty, was important. I would not build a
sailboat that was not beautiful. Surprisingly, this eliminated
a large number of potential plans. Sure, beauty is in the eye
of the beholding sailor and I certainly judge design aesthetics
in my own particular manner. But, it was an important, albeit
arbitrary, factor in my hunt. Now, there are many builders out
there that seem to discount this; simply valuing functionality
and performance measurements. I wish them well, but for me, my
boat would need to turn heads and generate approving nods.
My short list brought me to the design library of Graham Byrnes
of B&B Yacht Designs. I'd sailed with Graham in the 2008 Texas
200 and have sailed on/alongside his Core Sound and Princess boats
for many years. I'd even built one of his nesting dinghies several
years ago. His designs met all my "must haves", perform
very well in my cruising grounds and are quite fast. I instinctively
went to the time-proven, perennial Core Sound 17. This cat ketch
has a great reputation as a camp cruiser and endurance race boat.
But ultimately, I selected Graham's newest cat ketch design, the
Lapwing 16.
The Lapwing easily met my requirements for design, performance
and looks. There was a sizable list of "pros", including
a strong pedigree, user-friendly cat ketch rig and a strong builder/owner
community. It also featured an eight-plank, lapstrake hull with
pretty lines, a shapely transom and subtle tumblehome. I did,
however, have to consider a significant "con". This
was a new design; I mean, really new. The Lapwing was first commissioned
by veteran designer/builder Tom Lathrop and he completed Lapwing
hull #1 just a few months earlier. While Tom's Lapwing had been
completed, and another was being built in New Zealand, I would
be on the leading edge of this boat's development. Graham's own
Lapwing build had been interrupted by other projects and remained
unfinished in his shop. The leading edge of such projects often
becomes the "bleeding edge".
To make it even more challenging, Lapwing #1 had been built in
a different method than that specified in the still-infant plans.
Tom's prototype Lapwing had been constructed over a mold, while
the new B&B plan set described glued lapstrake construction
over permanent bulkheads with no intermediate, temporary forms.
The difference in those construction methods is actually quite
significant. To make it even more challenging, B&B had not
yet been able to create patterns for the boat's planks. Until
those patterns can be produced from Graham's shop, builders will
need to perform this tricky task on their own. So, to tackle this,
I'd be way out front of the Lapwing community's learning curve.
But, enchanted by her beauty, I ordered the plans and was assigned
hull #5.
The Build
On August 8, 2009, I ordered a dozen sheets of ¼"
Okoume from a marine wood outfit, ordered epoxy and materials
from Chuck and Sandra at Duckworks and picked up a dozen #1 Doug
Fir 2X6s from my local lumberyard. While my marine ply was headed
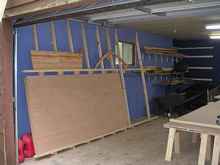
toward Oklahoma from the North East, I had time to work on my
building space. I have a spare two-car garage at the back of my
property that's always been used for storing my boat and lawn
equipment. So, I spent a few weeks transforming it into a boat-building
shop. Once the spiders, bugs and snakes were finally convinced
that I meant business, they begrudgingly left and in their place
soon came long work surfaces, a dozen new saw horses, shelves
and a wall-length plywood rack. With the dirt, dust and fauna
gone, the place even started to smell a little better. Go figure.
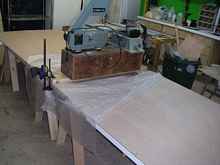
 |
The workshop where I would spend the next
year of my life |
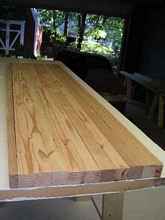
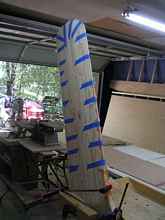
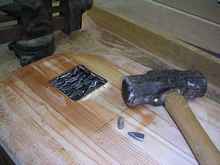
My first project was the centerboard. I ripped down some of my
Doug Fir stock and oriented the pieces in an alternating-grain
pattern. Some epoxy, clamp time and shaping resulted in a centerboard.
Borrowing a neat trick from the building community, I routed a
channel into the edges of the board and inserted an epoxy-soaked
piece of polypropylene rope. When set, faired and sanded, this
gives the centerboard a rock-hard edge. This will be handy as
I "discover" submerged rocks and tree stumps. To add
some weight, I routed out a pocket and filled it with lead sinkers
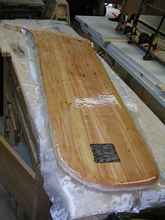
and epoxy. Ultimately, the centerboard was covered with 9 oz.
cloth and graphite-embedded epoxy.
|
Alternating the grain orientation adds structural
strength and resists warping |
 |
Cutting and shaping tools transforms dimensional
lumber into a sleek control surface |
|
An epoxy-soaked rope gives the board a strong,
resilient edge |
 |
A close-up of the rope-edge being faired
with silica-filled epoxy |
 |
Smashed lead sinkers add a couple of pounds
of weight to the centerboard |
|
Fiberglass cloth and multiple coats of epoxy
produce one tough centerboard |
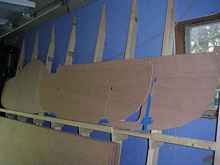
When my Okoume finally arrived, I was able to get started on
the boat's structure. BS-1088 Okoume marine plywood is a joy to
work with (once you recover from the sticker shock). I spent a
few weeks scarfing together large panels that were then cut into
rough shape using a cordless trim saw. Final shaping was performed
with my belt sander and hand planes. When the inner-structure's
panels and bulkheads were finally shaped, the boat was able to
go "3-D" on August 29th.
 |
A dozen sheets of Okoume Marine Ply in my
new plywood rack |
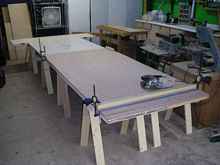 |
Here, I learn how to scarf plywood |
 |
Gluing together huge plywood panels with
epoxy, plastic and heavy weights |
 |
Bulkheads begin appearing
and await construction
|
 |
A dozen saw horses and old doors provided
me with the long temporary work tables I needed |
 |
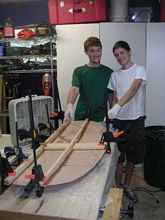
#1 son, Ethan, helps me glue all the structural
"bones" together |
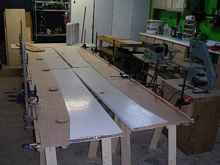
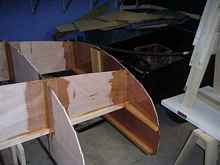
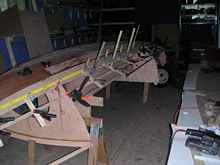
At this point, I had many tasks to perform before I could start
planking the hull. I had to build a tricky, curved transom; tape
and fillet joints; and shape and install the keelson and stem.
I was happy to take my time with this part (chiefly to put off
the upcoming planking task that was quite intimidating).
|
Ethan and #2 son, Colin, show off the transom
they made |
 |
The transom goes on and the joints get fillets
and tape |
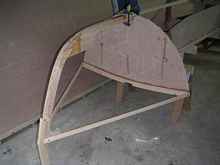 |
The stem is shaped, fastened and braced
in place |
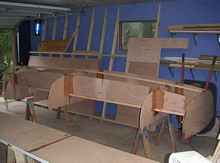 |
The keelson ties it all together and the
boat starts looking quite long |
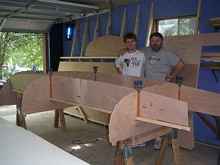
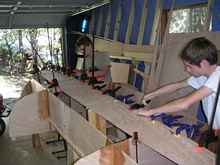
Working with Graham and New Zealand Lapwing builder, Richard
Whitney, I started trying to figure out plank shapes. I read a
book on the topic, spent hours of internet research time, and
Richard supplied me with some measurements that he was using for
his garboards and the #2 plank (Thanks again, Richard!). I can't
explain how challenging this step is for the inexperienced lapstrake
builder who cannot afford to waste expensive plywood. With help
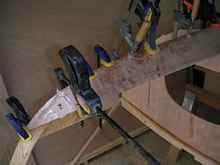
from a million clamps, the boys and I got the first two planks
in place (four planks if you count each side of the boat).
 |
It helps to have lots and lots of clamps |
 |
The garboard finds its home at the stem |
 |
The planking team gets plank #1 on! |
 |
Some 9 oz. cloth goes on the garboards |
 |
Planks 1 and 2 pretty much span the entire
width of the Lapwing's bottom |
The next three months were all about planking. The shape of each
plank had to be found on the three-dimensional boat and transferred
to two-dimensional plywood. To do this, I constructed a spiling
truss. This device consists of a pair of 18' long strips of plywood
and dozens of small truss pieces. By attaching the long ply strips
to the correct "upper" and "lower" locations
of the needed plank, you find the needed shape. You then hold
that shape by temporarily attaching the truss pieces. I used hot
glue and staples to set the truss into its shape. The truss can
then be CAREFULLY moved from the hull to the plywood for tracing
and cutting.
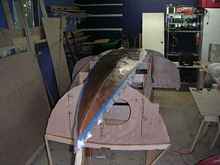
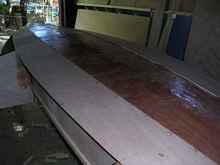
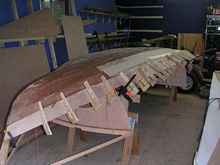
By mid-November, I had all eight (sixteen) planks on the boat.
Fall arrived early and I was now working in the cold. My plan
was to get the exterior hull painted before winter arrived, leave
the project, and then return with the springtime warmth.
 |
The spiling truss finding a plank's shape |
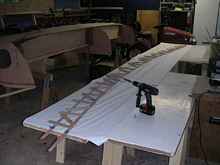 |
The spiling truss holding its shape for
tracing |
 |
Plank clamps hold #4 in place while the
epoxy sets |
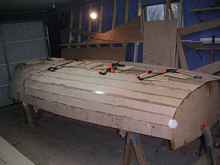 |
The Lapwing hull starts to take shape |
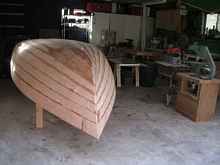 |
Planked! |
to be continued....
For more details on this building project and our ongoing adventures,
visit Blue Peter's website at www.svbluepeter.com.
Fair Winds
John Turpin
Edmond, OK
s/v Blue Peter
*****

|