| To Part Two
The genesis for this boat came a few years ago at the end of an Everglades Challenge. As usual, competitors were offering chances to take their craft out for a spin in the Florida Bay waters off Key Largo. Helen and I took advantage to individually try Mark Przedwojewski’s Sea Wind model Kruger Canoe with the Balogh sailing rig and inflatable amas (see www.krugercanoes.com for the excellent canoes Mark builds and offers for sale). We both loved it. I enjoyed steering with my feet, trying to figure out what to do with my suddenly free hands (feed me, my stomach suggested). Helen liked the stability provided by the amas and that if she got into trouble sailing the Kruger, she could pick up a paddle and work her way out with a few strokes.
We discussed off and on getting such a craft for ourselves. A Sea Wind is a solo craft, but Mark also offers the Kruger Cruiser, a double canoe. That was tempting, but we eventually decided it wasn’t quite what we wanted. But if it’s right for you and you’ve got the $6,000 the Cruiser with a Balogh sailing rig will cost, you won’t regret it. Your grandkids will be using the Kruger and passing it along to their offspring. They’re that well built.
We liked Jim Michalak’s Trilars design (a Larsboat double kayak) but it was shorter than we wanted. Our parameters including allowing two people to paddle without synchronizing strokes and without clashing paddles. We also wanted a cockpit long enough for one person to stretch out forward and rest with enough room for the second person in the stern to continue sailing or paddling. That’s in case we ever decide to do an expedition type event, like an Everglades Challenge or a Florida 120. As a side benefit, we should be able to carry a third person with ease on day trips. We also wanted a rudder so we don’t waste strokes keeping the vessel straight when we use it as a kayak and to aid maneuvering.
As for the sailing rig, I want to start with rigs we already have on hand, namely the 55-square-foot balanced lug from our Piccup pram as the mainsail and the 12-square-foot mizzen from our Frolic2, Oaracle, as the mizzen. The eventual plan is to go to a standing lug main, based on the rig Matt Laden uses in his Sand Flea pram, although somewhat enlarged.
With that established, we bought plans for Larsboat, the Trilars conversion, and for Toto, 11-foot little sister of the Larsboat. The Larsboat is a Toto with a four foot extension added in the middle. We contacted Michalak about a further four-foot enlargement to Larsboat. His reply was adding a second, straight four-foot extension in the middle of Larsboat should give us the craft we wanted. At this point, we had started calling the altered design "Helensboat," in recognition of Michalak’s habit of naming designs after owners. Jim also pointed out there was no need to draw up fresh plans as the hull panels could be deduced from the Larsboat plans, adding the necessary straight extensions in the middle, where there were already straight extensions when they were enlarged from Toto to Larsboat. He did recommend using extra temporary molds in the middle when assembling the hull.
One change I settled on was in the thickness of the ply. Michalak recommended quarter inch (6 mm) ply. Because of projected hard use, I planned to fiberglass the hull inside and out where Michalak recommends fiberglassing only at the chines. To compensate for that, I reduced the ply thickness to 4 mm. Michalak has noted others have reduced the thickness on his other kayaks, in some cases to an eighth inch (3 mm). I’m hoping to keep the hull light enough so two people can carry it with ease, and one person can move it a short distance without undue distress. Our current two-person roto-molded 15 foot kayak weighs around 80 pounds and I’m hoping to better that.
As this is written, the main hull is nearly done and could be taken for a test paddle if I were willing to do it rudderless. The past month has been spent fairing the hull, something I’ve never been good at. Thanks to some suggestions from friends this time it is going very well. (A hint for future builders: When you name the design after your spouse, he/she will be much more tolerant when you explain you want to buy some more epoxy and fiberglass or upgrade the hardware to make it a better or stronger vessel. However, he/she also will expect you to reach a high level of finish – something that’s never been my strong suit. "It won’t hurt you to raise your standards," Helen says as I come in dust covered from another session of hand sanding.)
Here’s the building progress so far:
|
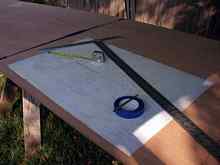
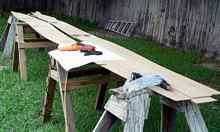
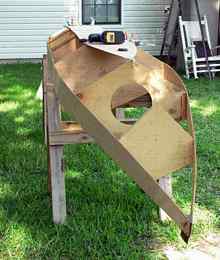
I screwed together 2x4s to make two boards 20-feet long and set them on sawhorses and then set on top two and half sheets of the plywood, in this case meranti marine ply. The panels were temporarily taped together. This enabled me to lay out the bottom, topside and bilge panels working at a comfortable height instead of crawling around on my hands and knees on the ground. The four-foot T-square helps plot the right measurements. |
|
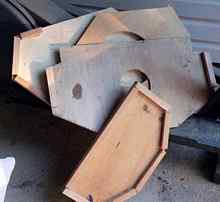
The bulkheads and transom were drawn at the same time. The permanent bulkheads and transom were done on marine ply; the temporary ones with lauan or other scrap ply. I doubled the transom for extra strength. |
|
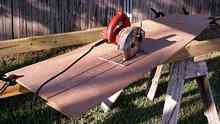
Everyone has their favorite way of cutting out panels. Mine is to use a circular saw with the blade set just to pierce the ply. Here I’ve got two sheets clamped together so two panels can be cut at a time. |
|
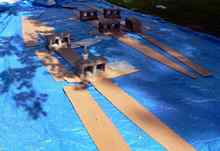
Once the panels are cut out. it’s out to the driveway to apply fiberglass buttstraps (the Dynamite Payson technique) to assemble the full size topside, bottom, and bilge panels. |
|
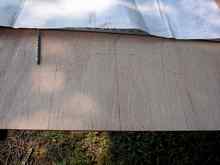
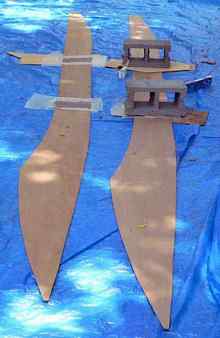
Note on the bilge panels, the straight sections in the middle, the result of stretching the Larsboat design to make the new Helensboat. There are similar straight sections on the bottom and topside panels. |
|
While the panels are setting, framing is applied to the temporary and permanent bulkheads. |
|
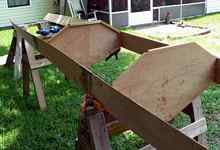
When the epoxy has set, the finished panels are taken to the back yard, ready for the boat to go 3D. A 20-foot panel of 4 mm ply is pretty limp stuff! |
|
Working from the middle to the ends, the temporary bulkheads are screwed to the sides, and the permanent bulkheads and transom are glued and screwed to the sides. |
|
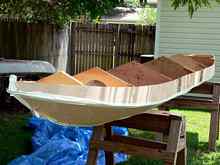
All of the bulkheads are attached, ready for the bottom. |
|
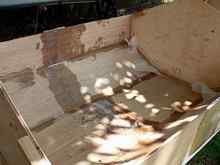
The bottom is attached the same way as the bulkheads. Note the wavyness. I should have used more temporary bulkheads in the middle of the boat. I expected when I flipped the boat over to fillet the inside of the chines that gravity would remove the undulations. Maybe it did somewhat, but not all of it and I wound up layering extra fiberglass in a couple places to even out the bottom. It would have been a lot easier to correct it here. |
To this point, I had spent one day laying and cutting out the bilge, topside and bottom panels, and cutting the bulkheads, before setting the project aside. When I got back to it, another day was spent fiberglassing the panels together and framing the bulkheads. By the end of the third full day of work, the boat had gone 3D with the side and bottom panels attached.
|
The bilge panels are deliberately cut oversize. Here, they are temporarily fitted and marked for final cutting. |
|
Then the chines are taped with duct tape and the boat flipped over. |
|
The inside of the chines are filleted with thickened epoxy. The picture here shows the chines and the wires holding the panels together. Note the waxed paper at the corners of the temporary bulkhead, so when fillets and fiberglass tape is applied to the outside it won’t stick to these temporary pieces. |
(C) 2011, Gary and Helen Blankenship
 |