|
I frequently stress the importance of reducing the time and effort
it takes to get the boat set up and on the water. It can make
a huge difference in how often you go boating. Sailboats are particularly
in need of this kind of work and mast tabernacles are one of the
best ways of reducing the fiddling.
In my case the payoff for having tabernacles would be especially
good. Gaff rigs have lots of lines, and I have two masts worth.
To be able to leave all that junk attached to the masts would
be heaven!
But as always, it’s not that simple.
While I most often sail this boat, it is sometimes used as a
power launch. So the masts have to retain their ability to be
unstepped and removed. Worse, tabernacles normally hinge to the
front of a bulkhead. These masts step in the middle of compartments,
which would mean very tall tabernacles. This wouldn’t work
with any kind of reasonable cover tarp at 65 mph on the highway.
Changing this would require moving bulkheads, which would also
demand switching from the daggerboard to a Michalak
leeboard, as well as a complete redecking. These
changes would probably be an improvement, but frankly I’d
rather start from scratch than try to make changes of that scope.
I did have one idea for making tabernacles that were integral
with a mast that fits the existing step.
However, this approach requires a steel tabernacle to stay slim,
and this gets heavy in a hurry. It also is much easier to build
square than round, which presents problems for gaff jaws.
On the other hand, the masts are not too heavy for me to lift.
Maybe it would be simpler to develop a method for keeping the
masts as is, and still leave the rigging attached.
Rig Simplification
The first thing to do was get rid of any strings we didn’t
need. I found that the lazyjacks were not at all useful for me.
When reefing it is just as easy to lower the reef points to deck
level. When motoring with lowered sails, I would simply put a
couple sail ties around the sail, boom and gaff, the re-hoist
with the halyards. Or brail up to the mast in a calm. Losing the
lazy jacks doesn’t seem like much, but with this many lines
it noticeably reduces tangling.
Similarly I got rid of the staysail halyard, since I really never
use it.
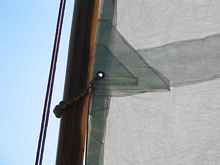
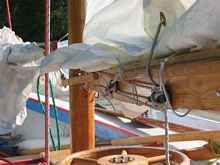
Boom Parrel Changes
The boom parrels presented a problem for this approach. If you
set them tight enough to keep the jaws on the mast, the boom cannot
brail up or lay down close to the mast without the parrel trying
to break the jaws.
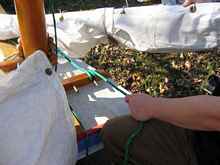
I replaced this with a simple piece of 3/16” Dacron line
and a rolling hitch. That way it can be lengthened for folding
up and snugged up when rigged.
I suppose it would work almost as well to use a clip and remove
it when unrigging. But the rolling hitch approach has the advantage
of supporting the boom at the jaws, which takes some strain off
the sail ties holding the bundled sail, boom and gaff.
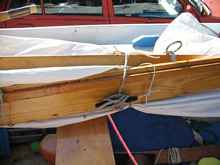
Hardware
There is not much that needs to change in this regard, really.
The one key element is that we need some way of holding the boom
jaws to the mast above deck level. This could be a light eyebolt
or the halyard cleat. All it needs to do is keep the boom out
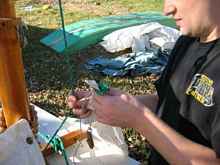
of the way while we get the mast stepped. In my case I had a cleat
on each mast to keep the halyards under control while unstepping
the naked mast. Now I unstep with the halyards loose, but the
cleats are still sometimes handy for controlling the halyards
after laying the masts down. But if I think they won’t tangle,
it’s one less step to skip cleating them.
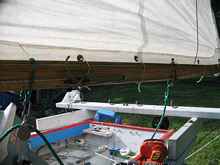
This worked really well. Here’s how it goes.
Setting Up
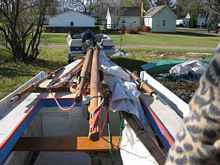
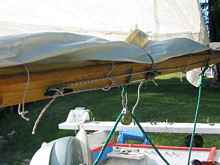
The masts still stow in their normal position in crutches in
the mast steps. The sails hang down below them forward and splay
out onto the center console midships, where they are tied down
to the pinrails.
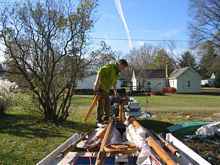
To erect the rig we first lift the masts out of the crutches
and remove the crutches. While doing this, the masts are set to
the side to be out of the way of the mast steps. The crutches
are unceremoniously pitched on the ground, later to be stowed
in the back of the Jeep.
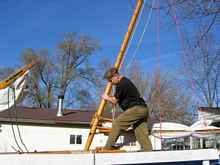
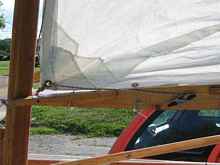
Then we walk the foremast up and step it. The boom parrell gets
hung up on the mast cleat, so it doesn’t fall down while
we’re trying to step the mast.
The halyards had been loosely fastened to the mast cleat.
Once we cleat them to the pinrail, the foresail is ready. (The
sheet doesn’t need to unclip from its horse anymore.) We
repeat the process with the main, except we need to clip the sheet
to the horse. If we want to clear the cockpits we can hoist the
sails a little ways and cleat the sheets.
Finally, the jib. We now leave the jib tied down to the deck
with a turn or two of tack line around the bundle. Before hoisting,
however, the tack line needs to be tightened and cleated. Then
hoist and sheet in. This normally happens after the boat is in
the water, which I’m parking the tow vehicle.
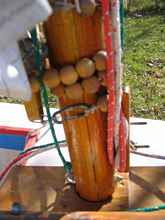
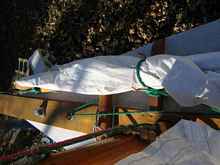
Here's the jib stowed...
...and what's under the bundle.
Then we unroll the jib (any wind will do that for you) and pull
it back on board. (It will be overboard.) Hitch on the halyard
and throw a sail tie on the works until you want it.
We’re ready to launch! So far rigging took about 13 minutes
including removing the light bar, shipping the rudder and putting
in the drain plugs. This is a huge improvement over the 40 minutes
it took before!
Before testing I also simplified the sheeting arrangement. I
decided that Midwestern wind is a little too fluky to cleat the
sheet as Bolger intended. So I got rid of the rings that guided
the sheet down the boom. That was my dumb idea, not Bolger’s.
It helped a little bit in keeping the sheet from snagging things,
but slowed down sheet response unacceptably.
This brings us to the testing portion. Boy, am I glad I disentangled
the sheet before this test.
Gusty Winds
We tested this rig in 15 mph wind gusting to 25-30. This is more
than we normally go out it, but that made it a good test. (I made
sure the motor was in prime shape before setting out!)
I knew we would be reefed, and as it turned out we had barely
sailed out under reefed main alone when a big gust launched the
sail tie off the reefed tack. Clearly the luff was under too much
strain for my little jam cleat sail ties to do the job. I was
very grateful I had changed the sheet to a “normal”
hand-held arrangement. This was on a beam reach, by the way.
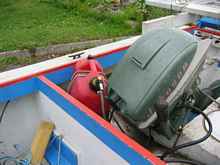
The gas tank had always been sort of in the way of the mainsheet,
but with this kind of force I am amazed the entire tank didn’t
get launched overboard. It certainly got roughed up and the hose
got disconnected. This is about where my wife asked if she should
put up the foresail. She should take up skydiving, or maybe bound
knife fighting – you know, something safe.
After demanding to know whether she was out of her mind, I turned
downwind to reduce strain and sort things out. Almost needless
to say, another gust hit us hard and to avoid capsize I had to
let the mainsheet fly. When the main boom thwacked against the
foremast I think she started to guess that the rig was overpowered.
Good thing there were no shrouds in the way. Smart guy, that Bolger
fellow. (I should probably knock wood when telling you I still
haven’t capsized a design that everybody says must be capsized.)
I turned back to a reach and then upwind so I could retrieve
the sheet. The next gust put enough strain on my rudder to yank
the steering cable right out of its cable clamp. I had the better
half drop the main while I had a word with Mr. Evinrude.
Steering Upgrade
Well, first thing’s first – steering. I had been
using steering cable clamps meant for outboard motors. Max
Wawrzyniak recommends doubling them in his book,
and I guess it stands to reason that an outboard motor applies
less force to the cable than a big rudder under conditions of
severe weather helm. But there’s no getting around those
forces with this rudder design. It’s a big barn door with
no balance area, and its tip sweeps dramatically backward, increasing
the leverage of that unbalanced area.
This experience increases my conviction that I really need to
build a Michalak
pattern rudder, but in the meantime I switched to
a different kind of cable clamp, and more of them. I'll probably
switch to 3/8” pre-stretched Dacron line, for next year,
actually. On my next outing I discovered that part of the plastic
coating on the cable had stripped off. I am afraid this rudder
is more than outboard motor cable can handle.
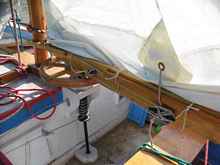
Time to fix the reef tack line.
Reefing
I don’t really like “jiffy reefing” lines,
since they tend to get caught on things. But I was sort of stuck
with them here. It turns out that it’s not so bad if you
have cleats to keep the lines from dangling where they don’t
belong. Jiffy reefing lines do save some effort and risk in this
case as well. The aft reefing point on the mainsail is right about
over the transom. Reefing it requires some precarious perching
over the motor well. Much better to simply haul in a line and
cleat it.
With another cleat to grab the excess line, the reefing line
doesn’t need to dangle on the motor and get caught on things.
(This is the main thing I never liked about jiffy reefing.)
The jiffy reefing line to the tack doesn’t eliminate any
danger, but it’s a lot stronger than a sail tie.
Also note that I replaced the original 1/8” Dacron tack
sail tie with 3/16” Dacron. It does make a difference at
the tack.
When I reef it there is extra line that I don’t want dangling
in my face. I take it around another cleat on the boom.
Actually, fixing the reef tie turned out to be an opportunity
to save even more time with setup. Finding sail ties in the bottom
of the boat has always been a time-waster in striking the rig.
It is much faster and easier, as well as more secure, to bundle
the sail with cleats mounted right on the boom, and a line permanently
mounted to the cleat. (The reef cleats are too far out at the
ends to help much with bundling.) The bundling cleats are the
“extra” cleats you saw above taking up the excess
line from the jiffy reefing system.
Notice that these cleats also serve as reef ties if you put
them in the right place. Just lace them through reef grommets
in the sail. Be careful not to overtighten, though, or you’ll
pull the draft out of the sail. Obviously this is handy if you
want to pull some draft out the sail, but I typically can’t
be bothered by such high-performance fiddling.
The only nuisance is that these lines dangle annoyingly in your
face. This is easily remedied in the same way, only this time
we don’t need a cleat. I added a small screw with a wide
head an appropriate distance from the cleat.
Gas Tank
Lest you think I forgot, I did move the gas tank further from
the sheet horse and a little lower. It seems to help.
The only reason I didn’t do this from the beginning is
that it gets in the way of steering with the motor. However, I’ve
since found that I steer with the rudder anyway. The only time
I ever steered with the motor was in the case above where I lost
the steering cable, and I can always move the tank into the cockpit
in these hopefully-rare situations.
How it all works
In total, all of these changes got our setup time down to 12
minutes. Not bad at all for a schooner. And that is me setting
it up alone!
The one time-waster still unaddressed is getting the cover tarp
on and off. I am not counting that 5 minutes or so because we
normally do it at home, but it is time that matters, so it must
be dealt with. Eventually.
Rob Rohde-Szudy
*****
|