| To
Part Two
Sometimes boats happen and you don’t really know how they
came to be. Likewise some boats become more than the sum of their
parts, they become more than you ever intended when you began
to build them. Laguna Dos is one of those boats, a classic beauty
that began as a whim with no original intent to become what she
is, a lovely and graceful permanent addition to our collection
of small craft.
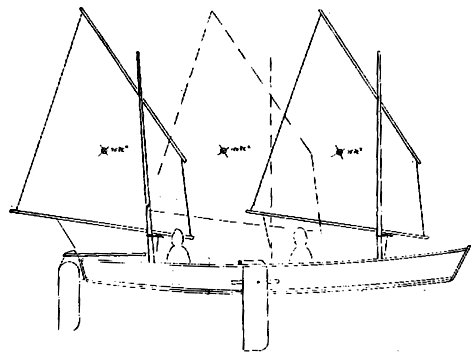
Laguna
At 23 feet the Laguna
is not a small boat but a roomy and large beach cruiser suitable
for the inland waters of the Texas Gulf Coast or other similar
shallow water areas. Designed by Jim
Michalak for the TX 200 and commissioned by Chuck
Leinweber last year, she is a variant on a classic “bateau”
style boat with antecedents in the Bolger Light Schooner. Twin
masted with three possible mast positions, she carries a combined
sail area of 150 square feet of balanced lug sails.
After the TX 200 this year, Chuck asked for builders for the
Laguna to form a fleet to sail in the 2010 TX 200. I was already
committed to finish rebuilding my Paceship 23 I had begun long
ago. My youngest daughter and her husband wanted to join me in
sailing her. I actually had no intention of building a new boat
for the TX 200. Somehow, between my wife Jackie and daughter Michele,
it was decided that the Laguna fleet was just too interesting
an idea not to join in and build one. Suddenly I had an imperative
- to order the plans and agree to build and participate. Before
June was out we owned Laguna plans.
The plan as we recall was to whip out a fast built Laguna and
teach my son-in-law to sail her, as he had accused me of only
building boats that one person could sail. Specifically he said,
“Bud must not like to sail with other people, he only builds
one man boats.” Well, that is something a father-in-law
should encourage, a sailing son-in-law, so the Laguna seemed a
good inexpensive and fast build to learn in.
A summer of nonstop travel with my mother-in-law ensued and no
boat building got done except for some really pressured building
of two PDR Oz racers to take to Georgia for the Puddleduck World’s
Championship, an event we made only with two wet painted boats
and sails constructed in the parking lot of the campground the
day before the races took place.
No Laguna building got done at all during the summer. October
saw us back from the Worlds in Georgia and we located wood for
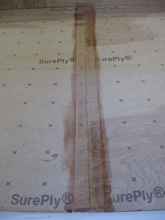
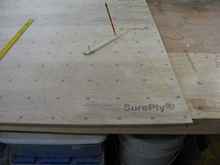
the Laguna. Sureply underlayment was located finally in nearby
Arkansas, so a trip to Ft. Smith, Arkansas got our initial plywood
supply. A small family owned sawmill in northeast Texas yielded
some superb air dried cypress and white oak, and a Lowe’s
in Shreveport, Louisiana gave us a supply of fine grained yellow
pine siding. At last we started cutting wood Halloween weekend
and the Laguna Dos officially began on November 1.
| sureply underlayment |
 |
Having built the two Oz racers in under two weeks of actual construction
time, Jackie concluded the Laguna could be built to a launching
point in three weeks of full-time building and set a date over
Thanksgiving weekend to meet with Gordo Barcomb and other Laguna
builders down in south Texas.
More about this much later. The concept of the Laguna originally
was a fast and less than careful build, a boat that could be beach
built, a “throw away” boat as it were, to be used
briefly and not finished especially well or detailed. I just can’t
make myself build that way but that was the idea when we began.
At 3:00 p.m. on November 1, I started cutting wood. I had that
nice straight grained yellow pine siding, twelve foot lengths
of 1 x 6 with no knots. With Jackie’s help we cut the parts
for the chine logs and the three part wales. Then I cut parts
for yards and booms out of the cypress. The cypress we had found
was air dried and rough cut, approximately 5/4 inch thick and
about 7 ½ inch wide, in random lengths of eight to ten
feet. I simply ripped the cypress using my table saw to whatever
dimensions I needed in the build.
I had made a scarfing jig for my table saw that cuts perfect
six to one scarfs. The chine logs needed only one scarf to create
twenty-four foot lengths out of the two twelve foot yellow pine
boards. The wales have three parts and I did not want all of the
scarfs falling in the same place. On the inner and outer layers
I put the scarf in the center. On the center piece of the wale
I cut one of the twelve foot pieces in half and scarfed a six
foot piece to each end of a twelve foot piece. The wales were
cut from the same fine grained yellow pine, which was the tightest
and straightest grained I have found in recent years.
I used Titebond III for all glueing done on the Laguna. Epoxy was used for sealing all inside and outside surfaces, as well as applying fiberglass cloth to the bottom of the boat. I did not use
stitch and glue construction, but glued with the Titebond and
sheetrock screws. When the glue was dried I replaced the sheetrock
screws with stainless steel screws purchased from Duckworks as
well. All pieces were dry fitted and temporarily screwed down
with sheetrock screws until permanently glued in place.
While the glue on the scarfs was drying on the long workbench,
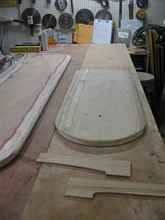
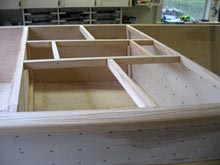
I made the inner stem, the transom and the four permanent bulkheads.
The stem is made of air dried cypress, a light and tight grained
wood. The transom and bulkheads are framed in the cypress wood,
covered in Sureply underlayment. With the angles of the chine
logs already cut I could now figure the exact dimensions for the
bottom of the bulkhead 11.5. This was important because when Gordo
built Laguna Uno according to dimensions on the plan the bottom
at 11.5 was too wide for the four foot plywood. I knew in advance
that I was going to have to make adjustments to make it fit correctly.
It was now time to lay out three sheets of plywood on the floor
for the sides. I scarfed the three full sheets on one side with
a layer of three inch fiberglass tape followed by a four inch
layer of tape, all set in epoxy. This a Payson butt joint. After this set up I laid out all the
dimensions on the ply. I found I had some problem getting a fair
curve but worked that out and cut out the two sides. I carefully
turned the sides over and taped the other side of the scarfs.
Now the fun begain. I clamped one part of the wale to the top
of the sides to make the long side pieces stiffer and easier to
lift. Bulkhead 11.5 was turned bottom side up and clamped to a
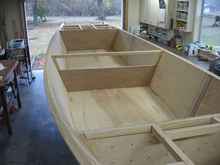
saw horse. Both sides were then attached to this bulkhead, then
the transom and the three permanent bulkheads were also attached
to the sides, as well as the inner stem. I had made two temporary
frames which I beveled bottom and sides and attached to the sides
as well for support. The chine log was attached even with the
bottom of the bulkheads and then the sides were trimmed down even
with the bottom of the chine logs. This was actually the first
hard job of the build that I encountered.
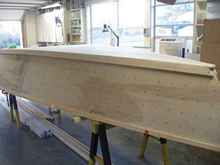
Because I was making the bottom of the boat out of two sheets
of ¼ inch plywood instead of one sheet of ½ inch
ply, I added three more temporary braces across the bottom. Two
of the three braces were placed where the butt joints would fall
on the first layer and the third was placed in the large area
aft of bulkhead 11.5. I needed the extra stiffness to allow the
first layer of ¼ inch plywood to hold its shape while the
second layer was laminated on. The second layer had its’
butt joints staggered from the first layer. By laminating in place
I hoped to achieve a stiffer bottom.
| bottom on and trimmed |
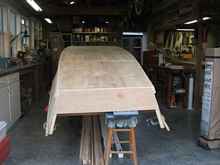 |
Once again, trimming the bottom even with the chine logs was
a long and hard job, even with a power planer and a belt sander.
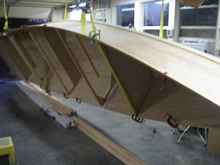
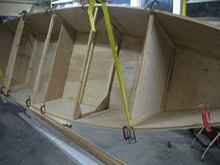
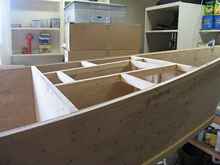
Now one week into the build, it was time to turn the hull over.
I attached two rachet cargo straps, two inches by twenty feet,
to two large beams in the ceiling of my workshop and running them
around the hull lifted the boat up enough to turn her over and
set down on two sawhorses positioned below. This was my first
chance to see the interior and get a feel for the size of the
boat. It looks big!
 |
 |
 |
 |
To this point the first section of the wale had been clamped
to the sides. Now they were permanently attached to the sides
level with the top of the bulkheads except for bulkhead 11.5.
When the Laguna is built according to plans bulkhead 11.5 is ¾
inch shorter than the sides. At this point the second and third
layers of the wales were attached. As each layer went on the sides
of the hull became stiffer and stiffer. I had initially thought
I might need to install small side decks, however after the wales
went on I decided that side decks were not necessary for stiffness
and would actually make sailing the boat more difficult.
Up until now everything had been done as shown on the plans with
the one exception of bulkhead 11.5.
On this bulkhead I only covered the bottom twelve inches with
plywood and left the top open so that I could store the yards
and booms inside the boat when trailering or storing her.
 |
bulkhead 11.5 |
It was at this point that Jackie and I realized that the Laguna
was a far better and more attractive boat than we had expected
when I began the build. Because I intended to sail the Laguna
Dos in other events than the TX200 I was actually planning all
along to build her to a most sturdy and seasworthy specification.
I did not want to enter events like the Everglades Challenge in
2010 in a hull I did not have confidence in. However I did begin
her thinking I would not take my usual care and finishing of the
boat as I did not consider that she was to be a longtime or often
used addition to our “fleet”.
Sailing the Laguna Uno that Gordo built convinced me that this
was not only a fast and responsive boat but one I would enjoy
sailing more than I had anticipated. Seeing her hull Jackie began
to praise her beauty and graceful lines, commenting on her classic
shape and sheer. We realized that as usual I could not accomplish
a fast and dirty build. That is not my style and the Laguna became
a careful and meticulous build at that point.
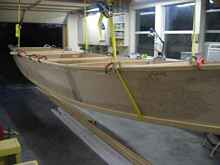
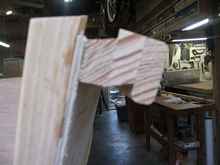
I got out one of my favorite tools, a router with a ¼ inch round-over bit and put a nice round edge on my wales, changed to a 1/8 inch bit and rounded over the top of the chine log, a process called “bull nosing.” A really big improvement in looks on the boat for very little work. It is often a small detail like this that creates a professional look on a home built boat. The smooth curve of the wales and chines echoed the curve of the hull, lending a more rounded appearance.
| wales with rounded edges |
 |
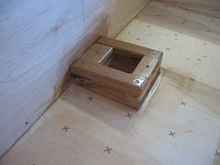
The first change from the plans that I wanted to make was a self-draining anchor well in the bow. I made a full height bulkhead twenty-four inches aft of the inner stem to separate the anchor well from the rest of the forward flotation chamber. This is where things began to slow down a lot in the build. All of the dimensions for this bulkhead had to be taken off the boat with a lot of angle gauge work to get the correct side and bottom angles.
The anchor well itself is six inches deep because I did not want to give up a lot of flotation.space. Making the floor of the well also involved a lot of angle gauge work. I installed a five inch inspection port in the floor of the well to allow access to the space under the well between the inner stem and the new bulkhead. This modification allowed me to keep flotation in the fore most area, yet have a draining anchor well for storage of my anchor separate from the rest of the forward cockpit area. Should there be mud or debris on the anchor it would be contained in this area and not spread into the cockpit area or the flotation/storage area.
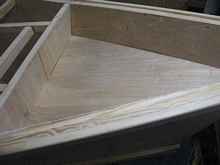 |
The anchor well |
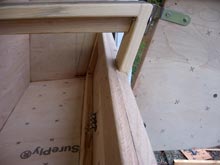
Now it was time to add framing to support the forward deck and the hatch areas. The plans do not show framing but with ¼ inch plywood it is necessary to provide support. After all, the crew will have to scramble over this deck to get on board from the beach, as well as in other situations where much weight and stress may be placed on these areas. Next I moved to the aft deck and added similar framing there, all made with fitted pieces of the cypress wood. In getting on or off the boat in a docked situation people most likely will step onto this deck, placing stress on the deck.
| framing to support the forward deck |
 |
 |
framing to support the aft deck |
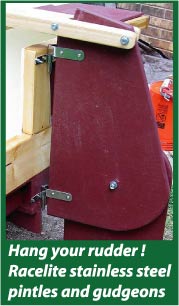
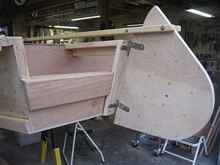
At this point I left work on the hull and proceeded to cut out and laminate the rudder cheek. I made this according to plans except that I used multiple layers of ¼ inch SurePly instead of two layers of the ½ inch ply called for. I needed to have the rudder cheek completed for the next step, which was deciding how to attach it to the transom. The plans show a simple 2 x 6 motor board across the back of the cut down transom. This does not leave a very high area to attach the rudder to and I worried about the tourque forces if the rudder pinions were too close together. I wanted them as far apart as possible, so I added a 5/4 inch by 4 inch cypress board vertically in the middle of the transom. This was braced by a two part beam attached to the aft most bulkhead. Now I had in effect a full heighth transom to attach the rudder to.
| Rudder cheek |
 |
It was time to break out my white oak lumber for the motor boards. I put a five inch wide piece on the aft side of the transom and a three inch wide piece on the inside of the transom. A ¼ inch by ¾ inch piece was sandwiched between the two to cover the raw edge of the transom SurePly plywood. I do not like raw plywood edges and when I am through with this build there will be no raw edges showing anywhere on the boat.
 |
motor board |
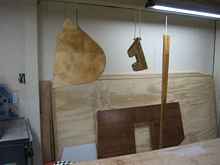
While I had the white oak out, I made the fore and aft mast steps and the fore and aft mast partners out of the white oak. This white oak is really hard air dried wood, hard to cut and work with. The only way to get screws to go in is to first rub them on a bar of soap! After constructing the mast steps and partners I coated them with three coats of epoxy, using the three-hit method, which requires three coats of epoxy applied wet on wet without letting them cure. I did this while they hung in the air from a beam in the shop.
| rudder cheek, mast partner and tiller with epoxy curing |
 |
I did not like the idea of holding the mast straight up in the air while trying to get it to fit in the hole of the upper mast partner. This would be especially difficult in the kind of wind and wave conditions where you needed to lower the fore mast and move the aft mast to the center location. I wanted to be able to plant the mast into the mast steps so that they would take the weight and then raise the mast to the partner and attach it there.
 |
mast step in place |
While looking at other Michalak boats on the Duckworks site to get ideas, I saw Chuck’s Ladybug which had a three sided mast partner with an aluminum gate and knew I had found my answer. Of course, it was rather difficult to build. The two partners took an entire day to build what with the hidden nut for the ¼ inch bolts and all. The partners require angles to insure a proper fit with the masts, especially in the aft partner where the mast is raked.
| partner with aluminum gate |
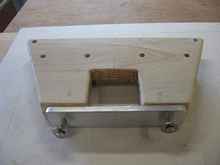 |
The mast partners are made in two halves- a top half and a bottom half. I used white oak that was 7/8 inch thick so the finished partners are l ¾ inch thick. I needed to attach my aluminum gates to the front of the partners with l/4 inch stainless steel bolts. I wanted the nuts for these bolts hidden in the center of the partners. First I assembled the top and bottom halves with screws. Then I took the assembly to the drill press and carefully drilled l/4 inch holes down the center of the joint between the two halves.
Now I took the two halves apart. Half of the hole was in the top half and half was in the bottom half. I determined where I wanted the nuts and with a l/4 inch chisel carved out a pocket for the nuts in both top and bottom halves. The parts were then epoxyed and screwed back together with the nuts and bolts in place. Before the epoxy cured I removed the bolts and left the nuts glued in place.
At this point we had reached the weekend before Thanksgiving. We were scheduled to have the Laguna finished to a point we could launch her and sea trial her down in south Texas, even with just an undercoat of paint to protect her hull and no seating finished. The plan was to put at least one coat of epoxy, fiberglass and graphite on her bottom, finishing her later. We were to meet Chuck, John H. Wright, Gordo and his daughter, along with Stan Roberts and his Piccup Pram down on the coast the day after Thanksgiving and camp and sail. Both Chuck and John Wright had offered the loan of their professionally made Laguna sails for the sea trial. We were all excited to have the chance to sail the two Lagunas side by side and possibly do a little racing. I had been pushing with long, long days and into the night building. The details were taking far longer than I had anticipated, especially the partners and the mast steps.
Pre-Thanksgiving weekend we spent with my mom in her assisted living home for their Thanksgiving feast with families. It also marks the weekend Jackie and I decorate her apartment for the annual Christmas decorating competition. We had meant to skip this year until so many residents and employees commented on how much they enjoyed our decorations. We did not have the heart to drop out, so decorate we did for two days. Mom had to go to Oklahoma City for her monthly visit to the Dean McGee Eye hospital on Monday and we were three days further behind.
At this point I was exhausted, pushing too hard and too fast. I began to fear losing a finger or two to the saws in a slip of inattention. There were still no rudder or lee board, no tiller finished, no masts and short one spar. I threw in the towel and conceded I was not a super human builder. It just didn’t look doable, there were only two days left before departure for Texas and the older trailer I was modifying to trailer her had not been touched. We notified everyone of the change in plans and I felt a great stress of the build lift from my shoulders. The deadlines we had placed were keeping me from enjoying what I was doing in the push to finish. I drew a sigh of relief and took some time off to rest.
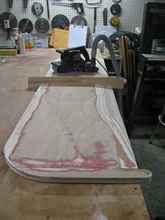
With this finished, I built my tiller and cut out all the parts for the two decks, the rudder and the leeboard. The Laguna tiller is a very simple one to make. It is sixty inches long and three and a half inches wide at the aft end, tapering to one and a half at the forward end. I made my tiller from 5/4 inch cypress. The rudder and leeboard are made from five layers of ¼ inch SurePy. The rudder has a five by five inch hole cut in the middle three layers which is then filled with lead, as per the plans. The outer two layers of the leeboard are two inches shorter on the aft end to cut down on the planing and sanding necessary when I shaped the foil.
I had made a template for the rudder and leeboard foils using the Michael Storer foil shape from my OZ-PDR plans. Shaping the foils on the large leeboard took about an hour per side using a power plane and belt sander The rudder took a lot less time.
 |
shaping the leeboard |
Shortly after we turned the hull over we had received information from Gordo Barcomb about problems with a great deal water in the cockpit of Laguna Uno after a sudden capsize. This made me rethink the type of seating I was planning for the Laguna Dos, as it was apparent that more flotation chambers seemed necessary to prevent this occurring and to help in righting her after a capsize. I decided to put in bench seating that doubled as flotation chambers in both fore and aft cockpits. That will be the next project to be completed before we can turn her and begin fiberglassing the bottom. Stay tuned for continuation and completion of Laguna Dos.
To be continued...
Plans for the Laguna
are available from Duckworks.

|