The pleasures of a lightweight boat are an acquired
taste, sort of like basswood Piantedosi sculls, turbocharged Mini
Coopers and McManus cabernet. There are multiple advantages both
obvious and eventually realized, but the use and ownership requirements
of a ply/epoxy lightweight gives a fresh spin to the term pleasure
boating, and it’s hard to go back to the ordinary. And although
we’re talking mostly about ply/epoxy cartoppers, many weight
saving techniques can be appropriate for larger boats.
The real advantages begin to show up not only in performance and
payload, but in getting the boat to and from launch and retrieve.
Lightweights under 100 pounds can easily be cartopped, which eliminates
the complexities, legal and otherwise, of pulling a trailer. If
you can lift 50 pounds by yourself you can handle a 100 pound
hull because you only have to lift half the boat at a time for
sliding it onto a roof rack. And even a 100 pound hull can be
carried on the smallest of compact-car roof racks, further increasing
the options for mobility. The ability to load and unload your
boat without assistance is a real convenience. For those unable
to carry, a lightweight with a slick, graphite-coated bottom can
be dragged without harm across parking lots, down launch ramps,
and over gravel beaches. Run a tether through a bow eyelet and
just start walking.
Lightweights can be faster when speed is important, or when stability
is critical they can be ballasted specifically to punch through
small chop, or enhance stability in wind. Ballasting weight can
be distributed fore and aft toward the ends of the hull, and as
naval architects like to say, this will “dampen the moment”
and reduce the hobbyhorse action of a lightweight hull. Alternatively
the ballast can be centered low and midships to aid stability.
Removable ballast is also a considerable safety factor if you
get in trouble as it’s easy to flip removable ballast overboard,
and with watertight compartments the hull will support itself
even if flooded. Whether the ballasting is lead shot in bags,
sandbags, water filled compartments, or just camp-cruising gear
and a passenger is a choice with a lightweight boat. Twenty to
30 pound bags of sand will nestle into odd corners low in the
hull where ballasting is most effective and can be moved with
one hand, leaving a free hand to hold oars or motor controls.
 |
Compartment Corner |
These boats do not lend themselves to production techniques but
are ideal for the amateur builder. You can build a ply/epoxy boat
and use it for years then give it to the grandkids in about as
good a shape as when you built it. They don’t watersoak!
Maintenance is simplified and longevity is enhanced. Epoxy is
a stable undercoat which adds longevity to an overcoat of paint
or varnish and boats often last over 15 years with the original
two coats of varnish over the epoxy finish. All this on a boat
that can be taken into open water, make landings in surf and get
dragged over beaches to a campsite.
DESIGN
The design process and preparation for building should be a period
of contemplation where you ask yourself how you plan to use the
boat. These choices require common sense to keep the boat as simple
as possible, and to start with the idea that perfection is attained
when there is no longer anything superfluous to take away, then
add-on wisely as you see the need. The construction of a lightweight
is as much art as science and requires the use of minimal and
strength-consistent scantlings throughout the boat in order not
to add unnecessary weight by over building. Here's where you can
push the envelope a bit, but common sense and safety are still
the prime requirements.
Two opposing options are to build the hull with a thicker skin
and minimal internal framing, or to go with a very thin skin and
rely more on internal framing, and it really depends on how you
plan to use the boat. Camp-cruisers, river boats, and drifters
dealing with rocky bottoms and beach landings obviously need more
abrasion protection than a boat launched from a pier and used
only in deep water. Building and installing all the fussy little
parts that make for internal bracing also makes for a more labor
intensive hull, but it can be the lightest way to go. All interior
components should also be designed monocoque with everything fastened
to everything else, which is also easy to accomplish with ply/epoxy.
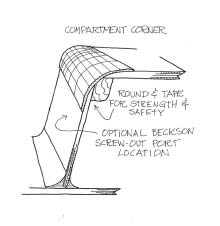
Compartments are the structural furniture of these boats and can
easily be made into seats, live bait wells, foam lined iceboxes,
dry gear lockers, and are also handy to isolate fuel tanks, batteries,
food, etc. Installing truly watertight bulkheads and decks is
a piece of cake with ply/epoxy and compartments can easily be
added throughout the hull and accessed with plastic screw-out
ports or hinged hatches. Self-bailing capability can be arranged
by diverting all water aboard to drain into a single footwell.
Emergency flotation capability is perhaps the coolest byproduct
of compartmentalization and makes an appealing safety feature,
and if the hull is sensibly compartmentalized both fore and aft
to maintain trim, the hull can fill from a sloppy wave top and
you can keep right on rowing, motoring, or sailing.
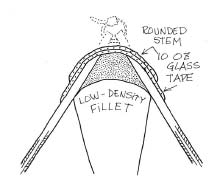
With ply/epoxy there is seldom need for the timber stem pieces,
chine cleats, and transom framing used in traditional construction.
To build a lightweight stem, stitch the port and starboard panels
together at the bow and apply a large interior fillet. Remove
the ties, and round and tape the stem exterior. Large radius rounds
are more durable than small rounds. For extra support apply a
second strip of narrower glass tape to stagger selvage edges.
To add support a number of four mil plywood cant frames can be
installed extending 90 degrees off the stem angle, and all this
can be further reinforced by adding a compartment in the forward
part of the hull. Stems built this way become very durable.
 |
Rounded Stem |
A curved panel is much stiffer than a flat panel and shape can
be used to provide strength without penalty of added weight. Round
bottom and multi-chine hulls function with minimal internal framing,
and the intersection of panels on multi-chine designs is reinforced
with epoxy fillets and glass tape to become a fore and aft “stringer”
which provides resilient stiffness the length of the hull. Even
on single chine hulls the tape and epoxy fillet forms an I-beam
structure that extends strength between athwartships supports.
Apply tape both inside and multiple lams outside for added strength.
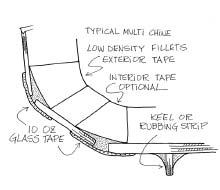 |
Typical Multi Chine |
Ply/epoxy construction allows the use of surprisingly minimal
thickness components. There is seldom a structural need for vertical
bulkheads thicker than four mil in these cartoppers, and flat
and sloping decks in lightweights can usually be four mil “no-step”
decks, or an upgrade to six mil in decks used for seating and
glass cloth can also be applied to decks vulnerable to wear. Decks
provide two-dimensional hull support, and no underside support
cleats are required when a deck is filleted into a sloping hull
side. A large radius fillet will reach out onto the deck two inches
or more providing an attractive structural molding; any hatches
or screw-out access ports will also stiffen the deck. Compartment
edges are fitted with a softwood cleat on the inside edge which
serves as a glue surface for the deck, and after gluing down the
deck a large diameter round is cut into the edge and taped.
Side decks are an overlooked method of reinforcing the sheerline
of the hull with minimal weight. When adding a side deck it’s
possible to eliminate all but a single inwale glue strip and after
attaching the side deck take a block plane and cut a large radius
round on the edge of the hull, then apply glass tape for a clean
“sneaker” look that will take a lot of abuse.
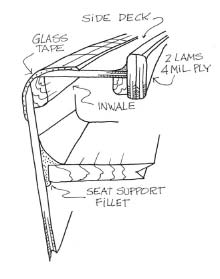 |
Side Deck |
Four mil ply is sufficient for narrow side decks, but larger,
wider decks may need six mil ply. Glue on a flexible laminated
plywood coaming for extra support and to help keep the cockpit
dry.
The gunwales or sheer line of these small boats deal with terrific
stress from rowing, wave action and the grinding abrasion of laying
against gnarly pilings and alongside other boats. My own boats
are routinely flipped upside-down for storage and rolled over
on their side to form a windbreak or rain shelter for camp-cruising.
Multiple strips are laminated onto the plywood sheer line of the
hull to form the gunwales, and hardwood strips look and wear better
but are much heavier. Lightweight softwood can be used for dramatic
weight saving, or use a single strip of hardwood over softwood
lams. To add more stiffness separate the inwale and outwale strips
with lightweight spacer blocks, or to reinforce the ends of the
hull more efficiently a compartment with flush deck provides useful
space, and the gunwale structure can often be shortened or eliminated
between compartments.
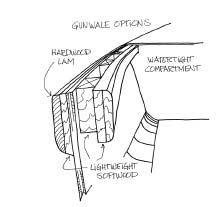 |
Gunwale Options |
I always encourage builders to climb inside the hull as soon as
possible during this process for trial fitting before deciding
the final location of seats, compartments, oarlocks, foot stops,
etc. Stack phone books for seats, clamp-on temporary oarlock positions,
use blocks of wood for foot stops and so on until the spaces feel
right, because we’re all built different and possess various
degrees of flexibility and comfort levels. When the hull is watertight
go out in wave action and sit quietly. Some flexing is expected
but any section of hull that pants more than a small amount may
require reinforcement and fortunately there are multiple options
to correct any problem including the addition of compartments,
glass tape, veneer patches, etc., and a real beauty of this system
is that modifications and retrofits are easily applied as needed.
TECHNIQUE and MATERIALS
Lightweight construction requires quality materials. Here's where
you pay more for less but the benefits are realized on many levels
including ease of building, looks, and longevity, not to mention
the safety factor and resale value.
Start with dry wood. Dry wood is stronger and has superior abrasion
resistance with reduced potential for rot pockets. A wood stove-heated
shop is ideal as it acts as a dryer to reduce and stabilize the
moisture content of wood. Even a preliminary sorting of materials
will produce a weight saving, so select all trim wood for optimum
grain orientation and moisture content. Keep a supply of Starbucks
gift cards in your wallet and be prepared to bribe the guys at
your local lumberyard so they’ll let you pick through the
stacks for the lightest, clearest, knot-free pieces.
Get the best plywood you can afford. Hardwood ply should be your
first choice because it takes epoxy so nicely and is readily available
in metric thicknesses and a selection of species and quality grades.
The more lams of veneer in a panel the better, and for my own
small boats we use mostly four mil and six mil British Standard
6566 or BS1088 hardwood ply. It comes in millimeter thicknesses,
and for non-metric users the six mil is five laminations of veneer
and equivalent in thickness to a hair under one quarter inch.
The four mil ply is three lams and just under 3/16 inch. Okoume
plywood is typically as much as 25% lighter than mahogany ply
and therefore a good choice for ultralights and lightweights,
but it often has somewhat less attractive grain. The topsides
in my lightweights are usually four mil, and I seldom have reason
to use anything thicker than six mil, even on white water dories
for commercial use in the Grand Canyon, some of which are still
around over 15 years later.
Ultralight hull bottoms can be as thin as four mil, cloth sheathed
on both sides and often with wider than usual tape on the chines
and graphite on the bottom exterior. For a standard lightweight
bottom, six mil hardwood ply with six-ounce glass cloth on both
sides works well, but for hard service drifters and river boats
I sometimes use 3/8 inch thick softwood AA marine grade ply for
the bottom panels. All softwood ply requires glass sheathing on
all surfaces, otherwise the swelling and shrinking of the annular
rings in softwood veneer will produce hairline cracks in the epoxy
coating. Skegs, keels, and rubbing strips can also be used to
reinforce bottoms with minimal weight and can easily be retrofitted
if needed. Skegs and keels are intended sacrificial, usually made
of four and six mil ply attached and supported by low density
fillets—all of which is easily planed off and replaced when
they wear down as intended.
An epoxy glue joint is lighter and more efficient than mechanical
fastenings, and screws are used only for temporary awkward clamping
situations or hardware installation. Screws used repeatedly are
stainless steel square drive Robertson head which do not strip
as easily as a Phillips or Reed Prince. Wax the screws with beeswax
to prevent the epoxy locking them in place and preventing withdrawal
and use flat washers to prevent burying the screw and splitting
out.
Veneer can be used for laminating very lightweight structural
knees and stems, but only slice cut, quarter sawn veneer, and
never the cheap rotary peeled veneer. Slice cut red cedar veneer
is particularly good because it is very lightweight and glues
so well with epoxy. A supportive knee laminated with three or
four lams of red cedar is amazingly strong and flexible. Patches
of veneer can also be glued to specific locations for reinforcement
or to dress up an area.
PRE-FINISHING
It’s not practical to completely “mummify”
an entire boat in epoxy, although some builders get close, but
by pre-finishing separate components before assembly it’s
possible to efficiently apply two or three very consistent coatings
of epoxy to all plywood surfaces. Pre-finishing components does
a dramatically better job than trying to coat all surfaces once
the hull is assembled. Pre-finishing ensures that all surfaces
are uniformly sealed including traditional rot pockets like the
inside of compartments, but the major advantage is that after
assembly the hull requires only minor detailing and preparation
for varnish or paint. This is huge if you consider for a moment
the usual time spent finishing.
Lay the plywood pieces flat on a workbench and dump mixed epoxy
on the plywood, move it around with a squeegee to wet the surface
then use a foam roller to achieve a consistent coating. Finish
by tipping off with a disposable foam brush. Bend down and slight
low across the surface to see globs and runs that need more brushing
or rolling. To prevent the usual bubbles in the first coating
of epoxy play the temperature game by heating the wood thoroughly
beforehand, then to prevent outgassing turn off the heat and allow
the temp to start dropping when applying the first coating. This
really works and saves time, epoxy, and effort. Let it cure overnight
and use a sharp flat scraper to remove bubbles, the usual raised
splinters and kamikaze bug craters, then apply the second coat
which will lay on much smoother.
These boats can be built with a bare minimum of tools and the
only thing you really need is a jig saw, block plane, a drill,
and various clamps, but scrapers deserve special mention. Nothing
else works nearly as well on epoxied surfaces, and don’t
even think about using sandpaper except possibly on trim wood.
A rectangular scraper provides eight cutting edges and can be
sharpened in minutes. They don’t make dust, they level high
spots and highlight low spots and can also be used to remove the
raised selvage edges of tape, and are perfect for the pre-finishing
process.
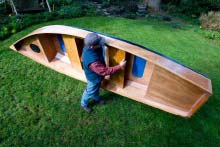 |
Car topping boat, light and stong. |
FILLETS
A fillet is a bead of thickened epoxy applied to a hull seam
or an intersection of panels, usually formed into a concave shape
by dragging a round shaped plywood paddle over the epoxy bead
before it kicks. The tenacity of an epoxy fillet is remarkable!
They become structural and also function as a supportive cleat
and molding and by using appropriate fillers they can be engineered
to match the strength of wood. Mixtures of low density fillers
such as West System 410 Microlight and 407 Low Density are ideal.
Nothing is gained by adding the considerable weight of a heavy
filler when a lightweight low density mixture will work better
and provide improved resilience to prevent cracking when flexing,
and also remain sandable if necessary.
Fillet paddles with a radius from ? inch to 10 inches will all
be useful and are easily made from scrap plywood. Tight acute
angles require smaller radius fillets and more open angles require
much larger radius fillets. Paddles can also be leaned at an angle
to increase the radius slightly, and flexible plastic paddles
can also be squeezed to fit the application. When applying large
radius fillets it may be necessary to make it a two or three step
process to get it right. Make successive passes and clean off
the excess with a sharp putty knife and then leave it alone. Don’t
pester the fillet! Sanded fillets somehow always look amateurish.
If you must sand fillets at least have the decency to paint over
them.
FIBERGLASS
The entire hull can be sheathed with six-ounce glass cloth for
additional protection, but it’s usually not necessary if
using quality hardwood ply. I prefer to tape exterior hull seams,
but if cloth sheathing is judged necessary for a yacht-quality
finish consider taping the interior seams in addition for strength.
Glass tape adds terrific strength to the hull, and I’ve
even learned to appreciate the look, but use real 10 ounce tape
and don’t cut strips from cloth as there is no selvage edge.
Apply the tape in full length strips, and use the narrowest tape
that will do the job. Tape can be applied pre-saturated or use
tabs of masking tape to hold it in position while rolling or stippling
with a bristle brush. Cut the brush bristles down to about one
inch long to provide necessary stiffness. After the tape is saturated
go to each end and tug gently to pull out wrinkles, then position
the tape over the seam by pushing with the stipple brush. Plastic
squeegees are also handy for applying glass cloth and tape as
they remove excess resin that may cause the fabric to float and
leave an inconsistent surface. Stand back often to eyeball and
correct unfairness. To add multiple layers of tape apply a narrower
width over wide tape to stagger the selvage edges. Lastly you
have the option of sanding with successively finer grits of paper
to featheredge the tape for a yacht finish, which is not my idea
of a good time, or if the hull is to be painted out use low density
sandable fillers then sand lightly. Otherwise just roll on two
coats of good varnish and enjoy the natural wood.
GRAPHITE
The use of graphite has been one of the most successful treatments
for my own series of small boats. A graphite coating provides
substantial abrasion resistance allowing a lightweight hull to
slide easily over gravel and parking lots without damage. The
more it’s used the slicker the graphite gets and adds only
ounces of weight, and may also be wrapped up around the chines
of the hull to provide an appealing waterline. A serendipitous
benefit of having a graphite bottom is that the wear pattern reveals
unusual areas of stress or wear on the bottom, which can be a
clue to retrofit a patch of glass tape to the area for reinforcement.
To give the graphite coating more body to fill small scratches
or dings mix in a small amount of colloidal silica. Spread with
a squeegee, then use a foam roller and finish with a throwaway
brush. If it gets so stiff you can’t brush it out, you’ve
mixed in too much silica.
Carbon fiber is graphite in fiber form and for certain applications
can’t be beat, but it works only in tension mode. It’s
great for oars, masts, and spars and allows scantlings to be reduced
for dramatic weight savings. Rout a groove in a lightweight oar
and saturate with epoxy, then tamp in two or three rows of carbon
fiber. Saturate well with epoxy, allow to cure then apply low
density filler to fill the slot.
Building small lightweight masts and spars is fun work, and there
are weight reducing options not available when building larger
masts and spars. I octagon most of my small masts, both to reduce
the labor of final rounding and also because I like the utilitarian
look. To lighten the mast after shaping, rip it lengthwise with
a band saw or jig saw. Leave the blade marks alone, and use a
sharp gouge or molding plane to remove wood from the inside of
each half. Take care to leave a minimal wall thickness, then saturate
each half with epoxy and reglue. Install wiring and crumpled aluminum
foil as required. The blade marks will ensure a perfect fit when
you glue it back together, and the mast will weigh about half
as much.
So building a lightweight is easy—the challenge comes in
making the lightweight boat strong enough for safety and to deal
with real world conditions. But with a combination of thoughtful
design and quality materials the amateur garage builder can produce
a structure with strength to weight ratios rivaling contraptions
from a NASA lab, and without special tools. Sure I miss the fun
of building plank-on-frame hulls with the delightful smells of
Alaskan yellow cedar and the burnt oil fragrance of sawn teak
to which I had become addicted, but the pleasures of light weight
and enhanced performance more than justify the means.
SOURCES: Scrapers: https://duckworksbbs.com/
Plywood: https://edensaw.com/
Epoxy, glass tape, graphite, carbon fiber, fillers: https://www.westsystem.com/ss/
Epoxy, glass tape, graphite, carbon fiber, fillers is available
at https://duckworksbbs.com/
Paul Butler's Website https://butlerprojects.com/
*****

|