|
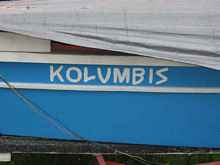
I don’t know about you, but for me it’s
always a bit of a let-down to see a beautifully crafted homebuilt
boat with mailbox letters slapped onto it for the registration
number. There’s nothing wrong with it, of course –
it does the job for a reasonable price. But you see every month
how compulsive I am, so I think we both know that wasn’t
going to fly on anything I build.
A little history
Here we are touching on the old and dying art of sign painting.
When Ole Evinrude was selling his first outboard motors, every
city had sign painters. It seems like a mundane trade, but these
guys were artists of the highest caliber. Don’t believe
me? Try painting some lettering on a vertical surface. Try to
make it look really sharp and professional. Go ahead! I’ll
wait.
See? I told you it was hard!
These professional sign painters painted lettering all day, every
day. They could paint signs as fancy as anything we can do on
a computer with nothing more than a collection of brushes and
their highly-trained eyes and hands. Actually, some of the fonts
you see on your computer came from styles painted by sign painters.
Now, of course, computers and modern printing methods can do the
same jobs with labor of much lower skill. (Like mine, for example.)
Still, sometimes you want it in paint.
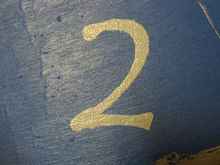
Trying my hand
I did this with hand brush lettering. I read up on the techniques
of sign painters, then practiced on cardboard for a few hours
before attempting anything on the boat. This was positively the
best I could muster.
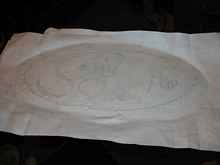
I cheated too! I first drew the lettering on paper with guidelines
to help me get the spacing right. Then I transferred it to the
hull by poking a pin though the paper. (I later discovered that
this is easier with a pattern transfer wheel made for sewing.)
I am in no way ashamed of these efforts, as I think they are
pretty respectable for someone untrained in the field. They do
the job, too, and anything is better than stick-on mailbox letters.
But some boat designs want something a bit more refined. To do
any better I have to resort to…
Stencils
One tends to assume that a stencil makes the job easy. If only
it were so. Stencils have tricks of their own that must be understood.
A good starting place can be found in the way-back issues of
Duckworks: https://www.duckworksmagazine.com/02/articles/mural/index.htm
The author goes by Errol Flynn, and I hope for his sake it is
a nom de plume. Whatever his name, his techniques are quite interesting.
But he focuses on spraypaint, which I found troublesome for lettering.
You need to mask a lot to avoid overspray getting where it shouldn’t
be. And the stencil must be stuck very flat against the surface
to be painted, or paint gets under the stencil and makes the letters
look blurry (at best). He calls this a “blow out”
and I will too.
Keeping the stencil flat against the surface is harder than
it sounds. It basically requires glue. But obviously it needs
to be glue that comes off easily.
Cutting Stencils
I think this is pretty self-explanatory, so I won’t belabor
it here. In short, I used manila file folders and stuck the photocopied
design to them with glue stick. Then I cut to the lines with a
utility knife. Any little bitty interior parts (like the middles
of numbers like “6” and letters like “A”)
need to be labeled.
Brushes
This is a whole new thing to those of us who are accustomed to
brush painting. Our first instinct will be to use the template
like a guide and brush along the lines. In fact this is the very
worst thing you can do. The thing we need to avoid is paint building
up along the edges of the stencil, because this always leads to
paint creeping under it – a blow out. This is ugly.
If you think about it, this makes sense. The brush is acting
like a tiny version of your finger when you use it to make a caulk
fillet. We don’t want any fillet of any kind – just
a very flat, thin coat of paint. This means stippling, not brushing.
This means a very, very dry brush. Apparently people who do wall
stencils dip the brush, then remove the excess on the edge of
the can, then brush out most of the paint on scrap newspaper.
When the paint is almost gone it is time to apply it to the stencil.
Yes, this is wasteful, but it’s how you get a clean impression
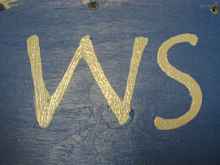
from a stencil. The left side of the “W” is two coats
in rapid succession done this way.
“Then why have bristles at all?” you ask. Good question.
It would seem that we don’t really need them, because we
are not using their capillary action. A lot of wall stencil people
use foam too. I didn’t have such good luck. Check out the
“S” in the photo above. Maybe I wasn’t getting
the foam dry enough.
Another approach would be a roller, but again I think I didn’t
get it dry enough.
I suspect that bristles are an advantage because they can individually
get down to the painted surface right next to the stencil, where
any kind of sponge or roller leaves a tiny gap, so you try to
make it wetter and get a blow out.
So let’s put some paint on a boat.
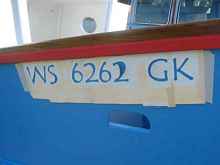
On the Hull
Here is the stencil taped on.
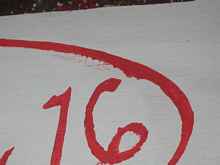
Notice the interior parts of the sixes. I glued those on with
a little rubber cement. It rolls off politely when the paint is
dry. Here’s a look at the stippling.
The “G” has one coat and the “K” has
two. I stopped at three.
Not too bad, though I probably should have filled that spot
under the second “62” where I chipped out the top
veneer.
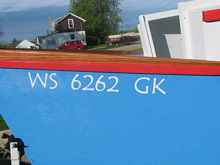
Patterns again
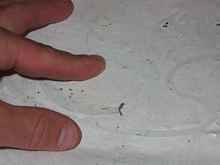
Here’s that file folder stencil on the boat again.
See how parts of the cardstock are lifting up? This happened
because I used the stencil to make some test runs. The paint drying
on the front side contracts a little and curls the paper. This
is really inconvenient. Curled stencils need to be held down when
stippling, and I did it with a screwdriver. This was not ideal
because I had to be very careful how I pressed it back down for
later coats or I would get paint where I didn’t want it.
I could have gotten around that by letting each coat dry fully,
but then I would have to worry about the paint gluing the stencil
to the hull.
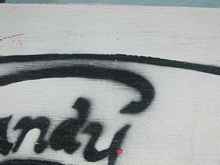
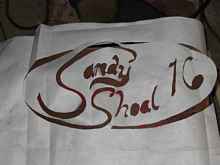
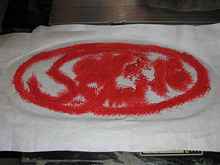
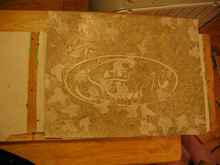
Clearly we need better stencils. This gets to be a much bigger
deal with complex, flowing shapes like the logo I designed for
the Sandy Shoal 16. (I had no idea at the time what a challenge
it presented in terms of stencils!)
Thin stencils and thin glue
My thinking here is that a thin material is too weak to curl
strongly like the cardstock did. But it needs to be a strong,
dimensionally stable material that doesn’t soak up water.
Professionally made stencils are normally Mylar, which is polyester.
This makes sense for all the same reasons that polyester is best
for sails and rigging, but where do you find a sheet of 5-7 mil
mylar?
I started looking around the house for other dimensionally stable
sheet goods. Here’s one that is very common – Tyvek!
Any copy store or office supply place has Tyvek envelopes in various
sizes, and sometimes you even get them in the mail without looking
for them at all. Do not run Tyvek through a copier or it will
melt. Glue sticks don’t grab tyvek very well, so I used
rubber cement to attach my photocopied paper design to the Tyvek.
I made sure to leave some strips unglued so I could later get
a fingernail under the paper to peel it off.
Now we have a much floppier stencil than last time, so we definitely
need to glue it to the substrate. Again I used rubber cement.
I applied the cement to the hull over the entire stencil area,
then pressed the stencil on. Carefully! It takes some real jockeying
to get a Tyvek stencil placed accurately before the rubber cement
starts curing too far.
The astute reader will have noticed that I have glue where I
want there to be paint. No problem. Rubber cement rolls off easily
from the openings in the stencil with the fingertips.
With the stencil so closely attached to the hull, we don’t
need to get so worried about dry brushes and stippling. However
it is a good practice to maintain, since any gap in the glue will
make a big mess if you don’t do the dry stippling. The bigger
your stencil and the more times it has been used, the more likely
it is that you will have some gaps.
After the paint dries we peel off the stencil and roll off the
remaining glue.
Unfortunately, I didn't get a useable photo of what was left
of the Tyvek stencil. There wasn't really much to see, since it
stuck to itself rather impressively. This, unfortunately, means
it isn't reuseable, making it little better than paper.
That’s when I had what seemed like a good idea. The problem
isn’t the material the stencil is made of. The problem is
that we have to cut the thing by hand! Maybe rather than focusing
on a durable stencil I should focus on a one-time stencil I don’t
need to cut.
A visit to the vinyl people
My local Kinko’s copy shop does vinyl signs. They have
a knife plotter to cut out the designs. They will tell you that
these tissue-paper thin pieces of vinyl cannot be used to make
stencils, and normally they would be right. But our case is rather
different – a single-use glued-on stencil. However it turns
out that it costs $15 per square foot. For each disposable stencil!!!
Not a chance.
Back to work on a durable stencil that can be glued down.
Durable stencils
Well, given the stick experience with Tyvek, I guess we need
something that it stiff enough to hold its shape, yet absorbs
no water from the paint. So some kind of plastic sheeting.
My first attempt was a scrap possibly the world’s ugliest
vinyl flooring.
The stiffness is nice, but the thickness is a pain for several
reasons. First, it is hard to cut accurately—hard enough
that I had to reverse the image and cut from the glue side. Second,
it is a giant pain to roll off the unwanted rubber cement when
you can’t just run your finger over it. Vinyl flooring is
so thick you need to cut little tools from more of the vinyl to
rub the cement away. This takes ages.
Worse, the thickness forces us to really stab the brush, which
results in terrible blowout.
Let's keep looking. My next attempt was transparency stock.
Transparency Stock
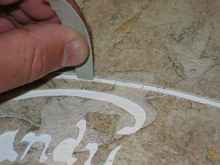
Finally we have a winner! This has a huge benefit in that you
can run it through a photocopier and put the art directly on it.
It is also thin and easy to cut. I hope you can see the cut transparency
in this photo.
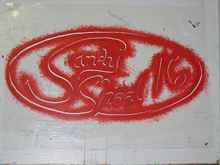
Here's the paint stippled on the glued-down stencil.
And the result.
Nice! And it peels off gracefully and stays flat, so it is easy
to roll off the rubber cement.
This allows us to try something else as well.
Shadow Lettering
Shadow lettering only requires the ability to add a second color
offset a bit from the first. After the first coat of paint has
cured, we repeat the process but shift the stencil a little. Normally
less than the width of the lines that form the letters.
Then we again roll off excess rubber cement and add paint.
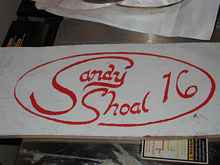
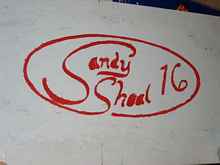
Here it is finished.
And finally, on the actual boat. I think I might reverse those
two colors when I repaint it, though. Looks a little “frosty”
this way.
Now we’re getting into that territory that once belonged
only to real sign painters, and now mostly belongs to computers.
Vinyl Glue-Ons
I should mention that there’s an easier way to go about
this. There are sign stores that make vinyl signs, including some
that specialize in marine vinyl. They have their machine cut out
letters or other graphics for you, which you then glue to the
hull. But as we found out above, it isn't cheap. And of course
it still looks like plastic. On some boats that looks fine, but
on some you want real paint.
Rob Rohde-Szudy
Mazomanie, Wisconsin, USA
robrohdeszudy@yahoo.com
*****
|