Sometime last fall, I told some of my friends that I wanted to build a canoe. The said yeah sure, “You have no clue.” I then decided I wanted to build a birch bark canoe. A canoe that is built with no nails, screws, rivets or glue. A canoe filled with history, tradition, and hard work. After doing some research on building canoes, specifically birch bark canoes, I found John Lindman, the owner and proprietor of the Bark Canoe Store in Spokane, WA. On his website, BarkCanoe.com, he advertised classes to build a birch bark canoe.
 I gave him a call but he wasn’t offering classes in the near future but he offered me to apprentice with him while he built a 26 foot chipawayan birch bark cargo canoe. I immediately accepted and decided I would film the entire process. In April, I packed up my van and headed out to Spokane, I had no idea how long I would be there, where I would sleep, or even what I would be doing. I ended up sleeping either in the shop or in the back yard for two months and put in over 200 hours of work on the birch bark canoe. During my time in Spokane we also built two fiberglass replicas of the birch bark canoe we were building. They were both 28 feet long and were built as “stunt doubles” for the genuine birch bark canoe. The canoes are going to be used in a television series which will reenactment Alexander Mackenzie’s voyage from central Canada to the Pacific Ocean in 1793. My time at the Bark Canoe Store with John Lindman was unforgettable and a period in my life I will value indefinitely. This summer I plan on going into the bush in northern Ontario and building birch bark canoe in the woods. Then in the fall, John Lindman has offered me a job with him building canoes. Never in my life I had made something that gave me as much satisfaction as building this canoe. I gave him a call but he wasn’t offering classes in the near future but he offered me to apprentice with him while he built a 26 foot chipawayan birch bark cargo canoe. I immediately accepted and decided I would film the entire process. In April, I packed up my van and headed out to Spokane, I had no idea how long I would be there, where I would sleep, or even what I would be doing. I ended up sleeping either in the shop or in the back yard for two months and put in over 200 hours of work on the birch bark canoe. During my time in Spokane we also built two fiberglass replicas of the birch bark canoe we were building. They were both 28 feet long and were built as “stunt doubles” for the genuine birch bark canoe. The canoes are going to be used in a television series which will reenactment Alexander Mackenzie’s voyage from central Canada to the Pacific Ocean in 1793. My time at the Bark Canoe Store with John Lindman was unforgettable and a period in my life I will value indefinitely. This summer I plan on going into the bush in northern Ontario and building birch bark canoe in the woods. Then in the fall, John Lindman has offered me a job with him building canoes. Never in my life I had made something that gave me as much satisfaction as building this canoe.
Below is a daily journal of all my tasks as well has procedures for how to do each step. These notes will help me build the canoe this summer aswell serve as general information for others who may be interested in birch bark canoes.
4/14/08
Day 1- My first day in Spokane. I met John Lindman, the owner of the Bark canoe Store at 2:30 and had coffee at Rockets. Talked about my tasks, ideas, and goals. I think things will work out well. At 4:00 I started preparing the ribs of the canoe, planning the edges off the outer side of the rib, the two corners that will be visible when the ribs are laid out. Began Boiling roots in water and learned to peel the bark off.
4/15/08
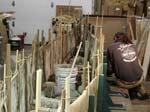
Day 2- Started at 2 and processed spruce root all day. Included peeling bark then splitting the root down middle. Filmed some shots of processing root and using the crooked knife. Worked over 10 hours and processed over 100 feet of root. I also planed all four edges of the thwarts. The thwarts are Ash, a hardwood, much harder to work with but much stronger.
4/16/08
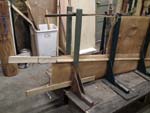
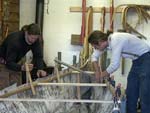
Day 3- Processed root all day and night 10+ hours. Started working on frame, reinforce with cross piece every foot. The frame dictates how the hull will shape out. A narrow frame is better, sleeker and faster in water. Got my own crooked knife and began sharpening an edge, still quite a ways to go.
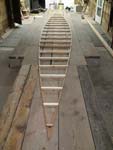 |
The Frame.
click images to enlarge |
4/17/08
Day 4- Processed more root. Almost finished the entire garbage can of spruce root. The root makes my fingers extremely dry and sore, cracks all along edge of pointer fingers. Today we started to soak the large roll of Birch bark in a cold bath to make it softer and more pliable. Its too large to heat in garbage can.
4/18/08
Day 5- Rolled out the Birch Bark. Three piece hull, main center piece is 14 by 4 feet and two 6x4 foot end hull pieces. Before we unrolled the bark we cut small horizontal slices, underneath and perpendicular to any cracks in the bark, this prevents the cracks from running any further than the cuts we made. When unrolling we poured near boiling water on edges and points of tension while unrolling to reduce risk of cracks splitting. As we unrolled the bark we weighted the edges to prevent curling which the hot water causes. We then placed and adjusted the frame on top of the bark. It took much time centering each piece of bark to the frame. Once the frame was centered we weighted it down with large rocks and bricks on top of plywood. The rocks covered the frame but did not over hang as the bark will fold up around the frame.
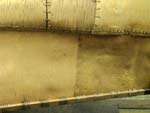
4/19/08
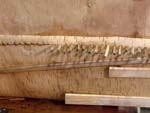
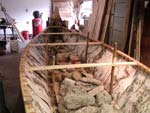
Day 6- Before cutting gores in the bark we scored the bark on the edge of the frame and poured hot water on the bark which facilitated the bark in folding up around the frame. We then cut gores every 10-14inches along the frame but only on the large center roll as the ends of the frame have very little curvature. Many of the gores were cut where there were already cracks in the bark. After cutting the gores we poured hot water along the edge of the frame which caused the bark to curl/bend up around the frame. The bark was reinforced in its new position by stakes which were screwed into the building platform.
A stake was placed every 2 feet or so. Before the stakes were placed, we “pre-bent” the bark into places with our hands and hot water. The ends were then bent up the middle with the help of a score by a pencil.; The ends were then staked in place. Fairing sticks (8’x1’x.5’’ pieces of wood) were then wedged between bark and takes which distributed the pressure along the length of the canoe. Inside stakes were placed between the frame and the inside of the bark and then tied to the outer stakes, forcing the bark to stay upright.
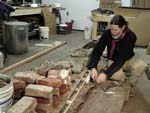 |
John cutting gores in the bark. Note the rocks on the frame on top of the bark. |
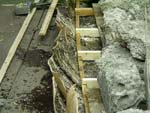 |
The bark being bent up around frame. |
4/20/08
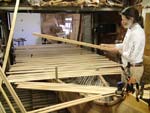
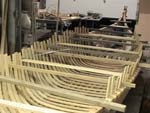
Day 7- Half day, cleaned up the shop and put into 2 foot panels which make sides of canoe. There are 13 panels on each side, a 26 foot canoe. The panels are held in place by faring sticks, stakes, and wood clamps.
 |
Outer (Green) and inner stakes are visible as well as upper inner fairing sticks |
 |
The outer fairing sticks are visible about one foot off the building platform. |
4/23/08
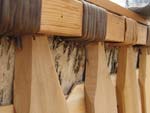
Day 8- Got back to Spokane late but began sewing the panels to the hull. Saddle stitch.
Sewing steps-
- Mark stitching line with pencil
- Mark holes 3/4in apart with pen
- Wet bark with near boiling water
- With awl make a hole every other pen marking
- Insert wooden pegs (soft wood) after each hole is made
- Make holes and peg remaining spaces.
- Prepare Root- Split it, make it uniform and thin (cut out guts)
- Sew
 |
Pegs in holes |
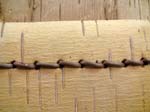 |
Stitches |
4/24/08
Day 9- Sewed all day. My fingers are numb and my knuckles bloody.
4/25/08
Day 10- Sewed all day. 1:00-9:30pm.
4/28/08
Day 11- Sewed all day.
4/29/08
Day 12- Sewed all day again! I helped John spread the gunwales and mortis and tennon the thwarts. The beam is 58 inches between the outside of the outwales.
4/30/08
Day 13- Sewed all day.
4/31/08
Day 14- Sewed all day and finished over 1500 stitches and 50 feet of stitching.
5/1/08
Day 15- Spread bark to the correct beam of 57 inches.
 |
The bar was spread outward to accommodate the beam of the gunwales. |
5/2/08
Day 16- Dropped gunwales onto bark and slit bark between the inwale and outwale. The gunwales are supported by height sticks which determine the depth of the canoe. The height sticks are placed inside the canoe. They rest on the frame so the bark is not damaged and supports at the thwarts. 2 at every thwart. We also took the stakes out.
 |
Here you can see the bark between the inwale and the outwale. As well as how the thwarts are positioned. |
Went to Seattle over weekend to pick up bark shipment from Siberia.
5/7/08
Day- 17-
Learned how to lash the bark to the gunwales. Lashed 13 groups.
Lashing-
- Prepare Root, same as for sewing but alittle thicker and longer.
- slide fat end of root between bark and inwale.
- With awl make hole just below root.
- Thread root through hole make sure root is snug and tight on gunwales by pushing down not by pulling tight.
- Root goes through each hole twice and is layed adjacent and tight next to the last loop.
- Each lashing is 2 inches generally 4 or 5 holes depending on root size.
5/8/08
Day 18- Did about 27 lashings, getting better at it.
5/9/08
Day 19- Lashed all day again! 30 lashings
5/10/08
Day 20- Lashed all day 30 lashings again. Done lashing for now as the ends are not completely bent up to the proper sheer. I’ve done about 100 lashings each lashing takes 10-15min. Much time is also taken to prepare the root.
 |
Here you can see the lashings along the gunwales as well as the height sticks supporting the thwarts. |
5/11/08
Went to P.T.’s property near Chewelah and made a Teepee with 11 poles and an opening that can be opened or closed for smoke from the fire. Slept in it and had a fire going all night.
5/12/08
Began working on the fiberglass canoe. This one is a replica of the birch bark canoe we are making but is 28 feet. It is basically the stunt double for the birch bark canoe. We will be making two of them which will be shipped out to Winnipeg on May 20. Production of the fiberglass canoes are week late so it’s going to be tight for the May 20 deadline. John hired someone to make the fiberglass canoe shell from a mold he made and our job is to trick it out so it looks like a birch bark canoe, complete with lashing (synthetic root), black pitch lines (synthetic pitch), and a birch bark paint job.
5/13/08
Lashed the fiber glass, its much faster than with the birch bark as there are never issues with the root or the holes made by the awl. The holes are drilled.
5/14/08
Lashed the fiberglass canoe and helped john mortis and tennon the ash thwarts.
5/15/08
Finished lashing the canoe and lashed the stems with a zig-zag technique.
5/16/08
Painted the canoe so it looked like birch bark, brown lines replicating the eyes.
5/19/08
Lashed the second canoe, the deadline is coming up but I think its going to get pushed back to the 21st. Long days coming up, started at 10 went til 10. Lashed and helped john with the gunwales.
5/20/08
Lashed all day and started zig-zag on stems.
5/21/08
Started lashing at 8:30am worked on the canoe until 8pm when it was put on the trailer and went on the road. We are finally done with the fiberglass canoes. But it was neat because it’s sort of like the modern day art style. Back in the day when Indians made birch bark canoes they used the best technology available, so these fiberglass canoes are pretty much a continuation of that tradition (to some extent).
5/22/08
Day 21- Cleaned up shop and 6 more lashings towards ends.
5/23/08
Day 22- Did 17 lashings at ends and re-bent the ends of the gunwales up to meet stems.
5/24/08
Day 23- I removed all the rocks and weights from inside of the canoe and took out the frame Lashed thwarts and ends. Lashing all done, 150 in total (I did every single one but the first one john demonstrated how to do it). We also fixed some of the sewing that was messed up and inserted the stems.
5/25/08
Day 24- Trimmed excess bark around stems ends which gave the canoe its end shape. I also sewed a panel on the top of the end because our bark was to short. At about 3pm we layed out all the ribs in their proper position in the canoe and marked where the bends would be. Better ribs, ribs with less grain runout, were odd numbers and ribs with a higher chance of breaking were even numbers. They were numbered from the middle out to the ends. Ribs are bent in pairs so an even is bent on top of an odd, this equalizes the tension throughout the rib and if one were to start to break the other backs it up. After they were all marked and numbered, we filled up a canoe and put the ribs to soak.We then flipped canoe over and began sewing the panels together.
 |
Here John is laying out the ribs in their proper position and choosing which are odd and which are even. There are 68 ribs in total. |
5/26/08
Day 25- Finished sewing panels. We than began pegging and sewing the gores and where the hull bark pieces fit together. I also began lashing/sewing the stem piece into the bark with a simple spiral stitch.
 |
Spiral stitch is visible on stem as well as all the panels sewn together. |
 |
Panels, gore, and hull sewn together |
5/27/08
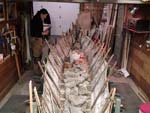
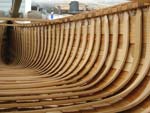
Day 26- Finished the spiral stitch around the stems, only went down half way. We then flipped the canoe back over to prepare for bending the ribs. Before we went ribs I made binders which are pieces of wood laid across the canoe with little nobs on the outside of the gunwales which when the ribs are put in place, keep the canoes shape and don’t let the ribs push outward and possibly break through the canoe. We heated up a garbage can of water to a boil and began bending the ribs. We bend ribs on our knees and always in pairs! To bend ribs you heat them up for a couple minutes then take them out and line up the bend lines on your knee and make one bend at a time, always keeping pressure with your hands and knee where you want the bend to start and where it will continue outward. Once you get enough bend on oneside you stick the other side into the water and heat it and repeat the process, then you use both knees and line up each bend with its corresponding knee and get the exact shape you want. Then the ribs are put into place and the bend marks are lined up with the chine of the canoe and they are temporarily nailed to the gunwales to dry. Temporary Sheathing is set underneath ribs to prevent the ribs from cracking or breaking through the bark, they distribute the pressure from the ribs evenly.
 |
Here the ribs, temporary sheathing and binders are visible. About 2/3rd of the ribs are in place. |
5/28/08
Day 27- Bent the rest of the ribs and set them to dry in the canoe. I also learned to split cedar sheathing. The sheathing lines the inside of the canoe between the bark and the ribs. We started with cedar logs and you split them in halves until they are about 2 inches thick 4 wide and about 4-5 feet long.
5/29/08
Day 28- Split Sheathing all day while ribs dried in place in the canoe. To split sheathing you start with a cedar log about 5 feet long with a diameter of about 12 inches. When splitting cedar you always split by 50% mass. And you always split from the top of the tree down the base. Those are two cardinal rules. When splitting logs and larger blanks we use a fro, which is 15in. thick metal blade with a handle that sticks up perpendicular to the fro but on the end. The fro gets pounded into the cedar but always by half the mass. Once the fro is pounded in you sort of pry the wood apart and moving the fro down into the split wood giving yourself more leverage with each downward movement. The ribs get split down to 1/8 inch pieces about 3in. wide and four feet long. Cedar can split amazingly thin and straight once you soak it in boiling water. It splits almost like string cheese. Once you get your blank down to 1 inch wide pieces hot water is necessary to prevent the ribs or sheathing from cracking.
5/30/08
Day 28-
Split sheathing and trimmed ribs. I cut off the tops of the ribs down to the top of gunwales. The inside of the rib will be beveled to underneath the inwale between the inwale and the bark but over laying the sheathing which run lengthwise of the canoe. After the ribs were trimmed and completely dried they were removed from the canoe to allow us to work with the sheathing and bevel all the tops of the ribs outside of the canoe.
5/31/08
Day 29- Finished splitting sheathing and began inserting them into the canoe then putting the ribs in place. Takes a long time to get everything straight and in place. No tacks are used in the process and everything is held in place by tension of the bark. The rest of the stem piece was sewed in with an Ojibway stitch.
 |
Top of ribs seen from inside |
6/1/08
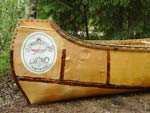
Day 30- Finished canoe today. Finished inserting the last few ribs and sheathing. Trimmed everything that needed trimming such as excess root or excess bark in places, planed a gunwale, fixed a lashing whatever had to be done. We also pegged in a gunwale cap the stretches the entirety of the gunwales runs directly above bark and is just narrower than the gunwales. After hundreds of hours of work the canoe is done. A pretty amazing feeling to have worked and observed the canoe from a roll of bark to 26 foot Chipewyan cargo canoe.
 |
How the ribs are laid on top of sheathing and beveled underneath inwale. The gunwale cap is visible as well. |
 |
The finished end (upside down).. Notice the spiral stitch on the bottom half of end and the ojibway stitch on the flat top of the end and halfway down the stem. |
 |
The canoe and I. |
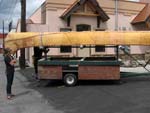 |
On the trailer and ready to be shipped to Peace River, Alberta near lake Athabasca. The canoe will be in a 1000+ mile voyage from the town of Peace River to the Pacific Ocean. The trip will be filmed for French-Canadian television series highlighting the expedition of Alexander Mackenzie to the Pacific Ocean. |
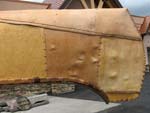
The Canoe was not pitched as it would run-off during shipment to Peace River. The pitch that was used on the canoe was a mixture of spruce gum and bear fat. The mixture of the bear fat keeps the spruce gum flexible so it does not dry brittle and crack off the canoe.
 |
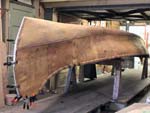
This is the finished canoe with the seams pitched with spruce gum and bear fat |
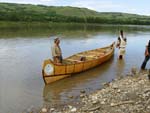 |
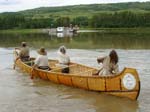
Getting ready for the 26' Chipawayan cargo canoe's maiden voyage on the Peace River, Alberta. |
|
She paddles like a dream! |
***** |