While most of us seldom sail at night, the Coast Guard requirement for the proper lights remains. I suspect the Coast Guard could cite you for not having the necessary lights even if you were out in the daytime. In the same way, they could cite you if you did not have enough life jackets, even though there were no emergency or even if you were merely at the dock. Lighting requirements are dependent on the length of the boat, going down to only requiring a flashlight at night if you are out in a rowboat! In my case, with a 26’ sailboat that can also be propelled by an outboard motor, I am required to have the port (left side—red) and starboard (right side—green) lights showing from the front around for 120 degrees and a stern (rear—white) showing to the back. If I am motoring I apparently should show a white all-around light up high, but I am somewhat unsure if an anchor light is satisfactory. I’ve read many books that cover the rules of the road and how to recognize if a freighter is about to swallow you up at night. To me it feels like a line in a movie where a young man, about to become a chauffeur, is reading in his driver training manual what to do if he were to hit a deer when all his driving is in Manhattan! I digress.
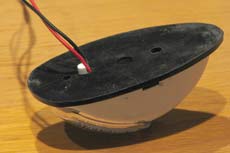
I replaced my boat’s navigation lights shortly after I acquired it several years ago because several chromed fixtures had corroded beyond recovery. The new lights used linear (festoon) bulbs and looked nice, but they have two inherent problems: 1) they draw about 1A (ampere) of current (at 12V) each and, 2) the housings protrude enough to catch my jib sheets under the housing when I tack. I had noticed the gradual emergence of LEDs in the auto and marine lighting markets. Several past articles in duckworks have explored LED bulb assemblies marketed to replace the incandescent bulbs in common fixtures, but the costs still seemed high. Even today, most marine LED fixtures seem too costly to those of us who virtually never sail at night.
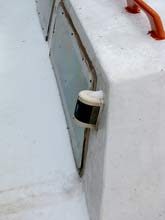 |
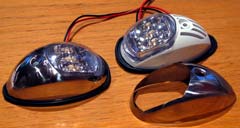
This is my old starboard light |
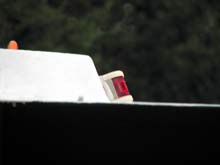
| This is my old port light |
 |
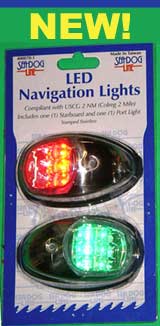
Recently, however, I perked up upon seeing that duckworks now carries a pair of LED navigation light assemblies for about $42—less than twice the cost of a pair of the least expensive incandescent assemblies. I couldn’t justify the expenditure based on power savings (I have a solar charger and never sail long enough to deplete the battery) but this winter I was going to carve some blocks to stop the jib sheets (ropes) from hooking underneath the present light fixtures on each tack. These LED assemblies have a lower profile than my present lights and are so rounded they would not catch the jib ropes. Before I would allocate a significant part of my budget (carefully watched by my wife/treasurer) on the lights I had some technical questions to answer. Chuck suggested I evaluate a pair, with a report for his web site/store. Here are my conclusions:
The direct colour advantage
 |
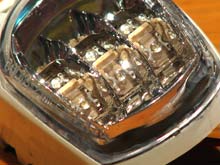
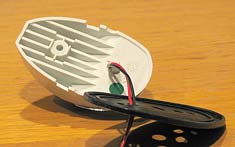
There is a complex chrome-coated reflecting assembly behind and around the LEDs. |
Each light uses 6 LEDs pre-mounted in a permanently sealed plastic assembly. There is a complex chrome-coated reflecting assembly behind and around the LEDs. I assume it is because of the expected long life (perhaps 50,000 hours—over 10 years of every-night use!) that the designers chose a permanently sealed assembly. That avoids the corrosion and poor contact problems that plague low-voltage devices such as flashlights. The LEDs emit only green (or red) and look clear when shut off.
| The LEDs emit only green (or red) and look clear when shut off. |
 |
These lights are especially efficient because the red and green colours are inherent in the diode junctions. Having been in the electronics field for over 35 years, I watched in the late ‘60s and early ‘70s the arrival of the (GaP) red LEDs and (GaAsP) green and yellow LEDs. For two decades, there were no practical blue LEDs until work with InGaN paid off. The colour of the emitted light depends on properties of the material. Wondering what modern magic had brought about white light (which by definition is light over a range of wavelengths) I consulted wikipedia. (https://en.wikipedia.org/wiki/LED#White_light_LEDs) and learned that commercial white LEDs are neither magic diodes nor a combination of 3 individual coloured LEDs (red, green, and blue ones close together could appear white). Instead, white LEDs are ultraviolet-emitting LEDs that excite a white-emitting phosphor (the same principle as “black” light exciting phosphors in an art show or a nightclub). The overall efficiency is lower than with conventional LEDs, so it takes more current to get the necessary intensity of light. Then, having gotten the wide-spectrum white light, for the navigation lights you have to use coloured filters to block all but the green or red. You lose twice—first in the light/phosphor exchange and second in the filtering. Here is where duckworks’ lights come out ahead—they use the inherent colour right out of the LED. White navigation lights are a different matter.
 |
Here is where duckworks’ lights come out ahead— |
| they use the inherent colour right out of the LED. |
 |
Power consumption
The current drain at 13V is about 64 mA for the green light and 83 mA for the red light (.84 and 1.09 watts respectively). A quick look at the catalogues shows 10 to 25-watt bulbs common in side navigation lights. Less bright 5-watt bulbs are acceptable for boats less than 12 meters in length that need only 1 NM (nautical mile) visibility rather than the 2 NM required on larger boats. The duckworks bulbs are rated 2 NM. In general, you can say these sidelights take less than 10% of the power of incandescent lights.
Alignment/light pattern
Chuck posted an extensive discussion about shimming to align the lights parallel to the centreline of the boat. In addition to mounting the lights at the correct angle front-to-back, mount them vertically as well. A quick measure of the pattern, (shining them up at the ceiling) shows that the pattern covers about 20 degrees above and below horizontal. Technically, on a seriously heeling sailboat, the sidelight could blank out, but I expect there would be enough wave motion to give some light part of the time. Since my cabin slopes about 15 degrees, I will have to make a shim to get the light vertical even though the mounting place is parallel to the boat’s axis. While studying the pattern on the ceiling
(I don’t have any accurate light measuring equipment), I see a clear drop off at the 20-degree mark and an almost rectangular pattern from the front (0 degrees) to the back (about 112-120 degrees). There is some spottiness in the light intensity over the area, but it looks like it is acceptable. In thinking about the vertical angle, I realise that as you move around to the bow the component of tip on a heeling boat will be less, so the light would be visible further forward even after it was not visible broadside. Personally I can’t imagine being out in those conditions at night and would hope any approaching boat had radar and I had a good radar reflector!
Mounting
The oval base is 4” long and 2 3/8” tall—make any shim at least that size. A stainless steel flat-head or pan-head screw (or machine screw) up to #10 size should holds the light fixture against the shim/cabin/hull. The screw uses up 1 ½” of its length going through the fixture, so pick a total length according to what depth you want it to go into (or through) the mount. Make a ¼” hole for the wires located 1-½” forward of where the screw is to go. The single screw toward the back holds the fixture but a small plastic part protrudes into the wires hole to prevent the fixture rotating around the screw. I suggest you either set the screw in epoxy to avoid rot to your hull or at least use some sort of caulk/bedding compound to keep moisture from entering either hole in you boat.
 |
A small plastic part protrudes into the wires hole to prevent the fixture rotating around the screw. |
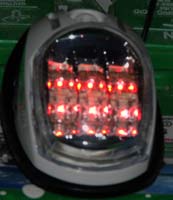
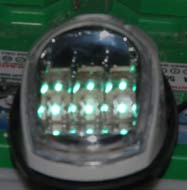
When the fixtures are not powered, they look identical (no colour filter to rely on) so the manufacturer adds a green or red coloured spot on the bottom of each assembly. It would be frustrating to finish mounting the lights only to find you had them reversed. Be sure to put the red-dot fixture on the left side when facing forward—the port side in nautical terms.
| The manufacturer adds a green or red coloured spot on the bottom of each assembly. |
 |
I am of two minds about using the metal cover. It does look more finished and provides a little more strength, but it looks to me like a material that will corrode quickly in a salt environment. The plastic assembly looks appropriate by itself. I suppose you could use the cover until it corroded and then use just the inner plastic part. (editor's note: The cover is 304 Stainless Steel which should not corrode.)
Wiring and fusing are no different from other fixtures. Personally, I intend to share the 3A fuse of the “running lights” circuit. If there were a short in the wiring then the fuse would blow. I cannot imagine a situation where one of these assemblies would draw significantly more than the .06 to .08A of normal use without failing to an open circuit. I favour soldering connections, but I have seen arguments for crimp or wire-nut connections as well. I try to cover all my connections with “liquid tape” to resist corrosion.
I had intended to include a couple pictures of the finished installation, but we got about 4” of snow last night and with discomfort of the cold, the 30 knot winds, the slippery, sloping decks, and the slow to impossible epoxy setting times at these temperatures, I decided to wait. I have lots of time because sailing season doesn’t come here to eastern Canada until May at the earliest. The good news is that I gave up just in time and pulled the boat about a month ago—it sits safe but snow-covered in the yard!
Tom Schultz
*****
|