Part I
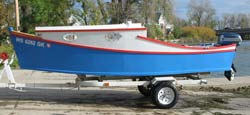
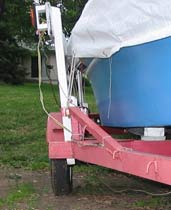
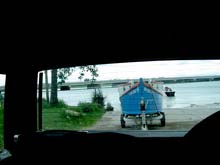
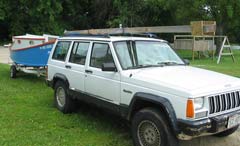
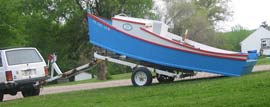
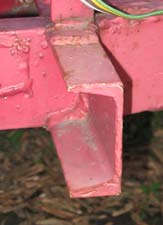
What a triumphant feeling it is to find that yard sale boat trailer for $50. But in the glow of victory we often fail to notice that the cheap trailer is narrow! So narrow, in fact, that the boat ends up riding above the wheels. Which means above the fenders. Which means too high! Such was the case with my AF4B when I got it. The builder had made smaller wooden fenders to mitigate (but not eliminate) the problem.
 click images to enlarge click images to enlarge
The boat being high up means the trailer has to be deep in the water to float the boat.
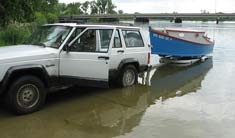
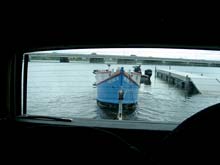
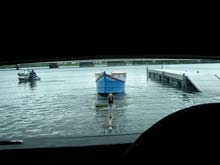
OK, that one is a worst-case scenario. The water levels were high, so we were stuck using the top of the ramp, which has less slope. But here’s the same ramp, trailer and same model Jeep with more normal water levels. Even here we’re dragging the boat off because it’s not quite floating yet.
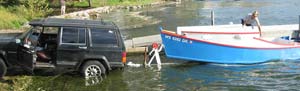
At first glance I’m sure you can see why this is no good. Most of the ramps near me are shallow, and the boat will not float off without some serious shoving with the tow vehicle’s exhaust and brakes underwater. Add to that the acrobatics required to avoid walking through slippery weeds when getting out of the tow vehicle. And finally, serious acrobatics are necessary to avoid getting one’s shoes wet when reeling in the winch. (I didn’t take photos of these for a reason.)
I don’t mind being a little acrobatic now and then, but I don’t want to have to. So what are we to do?
The “right” way would be a wider trailer so the boat could get down between the wheels. This worked perfectly with the Light Schooner trailer – wide, stable stance on the road, easier launch, and you can use whatever size tire you want. It also lets you run the axle on top of the springs if you want to go really low.
But I couldn’t afford to completely replace the trailer, and widening a trailer is not for the faint of heart. (More on this below.) So I started thinking about simpler ways.
Smaller tires
Smaller tires are the simplest and most obvious approach. I currently have 12” wheels with a 21.9” outside tire diameter. The little 4.80x8 tires would save me over 5” of ride height! More, because I could lower the bunks! But alas, it isn’t that easy. A 4.80x8 can only carry 590 lbs at best, and a maximum load of less than 1200 lbs would not cut it for me. It would carry the boat and trailer empty, but with less reserve that I would like. The inability to carry camping gear in the boat is a deal-killer. Unfortunately, stronger 8” tires with sufficient load rating would only save me 1.4”. Not enough to justify the expense. I suppose if you had a spare axle laying around you could do a miniature tandem axle trailer with four 590 lb tires, but buying such parts would cost as much as rebuilding the trailer the right way.
This is a thorny problem! We do have a couple dirty tricks, though. The first is a…
Tongue extension
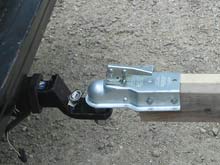
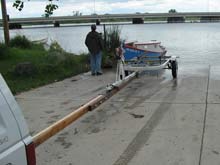
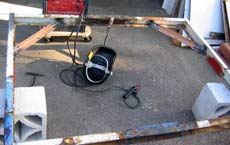
It sounds like some kind of surgical enhancement, but it’s just an extra coupler and ball on a long piece of steel channel. Mine is even cheaper, using 2x4 in place of the steel. Here’s how it works.
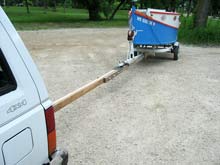
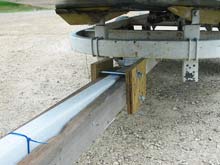
First I unhitch the trailer and set the tongue on a cement block. This is important because we need some height to work. I pull the Jeep forward to make space and slip the extension into place around the tongue. Then I lift the trailer by the winch post and set the coupler on the extension’s ball.
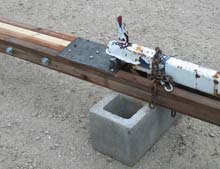
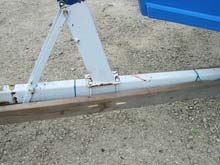
Then I close the coupler and add a couple bolts to the rear of the extension. The extension’s aft legs sandwich the trailer’s tongue and a bolt pins it in place top and bottom. Notice how this lifts the front of the trailer for a slight tilt bed effect. This can be helpful in shallow ramp situations. It certainly doesn’t hurt.
In my case I had to drill out some slots to make space for the tabs that fasten the winch post.
Finally I couple it to the Jeep. This process adds about 5 minutes to trailer-to-water time.
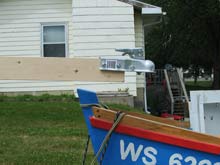
Don’t forget to tie the boat’s painter to the stern of the trailer. Lift the motor while you’re back there
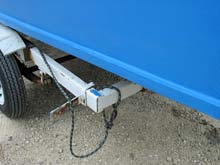
Then back it down the ramp.
Then nudge the brakes when the boat is almost afloat.
The boat floats off the trailer.
We immediately drive forward until the bow just touches the pavement. It takes some practice but works beautifully.
Retrieval is not quite so tidy as launching. I had to get my feet wet walking on the trailer frame to guide the boat onto its bunks. This would have been easier with goalpost-type loading guides, but I still would have gotten wet to crank the winch. But I guess getting wet once is better than twice. I think if my bow eye had been at the right height I could probably pull the boat into a set of goalposts and cleat it to the tongue extension, then winch and shove it into place after pulling out of the water. But this is a guess, and it probably would have required rollers to work.
Go easy on the gas with this tongue extension, though, or you’ll split the lumber. I wouldn’t try using this wooden version for any trailer over 2,000 lbs. Steel could be made stronger, but heavier, and it is plenty heavy enough as it is. Also, this extension is a whopping 17 feet long when assembled, so it is nice to be able to easily pull a few bolts to knock it down to 10’ for cartopping. I left it one piece, and it just barely fits.
There are limitations to tongue extensions, however. They can be handy for slippery ramps, or when the water levels are so high that most of the ramp is submerged. But they do not replace a low ride height. Why? In many areas backing further into the water will get you in trouble. In many rivers it is common to have a drop-off where the ramp ends. If the trailer wheels drop off the end…well, I don’t like the idea of jacking up a trailer underwater, do you? The problem in still water is often the opposite – powerful fishing boat motors pile up sediment just behind the ramp. If you back further into this situation, you will be embedding the trailer in a muddy shoal and not getting any deeper in the water.
Worse, the extension is enough of a pain in the butt that you’ll just stop using it, thus rendering it pointless. It’s like having a motorboat with all the extra nonsense of setting up a sailing rig…only you don’t get to sail. You just get to launch. This is bad.
Rollers and Tilt Beds
The only other approach to this problem I could dream up was a setup that would allow me to winch the boat onto the trailer without backing it fully into the water. I think this is the idea behind roller bunks and tilt beds. I suspect you need the former for the latter to work, since the boat needs to slide off easily. I also suspect the geometry is pretty critical here. For example, a really tall trailer dumping a boat into really shallow water might cause the motor to hit bottom before the boat floats!
Well, I didn’t have the guts to attempt this. My quick sketches lead me to believe that roller tricks are much better suited to a trailer that is already low, and mostly avoid the need to back it as far into the water.
So I guess it’s time to bite the bullet and look at the part you’ve all been waiting for.
Trailer Widening
This is one of those jobs that is conceptually simple, but there’s a lot of work involved. Basically you are rebuilding the trailer from scratch. In fact, building from scratch would be easier! We’re just saving on the steel bill. Not much either, since scrap steel to start from scratch might be only $150 or so, and an axle kit from ABC Trailer Supply is around $225 last I checked. But sometimes we need to take the po’ boy approach.
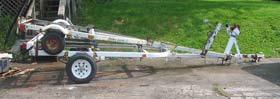
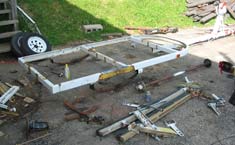
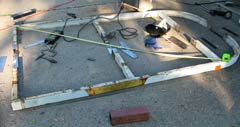
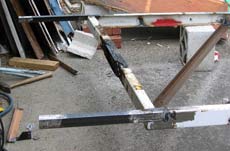
First we need to unload it. This is somewhat easier, since it is a tilt trailer.
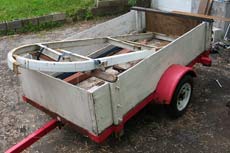
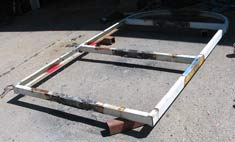
I forgot to take a picture of the unloaded trailer before starting, but here’s one with another small boat trailer on it. It should give you some idea.
Before we cut anything, let’s get some measurements.
Re-designing
To know what we need to change, we need an accurate picture of what we have. You will at a minimum need heights and fore and aft measurements between the winch post, axle, forward spring hanger and aft spring hanger.

I think it is easiest to draw a profile to scale to capture all of this. Then we can use it to take actual measurements, like how low will the stern drag if I use 8” wheels.
If you are starting from scratch it is a good idea to make a plan drawing as well. In my case this was unnecessary, since I was only adding joints near the middle in a rather straightforward way. But you will need to measure the maximum bottom width of the boat to figure out how wide the frame should be. A few extra inches isn’t a bad thing, particularly on a long trailer where you will need trusses to stiffen the sides. Either way, try to stick with standard widths. This makes it easier to buy an axle if you need to. In my case the frame will be 60” wide, which is a standard width for axles (58” between spring perches, on center). In my case, this means lengthening three transverse channels and one axle, each by a foot. But as always, there’s more.
Another problem this trailer has is that it isn’t really long enough. The extreme aft end is still around 8” forward of the motor well bulkhead. Really the transom should be supported, since that is where the motor’s weight is. I thought about incorporating a longer tongue, but I couldn’t find a suitable piece of scrap steel. So I’ll have to do something to extend the rear instead. We’ll get to that later.
This raises a different question about the tongue. Do I keep the tilt function or get rid of it to make the trailer flatter? Well, the tilt is sometimes nice when loading a boat from the lawn after repainting the bottom. In the scale drawing above I determined that it would have little effect on how level the rig rides—right now the frame rides slightly stern-up, and it will slightly stern down after moving the axle above the springs. I decided to keep the same tongue arrangement.
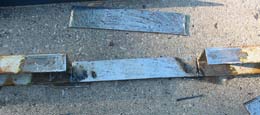
Scrap steel
Now we get to what might be the hardest part. You need to find steel that is a pretty close match for your transverse channels and axle. If you can’t do that, you will have to fabricate something, which is more work.
I thought I got lucky and found some 3” square tubing that was a pretty good match for three of the four channels I had to cut. My idea was to cut off some excess to turn it into channel. Unfortunately I hadn’t noticed that the tubing was a 1/4” wall thickness and the channel was 3/16”. It is probably better to keep it consistent to avoid stress risers, so I had to build channel out of plate steel.
I could have done some blacksmithing to make a replica of the channel on the trailer, but it seems a lot easier to weld flat panels together. If you go that route, I would deliberately leave an extra flange to avoid welding an outside corner. The scrap plate is cheap enough, but this approach uses more cutoff wheels, welding rods and time.
I had to do something similar with the axle using ¼” steel plate. We’ll get to the details on these below.
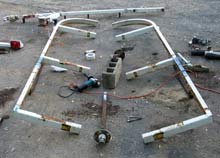
Disassembly
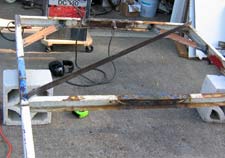
First we need to remove everything that’s removable. The springs are still on here, but you get the idea.
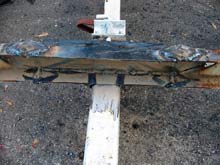
Then we cut off the tongue’s tilt channel. Those welds don’t go all the way through, so we just need to carefully cut the bead. “Carefully” because this is like using a chain saw. When the frame starts to shift it can grab the cutoff wheel, and then bad things happen. Make sure everything is supported so it will not move far, and so the pieces will move apart rather than together.
This is a fine time to buy a full face shield if you haven’t already. If you’re too cheap for that, use your welding helmet and take out the dark glass. There should be a clear glass cover plate to keep spatter off of it. If there’s not, get one. Those are under $2, which is quite a bargain for not launching bits of broken cutoff wheel into your sinuses. Scared yet? Good. It’s healthy. That said, I did shatter a wheel in this process. The name-brand wheels have strong fiber reinforcement and tend to hold together long enough to shut off the tool. Mine did and nothing hit my face shield. But they don’t always hold together so well, and I’m glad I had it on.
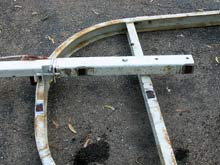
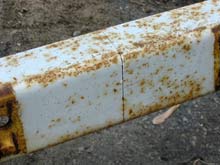
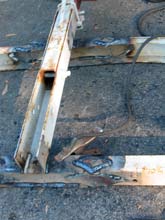
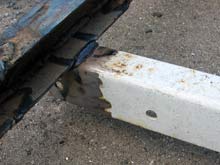
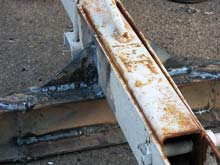
Then we mark nice, square lines in the center of the axle and transverse channels. Notice that I left the white paint on, since it made for a nice mark to follow. Marking on bare metal requires a soapstone marker (hard to see), pencil (comes off easily), or a permanent marker (doesn’t stick as well as you’d think). I use soapstone on rusty metal, but for bare metal or dark paint I hit it with some quick-drying flat white spray lacquer, mark it in fine permanent marker, and cut it.
Then we cut ‘em.
While you’re at it, remove as much old paint as possible near the welds to avoid the fumes mentioned in the welding 101 article. The paint comes off quick enough when you grind the steel clean for welding. And exception is the thick industrial enamel on some scrap and trailers. It gums up most grinding wheels, but cutoff wheels seem to do better. If it is really gummy stuff, I sometimes use a blowtorch to make it brittle and ashy. Then it grinds off easily.
In any case you’ll want a respirator or at least a powerful fan, since lead content is probable in such enamel. Another approach would be chemical paint stripper, which is handy in corners where you can’t fit a wheel in. Either way it is better to get it all removed on both sides wherever welding heat will later be burning the paint. I missed a few spots, and I can tell you it was not pleasant or healthy. (I forgot about that “both sides” part with the paint removal.)
See how this is basically starting from scratch?
I had to load it up and move it to my parents’ place, where the welder is.
Transverse Channels
Start with the main frame rectangle, since it is less critical than the axle. I started by tack welding all four transverse additions on a flat concrete apron. Remember how I’m doing this all with plate steel? The trick is getting the ends to match up correctly. I did this by tack welding all the panels in place on the trailer frame before welding them together to form channels. Here is the first step of tack welding the top flanges.
Notice how I kept things aligned. I slipped spacers under the joints where necessary to keep everything in the same plane. I was assuming that the concrete slab was flat, though I probably should have checked it with string before making that assumption. Fortunately it turned out to be close enough.
Then we tack in the webs. Some grinding was necessary to get them fit in and up against the flanges I had just tacked. These things are never quite perfect. Just be sure to test fit, because you would rather grind off some metal than to try to make welds that fill lots of empty space. Such joints are easy to burn holes in and require very low amperages. By the way, I didn’t actually clamp these in place – just held them by hand while tacking.
And then we tack in the top flanges. I did this by flipping the frame over. It is a lot easier to weld down than up, and your welds will be stronger and look nicer. Ditto on grinding for fit.
This entire process is a lot easier if your trailer is built from “normal” hot rolled channel. Scrap of this sort is far more common. Here’s a section view of normal channel in the schooner trailer.
See the difference? But stamped channel appears to be rather common on boat trailers, so I guess we might as well get used to it. But I would have saved 16 feet of welding with matching channels, which is probably a couple pounds of electrode and a couple hours of time.
Whatever kind of channel you have, don’t finish those welds until you make a lot of measurements and are certain everything is correct. Especially measure corner to corner to make sure you have a rectangle and not a parallelogram. Then I complete the welds.
Take note that I flipped the assembly again to finish.
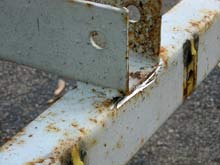
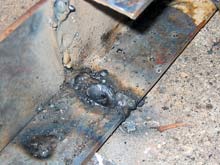
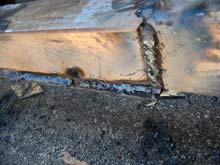
Look at the weld penetration on the outside. The metal is well-heated, and the filler is peeking through in most places. But not too much, since we need to grind it flat.
We need them ground flat to add diamond patches. We need the patches because the weld is always weaker than the parent metal. They need to be reinforced.
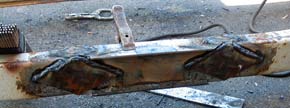
The diamond shape provides the maximum strength right at the joint, then tapers it down to nothing. This avoids an abrupt change in strength and stiffness, which is likely to end up being a fatigue point. By the way, cutting these patches is a job you can do ahead of time on a rainy day, or fit in on a weekday evening.

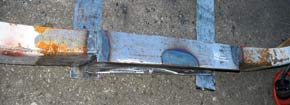
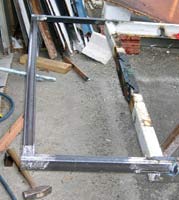
So here’s our main frame.
Time to put the tongue back on.
The tongue
First measure from the sides to get the rear end of the tongue centered. Make some alignment marks and clamp the tongue so it lands on them. Then measure to be sure the coupler is equidistant from the front spring hanger holes.
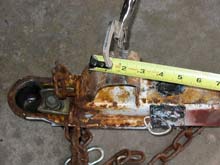
I clamped the tape measure right on one of its rivets to it could pivot. That way I wouldn’t need help for all this boring measuring and re-measuring. If this is wrong your trailer will not track straight no matter what you do, so get it right.
Once you have everything perfect, tack weld only the rear attachment then re-measure! You might need to adjust a little. When it’s perfect again, tack weld the front attachment. Then re-measure! Yes, it’s that important. Complete the welds when you’re sure. It is not a bad idea to take a break, come back to it and re-measure before finishing the welds.
Sorry about the blurry photo. You’ll get a better view in a minute. But first let’s flip the frame and weld the other side of the tongue channel.
That brings the frame back to where it started, but wider. But we’re going to make it better than it was before.
Gussets
Gussets are a way of transmitting diagonal loads to keep square things square. It’s obvious when you think about it. A square can fold up into a parallelogram if the joints get flexible. A triangle cannot. So we use triangle to strengthen square structures.
First, on a small scale, I also added a couple triangular gussets to reinforce the tongue.
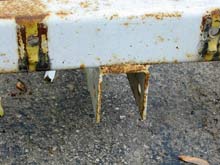
They probably should have done it this way from the beginning. They probably should have used some other gussets too. This frame has always twisted very noticeably. Here are two images with my dad putting the weight of one leg on one side of the rear of the frame, then the other.
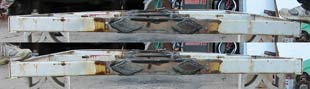
It I support the frame where the axle would go and put my full 185 lbs on one rear corner, that corner drops 1”. One might think that all small boat trailers are floppy, but that little Shore Land’r trailer you saw riding on top of this was very stiff! Better design, I guess. Anyway, a floppy trailer ends up relying on the boat to stiffen it, so this motion represents loads that get transferred to the hull. Such motion can also ultimately fatigue the metal and cause cracks. Let’s see if we can reduce it.
A useful observation here is that my lightly-built utility trailer has almost no twist, even before I added the box. (You saw that one above, carrying the pieces of the boat trailer.) The difference is that it has a steel plate deck welded to the frame all around. Why does this matter? Because the diagonals cannot stretch on the top surface anymore. This is what engineers means when they refer to a “stressed skin panel”. The frame doesn’t need to be as strong or heavy (or expensive) if a skin is holding it in its proper orientation diagonally. Much like the web of the channels holds the flanges in their proper relationship, so the flanges can take most of the load.
So how to we get this effect in a boat trailer? For a flattie like this boat we could mount a big plywood flatbed deck, but this is not what most folks want on a boat trailer. We want to be able to wash the hull and let it dry easily on the trailer, and a deck precludes this. The next best thing is diagonal gussets.
However after welding in two of these I repeated the same test. No change!! The gussets just went up and down along with the corner. Either we needed a bigger triangle or much stiffer steel. I tested that theory.
Aha! The frame flexed about half as much with this kind of diagonal attached. So here it is redone to be more out of the way. After putting these diagonals on both the frame rectangles the flex was reduced about 30%. Not great, but better than nothing.
In this case they are cheaply and easily made from some bedframe angle I saved from the trash. Just be sure to keep an eye on bedframe steel – it can be very brittle compared to typical mild steel.
Now let’s look at the rear of the trailer.
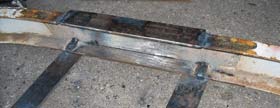
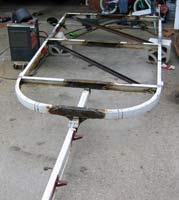
Stern Add-on
We should add something to support the motor’s weight. You could view this part of the trailer in two ways. On one hand it will take quite a beating, with the motor’s weight hammering on it whenever you tow it. On the other hand, anything is better than nothing, which is what has been supporting the stern. I thought about simply extending wooden bunks, but I wanted to use 2x4s on the flat, so they would probably be too flexible. So I welded something together out of more of that bedframe angle.
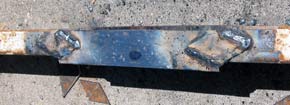
There was no real design process except that I knew I needed about 18” of support. So first I cut two 24” angles and welded them to the top rear of the frame with 18” cantilevered out the rear.
Then I added an aft crosspiece cut to the same width as the rear of the frame.
Finally I added some diagonal buttresses. I have no idea whether an architectural term like “buttress” is appropriate to a trailer.

These last two pieces involved a bit more cutting because the spines of the angles had to be slit at the right spots. It’s not hard though – just a matter of holding it up to the work and marking it. It probably would have worked fine if I had only welded the web and left the flange hanging, but this should be somewhat stronger for almost no gain in weight.
We haven’t talked about the axle yet, but let’s skip ahead.
Well, that finishes the frame. This part soaked up about two weekends and 6 lbs of welding rod.
Remember how I said you should stick with standard axle widths? This is because you should really buy an axle. Widening an axle is difficult and not especially cost effective for a small trailer. Next month we’ll look at why. We’ll also look at reassembly and setup.
Rob Rohde-Szudy
Madison, Wisconsin, USA
robrohdeszudy@yahoo.com
|