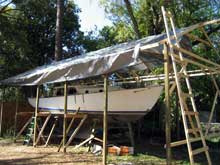
Everyone with a boat needs a boat shed. Whether you’re just parking with the trailer between weekends, holing up for the off-season, building anew, or performing a major restoration, you need a boat shed. My case definitely qualifies as the last instance. Though my little 1959 Flying Scot on its trailer hides under the wing of the ‘big boat’ the shed is without a doubt the domain of my 1963 Islander 32.
As unpleasant as it can be to do major boat work with the constant threat of rain and leaves, it is equally pleasurable to have your craft nicely tucked in under a roof, each raindrop a victory, each leaf sliding to the wayside a celebration of the shed. Even before I had tracked down my big project boat I had already planned out the shed, several in fact.
 |
Everyone with a boat needs a boat shed. Whether you’re just parking with the trailer between weekends, holing up for the off-season, building anew, or performing a major restoration, you need a boat shed.
click images to enlarge |
There are as many ways to cover your boat as there are ways to tie a bowline. On the most basic end you can simply toss a tarp over things. Of course you’ve got to take it off each time you want to work on the boat, it looks like a FEMA disaster site, and you can’t work in inclement weather. A tarp doesn’t get any cheaper, and for a basically sound trailer boat with only occasional need for work this is a workable solution. Next step up is to buy a car shelter or RV shelter. These are usually mild steel tubing with a fitted tarp. They come in all kinds of sizes and are cheap too. Of course I’ve seen more of these frames with tattered bits of tarp hanging off of them than I have seen complete examples but they must work for someone.
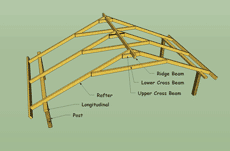
After this we get into more deliberate shelters. There are bow sheds like the designs from Stimson Marine (https://www.by-the-sea.com/stimsonmarine/), I’ve head a lot of good things about these and I would consider one if I was in a place with any kind of snow. Here in Florida ventilation is more important than a roof that sheds the white stuff. I needed something with open sides. There are a couple of good examples in amateur boat building books of boat sheds you can build on the cheap. George Buehler’s “Buehler’s Backyard Boat Building” has one anyone could put up and with a couple of pin-ups on the walls and an easy chair it would be just about ideal (as George says.) Reuel Parker has another great one in his “The New Cold Molded Boatbuilding” that one is specifically suited to my Florida weather as well. Ultimately I designed my own with those two and some others for influence. I wanted the vertical members to be in the ground to provide rigidity to the structure and I wanted it to be as open as possible without a lot of verticals getting in the way of bringing materials in.
You don’t need any tools or skills for a shed that you won’t need for the boat too. A saw to cut the lumber, a drill to drive the screws, a level to level, and a post hole digger is about it. A circular saw is needed to make the standing cuts of the posts though a chop saw works everywhere else and a jig saw is used for the rafter notches. The level and the post hole digger probably aren’t in your boat tool kit but check the garage, they’re probably in there. A very tall ladder will be needed, tall enough to reach the peak of your shed. Ladders this large are expensive and can be rented, or you can build a serviceable ladder from two sixteen foot two-by-fours and two-by-four rungs, this is a very heavy ladder and might need two to maneuver it around. Materials are all lumber yard stuff, in fact its probably worth the fifty bucks to have the yard deliver the materials. I don’t know what you drive, but my little truck can’t take more than a couple sixteen foot four-by-fours strapped to the tailgate and the roof at a time. The delivery guy unloaded them with the coolest fork-lift I’ve ever seen, it could carry a load and crab along sideways and spin in place. The lumber was neatly stacked right where I needed it. Fasteners could be nails but screws are a better choice. A nail gun would have sped things up a bit, but only a bit, the screws are stronger, and allow the whole deal to be taken down in a few years when the boat is finished. The preservatives in pressure treated lumber are changing over now to a copper based type and treated screws are now required for pressure treated lumber to avoid drastic corrosion. They will be probably be labeled ‘deck screws’ and the package will indicate they are okay for pressure treated lumber. I used the same 3 inch number 10 screws for the whole shed.
I can offer a few tips on site selection for your boat project and shed. Take a careful and through look at any overhanging trees. Any branch that looks like it may come down in twice your planned project duration should be taken out now before it drops through your tarp roof in the middle of a storm. Make an honest estimation of how long the boat will be in the yard, double that and start thinking about how big that sapling you just missed getting the boat in will be in that time. It is easier to take it out now. Build the shed after the boat has been delivered and set up. It is a lot easier for the boat mover to back the trailer in if he isn’t trying to hit an exact target. The deck makes an excellent spot to set rafters and otherwise work on the shed erection.
There is never any point in getting hurt on a project, this is supposed to be fun! Erecting the shed will involve a lot of overhead lifting, balancing, and fastening; much if it done from the tops of very tall ladders. There is always the possibility of something giving way or otherwise coming down unexpectedly. Assume that things will break, swing, or fall and always know what is overhead. Ladders are about the most dangerous tool you’ll ever use so get someone to hold the bottom and on the uneven ground make doubly sure it is well set before ascending. A hardhat isn’t very yare but it is a good idea.
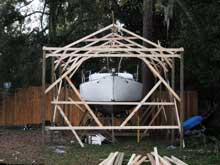
First consideration is size. Obviously it needs to be as long as the boat plus a couple of feet. Since I was using eight foot bays for the longitudinal sections I went with a 40 foot shed. Width is pretty easy too, if you have another place for tools and just need to cover the boat then about three feet on each side is perfect. With 10 feet of beam I got a shed 16 feet wide. You could go wider if you wanted to keep a lot of materials or work areas around the boat but remember that there is a lot of space fore and aft where there isn’t a lot of boat in the way. There is a good reason not to go too wide, which we’ll get to in a minute. Height at the peak should be taller than the boat by at least enough that you can stand in the cockpit and crawl on the highest part of the deck. Just a foot or two off is the minimum but at this height the sloping roof will come down over the side decks like a pulled down fedora. Let me suggest that high enough to walk on the side decks is a very comfortable height. I built mine to 12 feet at the posts and 16 feet at the peak. This provides full standing height anywhere on the boat. If I had to do it over I would go a foot or even two shorter. The room is wonderful and the breeze blows through perfectly, but my side decks get wet in the rain and reducing the visual mass would have been better as well.
| First consideration is size. Obviously it needs to be as long as the boat plus a couple of feet. Since I was using eight foot bays for the longitudinal sections I went with a 40 foot shed. |
 |
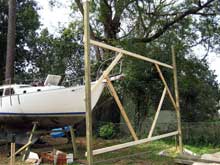
For the basic structure you can do the lay using batter boards and string or just lay a long measuring tape along the ground in the right spot and start digging next to it. Layout the post locations so that the outside of each side is the full distance to the outside of the other side’s post rather than a center-to-center measurement this will make sure your braces cover the full face rather than land half way across. This is a good time to point out (and just keep telling yourself this) that it’s a boat shed and not a boat so try not to get hung up on getting everything perfect, even an inch or two off isn’t a big deal. I’m not advocating sloppy work, but the important thing here is to get a roof up so the boat work can start, not have every single connection come out perfectly. In the course of my shed going up there were a few places where things were off by a couple of inches but the design was such that this wasn’t important, the real surprise was how close things came out. If you are a builder or furniture maker then this will be a terribly frustrating concept to grasp but trust me, the shed won’t fall down, and the tarp will still keep the rain off even if you’re off by feet, so don’t sweat it. In fact this may be an opportunity to be liberated from square corners, level structures, and any semblance of symmetry because boats don’t have any of that either.
I laid out and dug post holes, about two or three feet deep at the corners and every eight feet along the side walls. This gave me twelve holes around my 16 by 40 foot shed foot print. Into these went 16 foot pressure treated four-by-fours. Any lumber that will be in contact with the ground will need to be pressure treated, the rest can be standard if this is a temporary shed, pressure treated would be better for the parts that will be open to the elements. If for some reason you can’t sink posts into the ground then you can lay a pressure treated two-by-four sill along the ground and plant your posts on those with screws and diagonal bracing.
 |
Any lumber that will be in contact with the ground will need to be pressure treated, the rest can be standard if this is a temporary shed, pressure treated would be better for the parts that will be open to the elements. |
Once the posts were up and braced level and plumb the holes were filled in and tamped, no concrete was used. One post was chosen as a reference and a mark was made at 12’ above the ground. This next part would have been much easier with a laser level; you’ve got to carry that mark all the way around to each post. You can’t just measure up from the ground because it will be different on each post since the ground isn’t level. I used a sixteen foot two-by-four and clamped it in place on the reference line and with a four foot level on top moved the other end up and down until it was level along the next two posts and simply carried my mark around that way. Since you’ll be up on the ladder against posts that are otherwise not connected to anything you’ll need substantial diagonal bracing from the post to the ground in order to keep things plumb and level as you put your weight on post.
| Once the posts were up and braced level and plumb the holes were filled in and tamped, no concrete was used. One post was chosen as a reference and a mark was made at 12’ above the ground. |
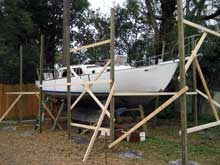 |
With the posts in place and well braced you’ll cut off the posts at the level marks you made. Now run two-by-fours around the flat top of the posts to tie things together and provide a place for the rafters to rest. They go on their face on top of the posts rather than on their edge, 8 feet is a wide span for a flat two-by-four but there won’t be any real weight from the roof. If you’re using a heavier roof or if you have some extra 4-bys around then use them, it won’t hurt anything.
 |
With the posts in place and well braced you’ll cut off the posts at the level marks you made. Now run two-by-fours around the flat top of the posts to tie things together and provide a place for the rafters to rest. |
At this point you better know how big your tarp is going to be. Don’t mess with blue or green tarps, or greenhouse plastic, just pony up for a silver one. I have the ‘heavy-duty’ silver from Harbor Freight (www.harborfreight.com), eighty bucks and it has been up for over a year. There are a few quarter sized holes from where the overhanging oak tree has shed some branches. The one hole that was over the boat has been taped up and is holding fine. The silver tarps offer a nice cool shed as well, I can’t image trying to complete the entire project basking in that blue tarp-light, it would make any kind of color work impossible!
The rafters are assembled on the ground. The trick to the rafters is that they need to be longer than the tarp is on each side. With my 20’ tarp I needed 10’ rafters. This works because the tarps are a nominal size and are about six inches smaller than they claim to be, just like the lumber is smaller than the nominal, go figure. Assemble the rafters on the ground, cut out notches for where they will hit the longitudinals connecting the posts and leave space for a longitudinal beam running down the peak. These notches are best laid out with a scrap of two-by-four for the shape and jigsaw for the cut. Use two cross pieces of two-by-four, one just under the peak to support the ridge beam and tie the two rafters together since they aren’t touching, and one about half way down. If there are corners from these cross pieces sticking beyond the edge of the rafters, cut them off. Once one rafter is complete with notches and braces you can use it as a pattern and lay subsequent materials on top of it for marking, cutting and assembly. Remember the rafters don’t need to be precisely measured in any way except the notches should hit the longitudinals, and the peak needs to be open enough to accept the ridge beam. If you assemble one on top of another then they’ll look just fine. You’ll need enough rafters to have one every four feet.
| The rafters are assembled on the ground. The trick to the rafters is that they need to be longer than the tarp is on each side. With my 20’ tarp I needed 10’ rafters. |
 |
Maybe a tarp sounds sort of cut rate to some people but there is a reason not to mess with something more substantial. The step up from a tarp would probably be some plywood. Getting that plywood up and secured would mean climbing up on top of the roof, something I’d rather not do; it would mean another day of shed work rather than boat work; and it would cost considerably more. Just to put the plywood idea to rest let’s think for a moment about the additional weight and stiffness the plywood would impart. In a big wind that tarp is going to shred and carry away long before it brings the shed down, I think a plywood roof would probably bring the whole kit and caboodle down on top of my precious boat. If I know a hurricane is on its way I can bring the tarp in ahead of the storm. It seems that most people go through about a tarp a year, some lost to storms, some to UV degradation, but like I said, mine is about a year old and still going strong having weathered several storms and numerous large branches falling on it.
Getting the rafters in place is part strong-man routine and part balancing act. You’ll need a partner or maybe more for this. This is where you really notice how much easier it is to build a shed around a boat rather than try to fit a boat into an already built shed. Lift the rafters into position and screw them into the longitudinals on top of the posts. With the rafters in their position run diagonals from the posts to the rafters that are on top of the posts. They should be stable enough balancing up there to stand by themselves with little or no bracing. Placing the ridge beam is about the hardest part since it needs to go up and over the whole deal to get into the notches. I did it with two beams and jointed them with a butt block once they were in place.
 |
Getting the rafters in place is part strong-man routine and part balancing act. You’ll need a partner or maybe more for this. |
The last piece of structure is to run another set of longitudinals along the outside of the rafter ends. This two-by-four will be the tie off for the tarp roof. If you’ve followed my advice the errors are starting to pile up and these longitudinals aren’t hitting the ends of each rafter. No big deal, it’ll still keep the rain off.
Getting the tarp in place is either harder than it looks or easier than you think it is depending on your point of view. First take another look over each rafter for any protruding edges, points, giant splinters, screws, or anything else that could snag and hole the tarp. This next bit of advice is very important so don’t skip it. You’re going to need to run a strip of carpet, about a foot or so wide down the top of the ridge to provide a smooth and soft place at the peak where a lot of the pressure is going to be on the tarp. Anyone who deals in carpet will have more than you need free for the taking. Bring a utility knife so you can cut out just what you need and not take home a thousand square feet of moldy rotten carpet. Attach the carpet by folding it over and nail on the side of the ridge.
| Getting the tarp in place is either harder than it looks or easier than you think it is depending on your point of view. |
|
With the carpet in place you’re ready to lift the tarp in place. You’ve noticed that a tarp of this size is very heavy and even more unwieldy but there is a simple way to get it over the structure. Go ahead and unfold it into an accordion running the length of the shed on one side, flaked down like a sail, or otherwise basically able to run free. Tie some line long enough to go completely over the shed to every other grommet on one side and toss it over. Now, slowly and evenly alternate between pulling lines and hand feeding the tarp up and over. The longitudinals on the ends of the rafters create a smooth edge to slide over and since the tarp will hang inside rather than over them they won’t create low spots to trap water on the tarp. Take your time and get help to ease the tarp into position. Once it is up just use some light gauge line through each grommet to lace the tarp in place as tight as you can without tearing out the grommets. You can use bungees but the cheap rubber ones degrade in the UV (I tried them first and oddly the ones in the shade degraded and broke within a few months, but the ones in the sun are still going strong) and the cloth covered ones fall apart too. Best use some light nylon you’ve probably got laying around.
At this point you’re done with the basic shed and can add any bracing you like, diagonals from post to post, crosswise connections between posts, or diagonals from rafter to rafter will all stiffen up the shed considerable.
Now sit under the roof and listen the thousand tiny victories as each leaf hits the tarp with a thud and slides off to oblivion. This is the basic boat shed, keeps the project clean and dry, drives the neighbors nuts, and in my opinion looks pretty good too.
The real boon however is what you can add to the shed. If this is going to be any kind of serious restoration you need staging. Staging is a cat walk encircling the boat right about at the water line or wherever gives you a comfortable downhand position to work on the deck. This is easily build with two-by-sixes running horizontal from the posts inward to within an inch or so of the hull, braced diagonally to the posts with two-by-fours. Ideally you’d use three-by-twelves for the catwalk over these, but I’ve got two-by-sixes, and they serve though they do flex a disconcerting amount.
I can’t image trying to do serious boat work out in the open anymore. Systems, interior, even a weekend paint job okay, but my project is a bilge up complete restoration and a boat shed is simply essential. Total costs were about five hundred dollars for the lumber, tarp, and screws. Construction took about four man days, my buddy Tim and I working for two full days. The entire thing is fastened with three inch decking screws and could be taken down just as easily as it went up by removing the screws. The posts have another life coming as raised garden beds. If you wanted to get really fancy you could hang up some shop lights, build some stairs, or even add a deck to the staging at the bow for a substantial boat level work area, but at some point you’ve got to start working on the boat!
More Articles by Boat Sheds:
|