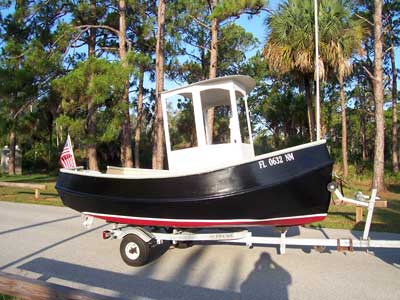
Mike Gill is an amateur small boat designer and like many of us, has no formal naval engineering background. But he has designed a cute little boat and has generously agreed to offer the plans for free here. See yesterday's article "The Launch at Koreshan State Park" as well as "Patricia Ann - A 12 ft. Pocket Tug" for more information. All you need to build this boat is in the zipped folder which you can download for free by clicking HERE.
Included in the zipped folder are:
- 13 construction photos
- 9 drawings or dimentioned photos
- the building sequence
Photos:

Hull panels and transom cutout and ready to be stitched together. |
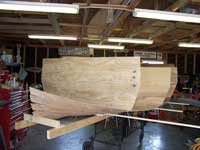
Bow, Bulkhead detail as hull is assembled. |
Hull panels, bulkheads stitched together. |
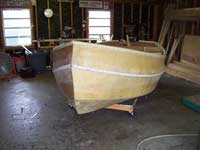
Hull glassed, PVC pipe rails being installed. |
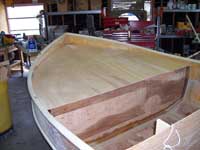
Fordeck fitted. |
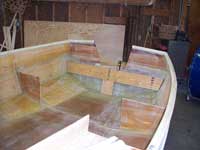
Wheelhouse foundation ready for epoxy and tape. |
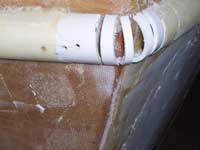
PVC rail corner before epoxy. |

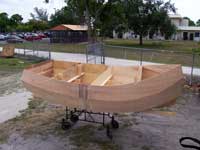
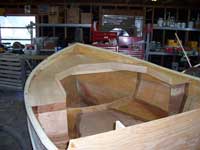
Hull ready for wheelhouse, bench seats. |
Transom detail, 2x6 support ready for taping. |

Wheelhouse stitched for taping. |

Wheelhouse construction. |
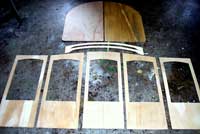
Wheelhouse pieces. |

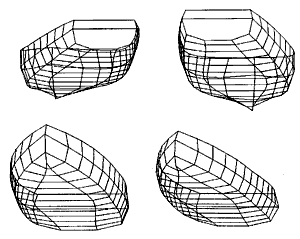
Painted and ready for launch |
click images to enlarge |
Drawings:

Here is the suggested building sequence:
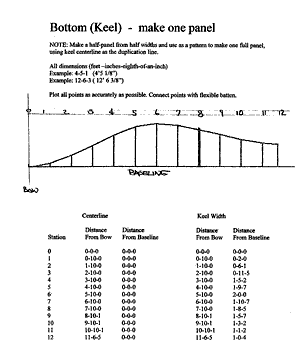
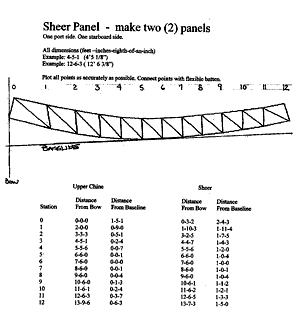
- Loft bottom (keel) panel. Mark centerline and all station lines boldly. Use 14-ft flexible batten to connect loft points. Make pattern for one side of hull bottom and use to duplicate other side to assure symmetry.
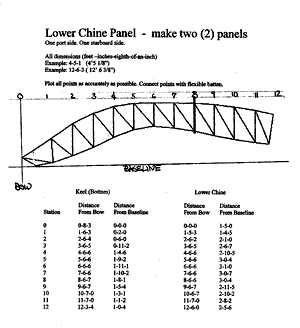
- Loft lower chine panels (port and starboard). Mark all station lines boldly.
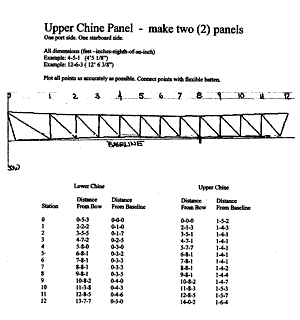
- Loft upper chine panels (port and starboard). Mark all station lines boldly.
- Loft sheer panels (port and starboard). Mark all station lines boldly.
- Loft transom. Mark centerline and all lines boldly.
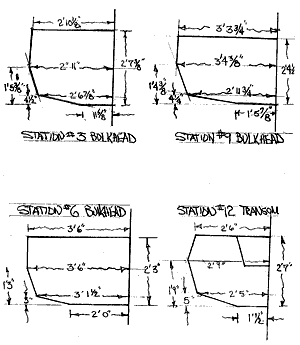
- Loft station #3 bulkhead. Mark centerline and all lines boldly.
- Loft station #6 bulkhead. Mark centerline and all lines boldly.
- Loft station #9 bulkhead. Mark centerline and all lines boldly.
- Review all lofting geometry for accuracy and cut panels. Stack-cut lower chine panels, upper chine panels and sheer panels.
- Use saber saw to make a quarter-inch cut to mark all station lines and centerline locations on the edges of all bulkheads, hull panels and transom. Use the small cuts to boldly draw station lines on both sides of ALL panels, bulkheads and transom.
- Using two layers of four-inch fiberglass cloth tape (6oz.) and epoxy, tape (splice) respective panels together on both sides.
- All panels and bulkheads should now be ready for hull assembly.
- Place bottom panel on assembly work surface and use scrap lumber to position bulkheads #3, #6 and #9 accurately in place with drywall screws. Scrap 1x2 or 1x4 pieces may be used to keep bulkheads straight, true and erect. Eliminate bends, bows and curves in bulkheads.
- Using #16 copper wire, stitch bottom chine panels in place with bottom panel. Make certain all station lines are aligned.
- Using a saber saw, cut three-inch slices from the front (stem) to station #1 to allow the wood to make the severe lower bow bend.
- Stitch the bottom bow pieces together using heavy copper wire. Take care to keep panels straight, aligned and bow stem plum with all centerlines.
- Carefully twist-tighten wire stitches pulling bottom panel and lower chine panels together. Double check alignment and station line relationships.
- Use thickened epoxy to make fillets and begin interior seam taping process. Fillets and tape should be applied at the same time to eliminate much sanding.
- Use four-inch fiberglass tape and epoxy to weld all interior seams together. Take great care to assure proper alignment of panels.
- Stitch upper chine panels to lower chine panel and bulkheads using #16 copper wire.
- Stitch transom into place using great care to assure proper alignment.
- Stitch sheer panels into place using #16 copper wire.
- Cut transom to provide proper inward angle for sheer panel.
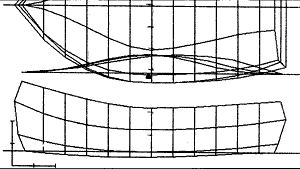
- At this time you should see the entire hull assembly.
- Begin taping all interior hull seams using two layers of four-inch fiberglass tape and epoxy.
- Apply two additional layers of tape and epoxy over all panel splice locations.
- After every interior hull seam has been welded with epoxy and tape, double check hull alignment. Look for twists and correct any abnormalities or misalignments.
- Install one and one-half-inch PVC schedule 40 cap rail. The pipe must be sliced lengthwise on a table saw to allow the pipe to slide over the sheer panel. The pipe must be sliced vertical nearly halfway through every 2 inches to allow the pipe to make the necessary bends from bow to transom.
- Using two layers of six-inch fiberglass tape, epoxy sheer cap rail into place. Double check alignment.
- Sand cap rail, checking for fiberglass splinters.
- Carefully roll hull upside down.
- Use epoxy filler to fill all cracks, holes, seams and gaps.
- Sand hull seams. Smooth and round all corners.
- Use two layers of four-inch fiberglass tape and epoxy all exterior hull seams including all bow slices.
- Sand taped seams smooth.
- Use 38 inch wide cloth and epoxy two layers of cloth over entire hull. Overlap cloth layers at both chines, bow and transom. Take care applying epoxy to avoid bubbles in cloth.
- Cut a 10-foot piece of one and one-half inch PVC schedule 40 pipe in half for keel. Tapered angles should be cut at both ends of pipe. Center half-pipe keel on centerline between stations #1 to #11. Use several temporary drywall screws to hold keel in place. Fill tapered ends with epoxy filler.
- Cut a five-foot piece of one and one-quarter inch PVC schedule 40 pipe in half for outboard keelsons. Both pieces will be used for outboard keelsons positioned between station #4 to #9. Tapered angles should be cut at both ends of pipe. The outboard keelsons should be positioned 14.5 inches from outside edge of center keel. two identical pieces of scrap strips of wood 14.5 inches long placed between centerline keel and outboard keel as spacers will assure alignment until pipe is secured. Use a few pieces of fiberglass tape and epoxy to tack keels in place. Fill tapered ends with epoxy filler. Round edges and fiberglass with cloth and epoxy.
- Double check alignment. Remove all drywall screws. Use three layers of fiberglass tape and epoxy to encapsulate the PVC keels to the hull. The PVC pipe serves as keelson and external I beam to stiffen hull bottom. Care should be taken to make certain lamination is solid.
- Cut one and one-quarter inch PVC schedule 40 pipe in half for lower sheer rub rail. Relief cuts must be made every two inches to allow required bends in pipe.
- Using drywall screws, secure pipe rub rail in place on both sides of hull centering pipe rub rail along lower sheer seam.
- When rub rail is aligned, tack in place with fiberglass tape and epoxy.
- Remove drywall screws. Two layers of six-inch fiberglass tape and epoxy shall be used to encapsulate pvc rub rails to hull.
- Fill and sand hull smooth for paint.
- Hull may now be flipped right-side-up.
- Cap all sheer rail ends (PVC pipe) and sheer cap with epoxy filler and cover with several layers of fiberglass cloth and epoxy.
- Using 38-inch cloth, epoxy two layers of cloth to hull interior, encapsulating all wood surfaces.
- Cut four-inches from top of bulkhead at station #3 and #6 in preparation for deck.
- Cut bulkhead at station #9 to given dimensions.
- Using scrap pieces of luan, fashion pattern for one half of forward deck from bow to bulkhead at station #6 using hull centerline as splice point.
- Scribe pattern on luan and cut to fit with pattern to complete forward deck shape. Check for alignment and fit.
- Mark location of PVC forward deck bow support and epoxy into place with several layers of cloth (see photo).
- Cut second half of forward deck, mate with first half and check for fit into hull.
- When you are satisfied with fit, mark all station locations boldly on both sides of deck and splice two halves together.
- Cut five (5) pieces 22”x 4” luan for wheelhouse attachment collar. Tape together and position on deck in preparation for wheelhouse cutout location. (see photos)
- When geometry is completed for wheelhouse attachment collar, cut out deck and epoxy and tape collar into place.
- Place 1” PVC half-pipe stiffeners on underside of deck and epoxy and tape in place.
- Sand fordeck and doublecheck for proper fit.
- Fillet deck/hull seam and follow with tape and epoxy.
- Cut five (5) luan panels for wheelhouse sides. Builder may want to duct tape the panels in place to check fit, alignment and personal taste. Window size may vary. The wheelhouse should be assembled to be removed.
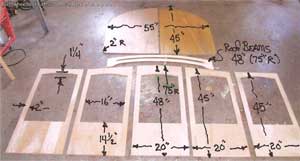
- Roof panels cut and cambered roof beams cut to fit.
- Wheelhouse panels and roof sewn together with copper wire and assembled to check fit. Trim to builder’s taste.
- Wheelhouse taped and encapsulated with epoxy and cloth in the same fashion as the hull. Wheelhouse should fit over the attachment collar like a shoebox lid.
- Cut 2x6 helm vertical support to be bolted at centerline of station #3 to receive ship’s wheel. Cut to desired height and round top. Steering pulleys and cable system may now be aligned and temporarily located.
- Cut and fit 2x6 transom support and motor mount. Epoxy and encapsulate with cloth. Drain hole and plug installed through bottom of 2x6 vertical support between motor mount and hull bottom.
- Cut and fit 2x6 cockpit bench seats. Bench seats to span between bulkhead #6 and transom with bulkhead #9 cut to support middle of bench. Each bench comprised of three pieces of 2x6 spaced ¾ inch apart. 2x4 rails bolted to bulkhead #6 to support bench. Aft end of benches supported by transom motor mount span.
- Sand hull and prep for paint. Interior of hull coated with two-part epoxy garage floor paint kit from Home Depot.
- Exterior hull painted with Petit Easypoxy (Gloss Black) product. Deck painted with beige acrylic latex house paint. Wheelhouse painted with Petit Easypoxy (Gloss White).
- Tug is designed for no more than 10 horsepower outboard.
*****
|