| ... and Daggerboards
There are many ways to build dagger boards and rudders.
Some are already show in Duckworks Magazine (see links
at end of article). I am a multihull designer/builder
who built, I do not know how many rudders and boards.
I was trying all sorts of building methods, plywood
glued together, foam sandwich, building them up from
wooden pieces. But all of them needed a lot of hours.
Till I found this way. I prefer this method over all
the others I have tried out. Because the construction
time is short. The boards or rudders are light and
strong. The surface is smooth and maintains the chosen
section over the whole length. They can be made in
the shape of any section.
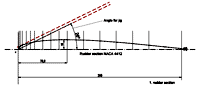
The example shown is for a NACA 4412 section. The
picture shows one of the rudders for our PELICAN catamaran
which is 10,50 m long. And the drawing examples are
from the KD 860 plans.
 |
Picture 1. PELICAN
rudder, length 2,2 m |
Start by choosing a suitable rudder board section.
In the example the NACA 4412 section was chosen. The
rudder cord is 260mm. Because of this small chord
only one stringer is used. If the chord is more as
300 mm a second stringer must be used at 2/3 of the
chord. To begin, draw the section to scale and determine
the angle for the jig flanks. The plywood planking
must just touch the leading edge as shown.
 |
The drawing
examples are from the KD 860 plans. |
Determine the length of the rudder. This will be
the length of the jig. In this case the jig is 1470
mm long. The flanks are spaced 300mm from each other,
so you will need 6 flanks. Make them from plywood
or particle board. For dimensions see jig drawing
upper left. Build the jig base according to the drawing
3. Build it up on a strong base. Again we used particle
board.
 |
Drawing 2: rudder
example |
The dimensions of the jig corner pieces and inner
wood pieces are only examples. But use strong and
straight lumber. Cut out the sides of the rudder.
Use good quality 4 mm plywood. For dimensions see
drawing 2. Scarf the trailing edge as shown in the
drawing. Each side must be 1,5 mm thick at the end.
This can best be done with an electric planer.
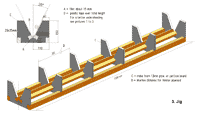 |
Drawing 3: Jig |
Mark the position of the stringer(s). Chamfer the
corners of the stringer. Use good quality Spruce for
this part. Mark the position of the stringers on the
outside of the panels (center). Drill 2 mm pilot holes.
About 200 mm apart. Glue the stringers to one side.
Check for correct distance in relation to the leading
edge. Fasten with small nails. Remove the nails after
curing. Apply epoxy to what will be the inside of
the rudder panels. Stick the two panels, at which
will be the leading edge, with heavy plastic tape
together. Place the panels in the jig and push them
to the sides of the flanges
 |
Picture 2. Dry
run of the side panels. Observe plastic tape
on the end and the panel leading edge. |
Use the inner pieces of the flanges as wedges. Before
applying plastic tape around the corners of the wedges.
Close the front and back end of the panels at the
leading edge with plastic tape. Mark the height for
the epoxy mix. Make a mix of epoxy, micro spheres
and fused silica. Place the jig level in both axes.
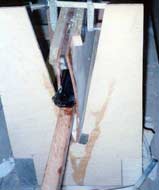
Fill in the epoxy mix (see picture 3). Any spilled
epoxy has to be removed. Watch for correct height
(15 mm).
 |
Picture 3. Filling
the leading edge with epoxy mix. |
Let the epoxy mix properly cure. Prepare 25 x 25
mm lumber as long as the rudder to close the trailing
edge. Close the rudder with clamps and the lumber
in between (see picture 4 and 5) and check for a good
fit. Do this as a dry run. Open the rudder again and
correct if necessary. Prepare two UD carbon strips
( 400 gr/m2 ). Wide 50 mm, as long as the rudder.
(See picture 4)
Apply epoxy glue to the gluing surfaces leading edge
stringer(s) and to the sides that the UD carbon strips
have to be glued to. Apply epoxy to the carbon strip.
Now partly close the dagger board. Place the carbon
strips as shown in the drawing 2. Watch that these
are bonded also to the sides. Eventually you have
to close the sides a bit more.
When you are sure the carbon strips are in the right
position, apply epoxy glue to the trailing edge area
and close the dagger board with the lumber and clamps
(see pictures 4 and 5).
 |
Picture 4. Detail
of closed rudder. |
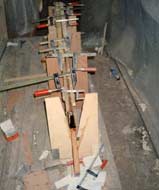 |
Picture 5. Rudder
closed. |
Screw the stringer(s) down. Use the pilot holes
to do so. Let cure properly. Remove the clamps and
lumber. Remove the rudder from the jig. Remove the
plastic tape on the leading edge. Trim the leading
edge. Round off the trailing edge to the correct radius.
Remove all screws and nails. Close the lower and upper
part of the rudder with a 8 mm plywood piece. Close
it on the inside! Fill all nicks, dents and screw
holes with epoxy putty. Apply 2 layers of 220 grams/m2
glass cloth. Fill the glass structure with thin epoxy
putty and sand down to a smooth surface without sanding
in the glass fiber. Apply primer and paint.
Finish the rudder otherwise according to the original
drawing. We use this system for building rudders and
boards for catamarans form 5,5 m
onwards for more as 22 years. All builders found this
way the simplest to build. No customer reported any
failure over all the years. The load on lee boards
is very high. Use the next thicker section as the
designer specified. The boards will be anyway lighter
as on the plans.
Bernd Kohler
ikarus342000.com

More Articles about Rudders
|