| Canoe sailors often deride sails
like the Lateen or the Chinese Junk for having one
tack less efficient than the other but they are quite
happy to sail with the leeboard on one side only –
creating far greater efficiency losses.
The Niblett Semi-Automatic Leeboard system is designed
to make tacking easier and reduce leeway when compared
to the throw-over type, while retaining the efficiency
of always having the leeboard on the lee side rather
than bolted permanently to one side of the boat. Although
this was designed with a canoe in mind it would work
just as well on a Dory or Dinghy etc. and the shape
of the foil does not affect its operation.
 |
Figure 1 -
click image to enlarge |
The Origins of the Niblett
Semi-Automatic Leeboard System
Named after John Niblett who gave us
the original idea and his son Roy Niblett who built
the original prototypes for his sailing canoes Zahir
and Elfwyn. Roy used two stainless steel hinges per
side which, when we made my version, we decided was
over specified and I have used one hinge per side
which has proven to work just as well.
The originals were all mounted on thwarts, which
has an advantage - if you don’t want to modify
your boat you can lash or clamp it on - but my next
move was to remove the thwart and bolt directly to
the gunwales. This lightened the system, making it
look prettier and also facilitated sleeping aboard
(the fewer thwarts you have across the sleeping area
the better).
How the Semi Automatic System
Works
For the purposes of easier representation I will
describe the version with the thwart (its easier to
draw a thwart than a canoe). Looking at Fig 1 (not
to scale) you will see that there are two leeboards,
one each side (obviously). These are attached –
by pivot bolts - to cheeks which are hinged off the
thwart and connected together by the interlock. The
interlock is a doubled length of 8mm pre-stretched
rope. We did considered using a length of wood or
tube, but then it would be impossible to lift both
boards at the same time for running or landing in
shallow water.
On the water; sailing with both
boards on deck and the wind anywhere on the beam,
swing the leeside board out until it is at right angles
to the hull. The weight of the board will cause it
to drop until the tip is in the water and the boat
will make leeway approximately the length of the board.
As it does this the board will go deeper and come
to rest when it reaches the limit of the interlock.
If the interlock length is set correctly the board
will be about 4 degrees out from touching the hull.
(As shown in Fig 1).
To tack: Before you get to the turn
swing the windward board out at right angles to the
hull, leave the leeward board where it is. Make the
tack and as the wind comes onto the other side of
the sail you will notice the board - that is now on
the lee side – drop into the water and as before
come to rest against the limit of the interlock. With
the lee side board down the interlock lifts the board
on the windward side and because the boards are on
pivot bolts the windward board can then be pivoted
forward onto the deck (see fig 2).
This system doesn’t save the effort of manipulating
the boards but it saves you having to do it when you
are occupied with tacking.
How to Make Them
Materials
- 2 – Stainless steel hinges
- 1 – Thwart the same width or wider than
the hinges (if you are using a thwart)
- 2 – Cheeks the same width or wider than
the hinges
- 2 – Leeboards
- 1 – length of 8mm (or greater) pre-stretched
rope – measurement dependent on boat width
- 2 – Pivot bolts (coach bolts) stainless
- 2 – deck eyes
- 16 – c/s bolts stainless
Cheek, thwart and hinge
First you need to decide where you are going to fit
the leeboards. If you haven't yet positioned your
mast then the best place for the leeboards on a canoe
are halfway along the length (or at the widest point)
– the mast (or masts) are then fitted to suit
the leeboards rather than the other way round. The
reason for this is to reduce drag caused by water
trapped between hull and leeboard and the steering
effect of the leeboard following the line of the hull.
On a dinghy or a canoe with mast already in position
fit the leeboards in relation to the centre of effort
of the sail.
Make a thwart to sit on top of the gunwales, the
length should be the maximum width of the hull (including
outwales). Attach a stainless steel hinge to each
end – so that it can stand at right angles to
the thwart or fold back inboard as shown (see fig
4)
The thwart can be either bolted (fig 4), clamped
(fig 5) or lashed to your canoe. My first one was
bolted through the centre thwart. By simply drilling
two holes through the leeboard thwart and two corresponding
holes through the centre thwart – two 10mm bolts
were then pushed through and wing nuts tightened.
(If you choose not to use a thwart – as I now
have – make sure your hull is strong enough
to stand the strain of the loading.)
The cheeks should be made of 20mm plywood, be the
same width as the thwart and approximately 20cm tall,
the cheek hinge holes and the thwart hinge holes must
be counter-bored deep enough so that the nuts sit
below the surface on the opposite side of the cheek
and thwart from the hinge.(fig 6). Use the Countersunk
bolts to attach the cheeks and the thwart to the hinges
Using coach bolt with head on the inside attach leeboard
to cheek. Tighten wing nut on the outside to increase
friction on the board.
Repeat at other side and attach deck eyes above the
pivot bolts.
Tie the doubled length of pre-stretched rope between
the deck eyes and set it so that when one board is
up the length of the rope tops the other board about
4 degrees before it would be upright.
Attach to boat using your chosen method and you are
ready to sail
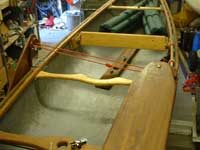
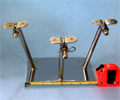
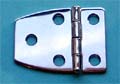
 |
cheeks with interlock line fitted |
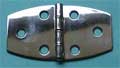
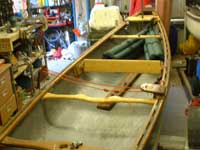
|
Leeboards
fitted with one in reet position |

Other Articles by John Tompkins:
|