“Dad! Dad!
Dad! Can we build a boat?”, my three sons, aged
4, 7 & 10, asked me.
“Why not?”, I replied, “all we
need to do is cut this bit of foam to the right shape
and then we can stick a skewer in it for a mast. Then
we can ……”.
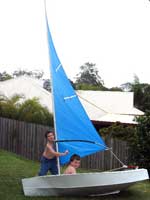
“No, Dad! We want a big boat to ride in!!"
Stunned silence from me as I digested this.
Dad! We want
a big boat to ride in!!
(click images
to enlarge)
“What the ....? A real boat? How am I going
to make a real boat? How much is that going to cost?”,
were the first thoughts that ran through my mind.
The following is a brief summary of how I constructed
an inexpensive boat using plastic sheet, in particular
the methods for working with the sheet. Total cost
of this boat was AUD$25, however I got the sheet for
free. I would expect that you could purchase enough
sheet to build a boat of similar size for an additional
AUD$80.
Design
Gregg Carlson’s hull design software was invaluable
in determining the waterline of the hull with a load,
and to create the undeveloped panel shapes of the
hull.
A screen shot
of the hulls file. (click HERE
to download the file)
I used the co-ordinate tables that Gregg’s
program can generate to mark out the perimeter points
for each panel, and then used a thin strip of timber
to create a ‘curve of best fit’ between
these points.
At this point I was not putting too much thought
into the design, nor did I take a lot of care when
I was cutting out the panels, as I thought that the
material I was going to use would not be successful
…… in hindsight I wish I had!
Material
I decided to experiment fabricating a hull using
ABS (Acrylonitrile Butadiene Styrene) sheet. The main
reason for this decision was that the company I work
for manufactures the sheet in 2.4mm thickness for
use in our finished products, and I was able to obtain
sheets that had been rejected for minor surface blemishes
at no cost.
I was able to
obtain sheets that had been rejected for minor
surface blemishes at no cost.
I had used the sheet on many previous occasions to
prototype components as it is extremely easy to cut
& shape, and fast, strong bonds can be made using
acetone to chemically weld the sheet together.
ABS is a plastic that has very good impact resistance,
excellent resistance to water & salts, and has
good gloss, all of which mean that the completed hull
does not require painting.
ABS does not have good resistance to UV light, so
if the hull is going to be stored outside for extended
periods it would be advisable to give it a coat of
paint (use a plastic primer first) to protect it from
the sunlight.
The density of ABS is approx 1.05grams per cubic
centimetre, so it is denser than plywood and will
not float, however this is offset by the fact that
you can use thinner gauges and still keep the hull
reasonably light.
ABS is a plastic
that has very good impact resistance, excellent
resistance to water & salts, and has good
gloss.
The ABS sheet is not very stiff… if you pick
up a 4’x8’x1/8” sheet by the middle,
the ends will be just about hanging vertically. This
is advantageous when twisting hull panels into shape,
however I was dubious about the rigidity of a finished
hull. This proved not to be a problem when the panels
of the hull were bonded, as the curvature in the panels
created integral stiffness in the hull.
Sources of ABS sheet can be located by looking up
‘Thermoformers’ (also known as Vacuum
Formers) or ‘Plastic Extruders’ in the
Yellow Pages. With a bit of haggling you could most
likely get some sheet for a reasonable price. If they
have some sheet lying around that they have rejected
for minor surface blemishes, then you could convince
them to sell it to you at their material cost price.
They would otherwise have to granulate it to re-use
it (at extra cost to them) or sell it to a recycling
company for a fraction of what they paid for it.
Based on material-only-cost you should be able to
get a 2400mm x 1200mm x 3mm sheet for $20 (Australian
dollars). For comparison, a 2400mmx 1200mm x 4mm marine
ply sheet costs around AUD$77.
Cutting
The sheet does not have to be cut with a saw. In
fact the use of a high speed power saw, such as a
jigsaw, tends to generate too much frictional heat
resulting in the molten material in the kerf joining
back together behind the blade. By the time you get
to the end of your cut, the two halves have welded
themselves back together!!!
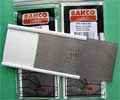
The simplest way to cut the sheet is to firmly score
the sheet with a sharp hobby knife and then snap out
the shape by bending along the scored line. This method
is extremely quick, an 8 foot long panel for the boat
I built typically took 5 to 10 minutes to score and
snap.
The simplest
way to cut the sheet is to firmly score the
sheet with a sharp hobby knife and then snap
out the shape by bending along the scored line.
The edge of the knife blade can be dragged along
the cut edge to remove any burrs.
An open style rasp like the ones used to shape car-body
filler, is useful to perform any cleaning up of the
edges and also to shape thicker components that you
have created when laminating sheets together.
Bonding
Acetone is ideal to bond ABS to itself. An eyedropper
(preferably made from polypropylene which is not affected
by acetone) is used to drip acetone onto the join.
The acetone wicks into the joint and partially dissolves
the ABS that it comes into contact with. The dissolved
ABS will bond firmly together as the acetone evaporates.
Fillet style welds can be created by dissolving small
offcuts of ABS sheet in a sealed glass jar (make sure
the jar has a metal lid) of acetone overnight. The
resulting viscous liquid can be applied to an internal
joint to create a fillet. The acetone component in
the liquid partially dissolves the parent material,
bonding it to the fillet, and then evaporates away
over the next 24 hours (Fillets are generally ‘touch
dry’ and have some integrity within an hour
or so).
Laminating can be used to create thicker panels for
items like rudders. When laminating it is preferable
to cut the shapes from the sheet before laminating
them together, as a 10 or 12mm thick laminated piece
of ABS is difficult to cut.
Laminating can
be used to create thicker panels for items like
rudders.
When your quantity of cut shapes are ready, use the
eyedropper to cover one side of a shape with acetone.
Place the next shape on top and repeat the process
until the desired thickness is achieved. A couple
of house bricks atop the whole thing ensures that
you don’t get any small gaps between the laminations.
Construction
The cut hull panels were assembled using a similar
method to ‘stitch & glue’, except
in this case I used plastic packaging tape to hold
the panels together. A few areas, especially around
the bow where the curves are tight, were stitched
with copper wire as the tape did not have sufficient
adhesion where the bending forces were high.
The inside of the joints were filleted as described
earlier, and a 20mm wide strip of thinner gauge ABS
(1.1mm in this case) was bonded to the outside of
the joint to improve the joint strength. The strips
were held in place with tape and acetone was wicked
into the joint to bond the strip to the hull. Once
this was secure the tape was removed and thinned-down
filleting liquid was applied with an eye dropper to
the edge on the strips to seal them and improve their
adhesion to the hull.
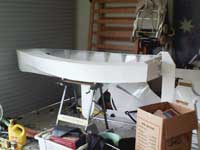
At this point the hull was still an empty shell,
however it was already exhibiting a high degree of
rigidity. When held at each end and a twisting force
applied, the hull did not bend or warp. The hull was
placed in a mate’s swimming pool and was of
sufficient strength to support my weight (a not inconsiderable
100kg).
From here on I had no further plans as I did not
expect the hull to be as strong as it was, so I made
the rest up as I went along.
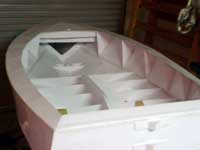
I added a frame near the bow, and ribs along the
sides and transom to increase strength and to assist
in creating watertight compartments.
I added a frame
near the bow, and ribs along the sides and transom
to increase strength and to assist in creating
watertight compartments.
As this boat was for my kids, I decided to make the
centreboard deploy by swinging down and forwards.
This means that if a submerged object is struck, or
they forget to raise the board when beaching, the
board will simply swing up out of the way. A centreboard
box was created by lamination and bonded to the hull.
The hull was cut from underneath to expose the inside
of the centreboard box. The centreboard was also made
by lamination.
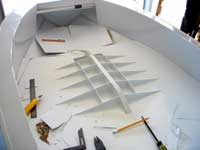
Ribs were added to the bottom of the hull to allow
a floor panel to be bonded over the top of them. The
corners of each rib plate had a 5mm x 5mm chamfer
to allow any water that may find its way inside to
flow to the keel area, and then flow back to the transom
where a bung is fitted.
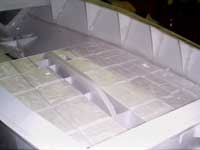
Expanded polystyrene foam blocks were cut to size
and fitted into the spaces between the ribs to create
about 40 litres of positive buoyancy. The bottom edges
of the foam were also chamfered to allow water to
pass.
Expanded polystyrene
foam blocks were cut to size and fitted into
the spaces between the ribs.
A bead of filleting liquid was applied to the top
of each rib, and then the floor panels place on top
of the ribs. Weights were placed on the floor to ensure
a good joint.
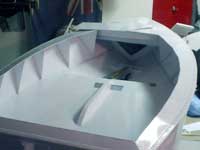
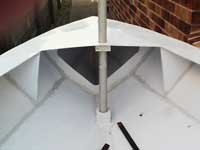
The two square holes beside the centreboard box allow
access to the centreboard pivot pin
The frame near the bow was sealed off with a piece
of sheet to make a buoyancy tank. The ribs on the
sides and transom were also panelled over to create
further buoyancy tanks.
Rudder cheeks and the rudder blade were made by
lamination. The rudder pivot blocks on the hull were
also made by lamination and then a strip of sheet
was heated with a cigarette lighter, bent to shape,
and bonded over the pivot blocks to improve their
adhesion to the hull. The rudder blade pivots up and
backwards for the same reasons described regarding
the centreboard.
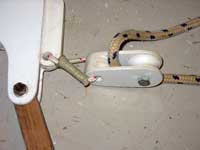
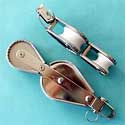
This pulley
was attached to the top of the rudder cheeks
for the sheet.
All the pivots for rudder and centreboard are made
from pieces of 4mm stainless rod.
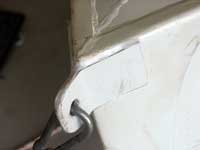
Another strip of sheet was heated, bent, drilled
and bonded to the bow to create an eye for attaching
a 40 foot ‘leash’ so that the kids can
learn to sail without inadvertently ending up in the
Pacific Ocean.
An eye was
made so that the kids can learn to sail without
inadvertently ending up in the Pacific Ocean.
The mast and boom were a donation from a mate. The
mast a telescoping windsurfer mast made from aluminium
tube. This works out well when used with the windsurfer
boom as I can locate the boom high enough on the mast
so that it doesn’t hit my kids on the head,
but the sail can still extend down between the two
legs of the boom.
The mast is held in place by a block in the bottom
of the hull, and another on the underside of the deck.
Both of these were made by cutting out 60mm square
pieces of sheet and using a holesaw to cut a suitable
diameter hole in the centre of each piece. When using
the hole saw I had water trickling onto the workpiece
to prevent the saw melting into the ABS sheet. These
pieces were laminated together to form the blocks.
The mast simply slips into the blocks and does not
use any stays.
The mast is
held in place by a block in the bottom of the
hull, and another on the underside of the deck.
Ribs were added in the area of the blocks to increase
the strength in this area.
The sail was fabricated from polytarp, and is hauled
in via a pulley, which I also fabricated from ABS,
which is tied to the top of the rudder cheeks.
The pulley wheel was made by holesawing several pieces
of sheet, laminating the resulting discs together,
putting a bolt through the central hole and tightening
a nut onto the other end. When this was dry, the end
of the bolt was secured in a drill chuck, the drill
was clamped to my workbench and powered up, and then
judicious application of a ½” round file
created the groove in the pulley wheel ….. sort
of a poor man’s lathe.
The pulley body was made by lamination.
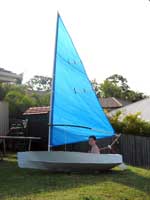
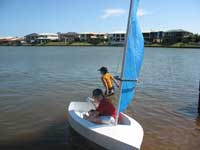
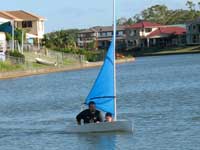
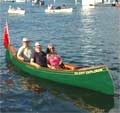
The two photos below were taken on our first test.
On the day there was only a light breeze of maybe
4 or 5 km/h, however this was still enough to push
this little boat around the lake. The weight of the
hull without mast and sail is around 28kg.
When the boat was first tested the centreboard would
not drop down under gravity. A pull cord (I used 4mm
lawnmower starter cord) was added which runs down
through the top of the centreboard box and attaches
tangentially to the top of the centreboard. Pulling
this cord lowers the centreboard.
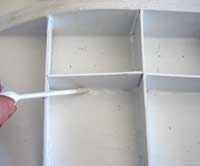
Addendum:
Chuck, final three photos.
First one shows the ribbing I added around the centreboard
box. What I'm trying to do here is put a floor over
the top of the centreboard box to allow the operator
to sit in this area comfortably.
The ribbing
I added around the centreboard box
Second photo shows the application
of the ABS/Acetone using an eyedropper to create
a "fillet weld" on the new floor ribs.
The application
of the ABS/Acetone using an eyedropper to
create a "fillet weld" on the new
floor ribs.
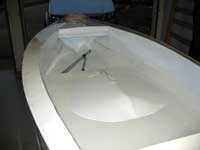
Third photo shows the new floor in
place. Towards the bow you can see the paddle made
from a telescoping mop handle with a laminated ABS
blade. This stows in the small area in front of
the mast keel step (in the first photo you can see
the handle in its stowed location). The cord protruding
from the top of the centreboard box is the pullcord
that lowers the centreboard.
The new floor
in place.
Well, thats about it! Probably the
only thing left to do is put a dart in the trailing
edge of sail as it seems to spill a lot of wind.
I've already started on a hull design for a 14'
ABS hull to use on Moreton Bay. Hopefully I can
put the lessons I have learnt on to good use on
the new hull.
Thanks for 'listening' to me and giving me the opportunity
to share this with others.