| The North West School of Wooden Boat Building
Traditional Small Craft Class continues its work on
the two Grandy 12-foot skiffs being built this semester.
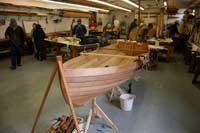
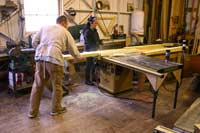
The Traditional Small Craft students completed planking
the two skiffs in five weeks. Here, one of the last
planks is placed on one of the hulls.
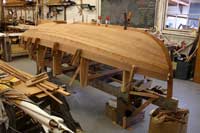 |
Planking is
nearly completed on this Grandy skiff. |
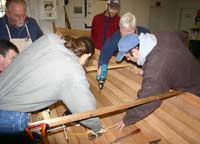
After planking was completed, the skiffs were taken
off their building platforms, the molds were removed,
retaining braces placed over each hull to help maintain
their shapes, and the skiffs set gently on the boat
shop floor. At this point, they each weighed less
than 50 pounds.
 |
After planking
completed, the boat is taken off its building
frame (or building ladder), the molds removed,
and it is carefully laid right-side up on the
floor of the shop. |
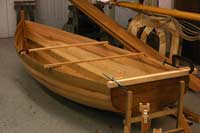
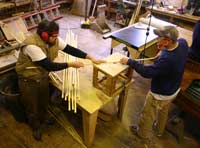
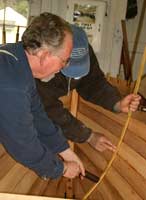
Temporary stands were built under the boats, and
the boats placed right side up on the new stands and
leveled. Bow and stern were securely braced to the
floor as well, to help resist the stress of frames
being placed in the boat.
 |
Temporary stands
hold the Grandy skiff upright as students prepare
to frame the boat. |
The framing story really begins back in January,
when the school was fortuitously donated a stand of
small second and third-growth black locust trees which
had been recently cleared from a steep hillside overlooking
the Puget Sound.
Black locust (Robinia Pseudoacacia) is a tough, easily
bendable wood which, although it grows easily here
in the coastal Pacific Northwest, does not seem to
be commercially available. It is nearly ideal for
small boat framing and planking.
Instructor Ray Speck organized a small volunteer
team of students one weekend, and went out to harvest
some the trunks suitable for frame stock.
Ray selected the straightest trunks, and the students
lifted each trunk by hand up a steep slope and into
waiting trucks.
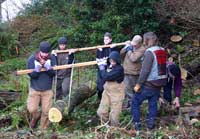 |
Boat school
students recovering donated black locust logs
from a hillside overlooking the Puget Sound.
|
Tyler Thompson and his assistant Al Katz, local sawyers
and Boat School graduates, donated their services
to the school and slabbed the bright yellow logs into
planks using an Alaskan chain saw mill.
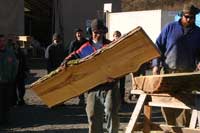 |
Al carries a
fresh slab of black locust while Tyler prepares
for the next slice. |
Some saw mill operators use portable bandsaws for
this purpose, others use bandsaw mills. Al mentioned
there are quite a number of these small mills out
there, and it is often worth seeing what lumber is
available through such sawyers should necessary boat-quality
lumber not be commercially available.
The planks were sawn into useable boards by the students,
using a circular saw and an aluminum straightedge
guide.
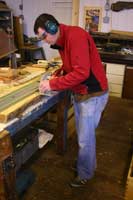 |
Matt sawing
planks into boards. He’s removing sapwood
and bark in this picture. |
The boards were sawn into frames. The resultant frames
measured ¾-inch wide by 3/8-inch thick, and
ranged from 3 to 7 feet long.
 |
Carter and Alicia
cutting black locust boards into frame stock.
|
Once made, frame edges were rounded on the router
using a quarter-round bit. The rounded, or “eased”
edges helped keep the frames from splitting when being
bent into the boat.
 |
Jeff (left)
and Carter rounding frame stock. |
The frames were kept wrapped in plastic until they
were ready to be used. A day or two before use they
were liberally wiped down with a combination of half
boiled linseed oil and half turpentine, which helped
to retard moisture loss from the frames while they
were being steamed.
 |
Laura wiping
down the frames |
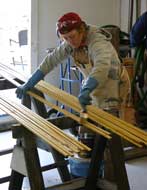
The frames were also divided into three grades, which
we indicated by one to three ink dots on the end grain.
A “one-dot” frame is “best grade”,
had straight grain and no knots, and consequently
was used where a great deal of bending must be supported.
These black locust frames had swirling grain from
growing on their hillside location and quite a few
knots; I’d estimate we got perhaps one-third
to one-half useable wood for frames from each trunk
we harvested, which was not unexpected.
 |
Alicia grades
framing stock. |
Instructor Tim Lee briefed the framing process to
everyone working on the boat. Tools were gathered
and pre-staged, and movements rehearsed. The steam
box was lit and frame stock steamed – about
twenty minutes for each of the 31 frames in the boat.
 |
Instructor Tim
Lee (right) explaining how to frame the boat
to the students… |
 |
…and demonstrating
it with the first frame (here, student Walt
is preparing to fasten the screw that holds
the frame in place on the keel apron). |
As each frame arrived hot from the steambox, it was
bent into the boat and secured to the keel with a
bronze screw. Then, from inside the boat, holes were
drilled through the frame and each plank from the
garboard plank next to the keel to the sheer plank.
A copper nail was slipped through the hole from the
outside, and a bronze rove (which looks like a small
copper cone-shaped washer) slipped over the nail on
the inside of the boat.
 |
Jerry bucks
the copper nail and rove as another student
hammers it home from the outside of the boat.
|
Then, one student pressed a heavy steel bucking iron
against the nail and over the rove from the inside
of the boat while another student pounded the nail
home with a ball-peen hammer from the outside of the
boat. Finally, the nail was clipped off just above
the rove, and the stub peened over so the rove couldn’t
be removed.
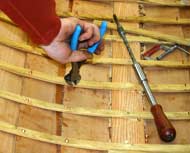 |
Clipping off
the protruding copper nail after bucking it
and before peening it over the rove. Nails that
haven’t been clipped can be seen to the
left of the student’s hand on the same
frame. |
31 frames in the boat with 16 planks (8 on each side)
means we had nearly 500 opportunities to practice
riveting – it was a busy day. But, while planking
took nearly five week, framing took one day, no more.
 |
Instructor Tim
Lee instructs by example while students Walt
(seated) and Jason rivet frames. Matt (red jacket)
takes a breather from framing amidship as Sean
(back left) and Alicia frame the stern sheets.
|
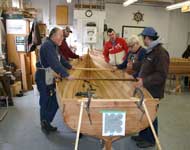
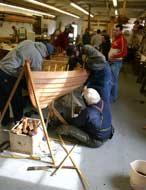
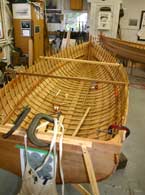 |
Spreaders retain
the hull’s shape after framing is complete
|
In the next installment, I’ll show you how
risers, thwarts, stern sheets and knees were made
and installed in the 12-foot Grandy skiffs we are
building.
Sincerely,
Pete Leenhouts
For further information, visit the school’s
extensive website at www.nwboatschool.org,
call the school at 360-385-4948, or write The Northwest
School of Wooden Boat Building, 42 North Water Street,
Port Hadlock WA 98339.
|