| The Traditional Small Boat Class at the Northwest
School of Wooden Boatbuilding in Port Hadlock WA is
building two 12-foot Grandy dinghys. When last we
looked
in on our class, they had just finished lining out
the hulls with battens in order to determine plank
and frame locations.
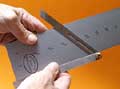
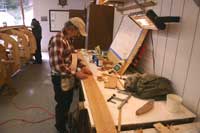
|  Matt
uses vertical cedar battens to determine frame
locations. The horizontal battens running fore
and aft show us where the plank edges will go.
Frame locations are marked in pencil on the
keel, while plank edge locations are marked
in pencil on the molds. Matt
uses vertical cedar battens to determine frame
locations. The horizontal battens running fore
and aft show us where the plank edges will go.
Frame locations are marked in pencil on the
keel, while plank edge locations are marked
in pencil on the molds.
|
The class began planking the two skiffs with 3/8-inch
cedar planking in early February. Since the boats
were being built upside-down at this point, the first
planks to go on were the garboard planks, those closest
to the keel. The process used to determine the shape
of each plank is pretty much the same as that used
during installation of the garboard plank.
First, a spiling batten of thin cedar was placed on
the boat, and a spiling block used to transfer the
shape of the keel to the batten. The spiling batten
was just an old piece of thin cedar roughly the size
of the plank. It was painted white so we could see
the pencil marks more clearly. The spiling block was
just a small block of wood. It was used to transfer
the keel line to the spiling batten and to transfer
the pencil mark which reflected where the upper edge
of the horizontal framing battens crossed each mold.
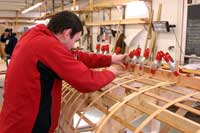
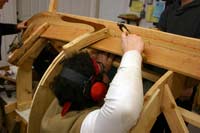
|  Sean
(left), watches instructor Tim Lee assist Jason
and the port planking team wrap a steamed cedar
plank around the molds. Sean's left hand is
on his white-painted spiling batten, which is
laying up against the keel. Sean
(left), watches instructor Tim Lee assist Jason
and the port planking team wrap a steamed cedar
plank around the molds. Sean's left hand is
on his white-painted spiling batten, which is
laying up against the keel.
|
Once the shape of the plank was transferred to the
spiling batten, the batten was laid on a piece of
3/8-inch planking stock and the marks transferred
from the spiling batten to the plank stock. Both planks,
port and starboard, were cut out on the bandsaw at
the same time, since they begin as mirror images of
each other.
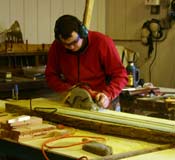
|  Ed
is checking to ensure the pattern as drawn on
the 3/8-inch cedar planking stock is roughly
fair. It doesn't need to be perfect at this
point, because we will carefully fit the plank
to the boat after it has been cut out and steamed.
The construction diagram for the skiff is taped
to a piece of thin plywood and propped up on
a bench for easy reference by the student boatbuilders. Ed
is checking to ensure the pattern as drawn on
the 3/8-inch cedar planking stock is roughly
fair. It doesn't need to be perfect at this
point, because we will carefully fit the plank
to the boat after it has been cut out and steamed.
The construction diagram for the skiff is taped
to a piece of thin plywood and propped up on
a bench for easy reference by the student boatbuilders.
|
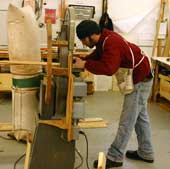 |
Sean is getting
out the planks on the 14-inch bandsaw. |
After the planks were cut out, they were steamed
for 20 minutes in the steambox (at 180 to 190 degrees
F) and then clamped to the boat so each plank takes
up a part of the curve it will have when permanently
fastened to the boat.
While the plank was being steamed, a planking lap
was cut at the bow of the boat on the previous plank,
and a dory lap was cut at the transom end of the previous
plank. There was no room for error here - a mistake
would mean taking off the previous plank and doing
it over, so each student made time for plenty of practice
on scrap before trying his or her hand on the boat.
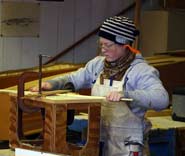
| 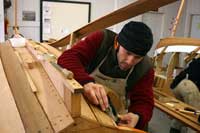 Sean
cuts a dory lap on the transom end of the previous
plank. These laps allow the plank being added
to the boat to lie closely to the previous plank,
sort of like a clapboard lies on the side of
a house. Paring chisels, planes, and cranked-neck
chisels are favored for this kind of precision
work. Sean
cuts a dory lap on the transom end of the previous
plank. These laps allow the plank being added
to the boat to lie closely to the previous plank,
sort of like a clapboard lies on the side of
a house. Paring chisels, planes, and cranked-neck
chisels are favored for this kind of precision
work.
|
| 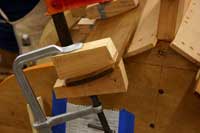 While
cooling on the boat, the steamed transom end
of a plank is shaped to the necessary curve
with a caul shaped like the curve of the part
of the transom over which it will be fastened. While
cooling on the boat, the steamed transom end
of a plank is shaped to the necessary curve
with a caul shaped like the curve of the part
of the transom over which it will be fastened.
|
The plank was carefully shaped to the curve of the
boat and the lines marked on the molds during the
lining out process (previous article). Our goal was
to do this during one fitting, but these early planks,
as did most of the eight planks on each side of the
boat, took several fittings as each student learned
how to work to the close tolerances required by instructor
Tim Lee.
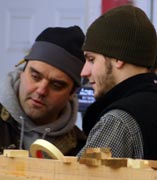 |
Instructor Tim
Lee and Adam consider plank shape at the mid-section
to ensure the actual plank closely matches the
desired shape. |
 |
Alicia and Michelle
shape the bevel on the edge of a plank with
a handplane. |
Once the plank was properly shaped, dolphinite, a
bedding compound was carefully smeared on the lap
edge of the previous plank (or, in the case of the
garboard, along the edge of the apron which lies over
the keel). In the case below, you can see that the
plank was shaped a bit smaller than it should have
been, as indicated by the clearly visible planking
edge mark on the mold just to the right (above) the
plank.
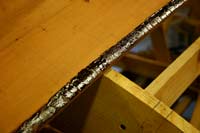 |
Dolphinite on
the edge of the plank. |
The new plank was carefully and securely clamped
to the boat. Holes were then drilled through the planks
in-between the future location of the frames...
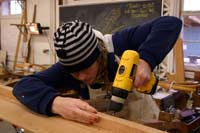 |
Laura drills
through the planking for the copper clench nails |
...and the planks were nailed and clenched together.
Clench nailing required some physical flexibility
to insert the copper nail in the hole while holding
the clenching iron under the boat and against the
nail point. Then the student tapped the nail head
in order to drive the nail point against the clenching
in order to bend it over towards the planking before
driving it home along the grain line. We practiced
clench-nailing scrap before being allowed to do so
for real on the boat.
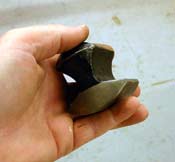 |
A clenching
iron. This one is actually intended for auto-body
work, but works well for clenching copper nails.
There are many different shapes which work well.
|
 |
Jeff clench-nails
a plank (the first broad) to the boat. |
While teams of students were planking the boat, others
were getting out the frames from just-felled black
locust.
 |
Matt uses a
circular saw to get out framing stock from locally-sawn
black locust timbers. |
 |
Laura uses the
router to chamfer the edges of the framing stock
so that the frames will bend more easily without
splitting after steaming. |
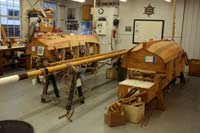 |
End of day in
the Westrem Small Boat Shop at the
North West School of Wooden Boatbuilding, Port
Hadlock WA. |
Planking should be done by the middle of March, after
which the boats will be turned right side-up so that
they can be framed.
Additionally, the class is beginning to loft a 17-foot
Whitehall pulling boat; I'll cover that process in
the next installment of my Report Card on the Traditional
Small Craft Class.
Should you have the chance to visit the Olympic Peninsula,
the North West School of Wooden Boatbuilding is located
at 42 North Water Street, Port Hadlock, WA. The school
welcomes visitors Monday through Friday 8am -5pm for
escorted tours through all of it's shops and facilities.
The school also offers short courses ranging from
a weekend to two weeks from spring through the summer
and fall. The school's web site at https://www.nwboatschool.org/
provides further details.
Sincerely,
Pete Leenhouts
Student, Traditional Small Boat Class
North West School of Wooden Boatbuilding
Port Hadlock WA
https://www.nwboatschool.org/ |