|
by Tim Lehman - Steelton, Pennsylvania - USA |
My first boat, a pirogue, handled well and was a lot of fun to use, but it was heavy. It was the product of a lot of research and some “educated” guesses based on the pictures and diagrams that I found on the subject. I decided that I “needed” something lighter and easier to lift up onto the top of my Jeep. I started looking at kayaks. I looked at everything from Hannu Vartiala’s Prism to Duckworks Magazine projects to CLC designs to Mill Creek boats to every free kayak plan on the internet that I could find. I finally settled on the Pod Yak, designed by Steve Lewis at Lewis Boatworks. A lot of factors influenced my decision, but the main ones were that this was a new design and Steve was looking for someone to build a prototype and secondly, the challenge of building something that no one else has built appealed to me.
This is my first attempt at a stitch-and-glue project, as my pirogue was built using more traditional nail and glue methods. I started working on it over the 2004 Thanksgiving weekend. Work continued over the next couple of months, mostly on weekends, usually a couple of hours at a time. Most evenings were already filled up with other activities, such as kids’ basketball practice and scouting activities, so progress wasn’t as rapid as it could have been. And there wasn’t much opportunity to use the boat during that period anyway, what with most of the local lakes and rivers beginning to freeze over for the year. But the boat did get built and launched.
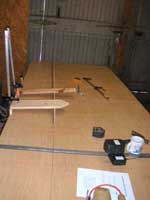 |
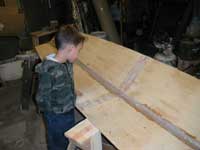
Here are the first panels getting laid out and ready for cutting. I temporarily joined the plywood with duct tape while laying out the panels. Later I will use resin and cloth to butt-join them permanently. And there's my improvised clamping system for holding the end of the batten in place so I can draw the curves.
(click images for larger views) |
|
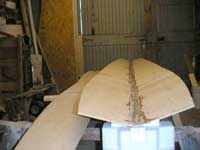
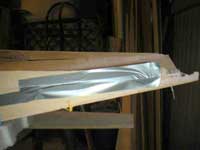
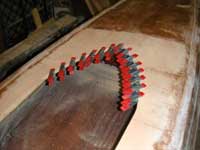
 These are the "gravity clamps" in place to keep the panels from shifting while the resin sets up. I used some scraps of cloth cut into 2" strips instead of using tape on these joints. I mixed up a little too much resin this time, so I've started coating the panels with the excess. These are the "gravity clamps" in place to keep the panels from shifting while the resin sets up. I used some scraps of cloth cut into 2" strips instead of using tape on these joints. I mixed up a little too much resin this time, so I've started coating the panels with the excess. |
|
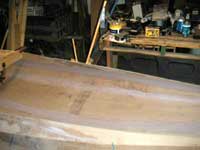
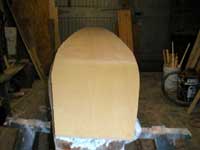
 Here you see the bottom panels, joined together and ready to attach the lower side panels.
We got a bunch of new computers at work and I scarfed up these Styrofoam packing blocks to use as filler for floatation chambers. They also make good cradles for supporting the Pod Yak hull while I'm working on it. You can see them here, propping up the ends of the bottom. Here you see the bottom panels, joined together and ready to attach the lower side panels.
We got a bunch of new computers at work and I scarfed up these Styrofoam packing blocks to use as filler for floatation chambers. They also make good cradles for supporting the Pod Yak hull while I'm working on it. You can see them here, propping up the ends of the bottom. |
|
| My youngest son, first mate and chief pprentice, Pete, inspects the job. |
|
|
 Steve warned me about the sharp points on the ends of the side panels. As you can see, a little bit broke off at the ends. (Oh well, at least I didn't poke my eye out.) A bit of thickened resin and a lot of sanding should take care of it. In the meantime, I'm using duct tape to hold what's left of the ends in place instead of wire or zip ties. Steve warned me about the sharp points on the ends of the side panels. As you can see, a little bit broke off at the ends. (Oh well, at least I didn't poke my eye out.) A bit of thickened resin and a lot of sanding should take care of it. In the meantime, I'm using duct tape to hold what's left of the ends in place instead of wire or zip ties. |
|
 I put this temporary brace in to steady the side panels while I do the fillet work. They stay in place pretty well without the brace as long as there is no pressure placed against them, i.e. some klutzy boat builder leaning over the side and pushing the panels down flat. And since I'm the klutz in question, the brace is definitely a good idea. I put this temporary brace in to steady the side panels while I do the fillet work. They stay in place pretty well without the brace as long as there is no pressure placed against them, i.e. some klutzy boat builder leaning over the side and pushing the panels down flat. And since I'm the klutz in question, the brace is definitely a good idea. |
|
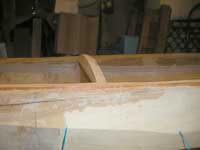
 This is a completed fillet. I used regular Bondo rather than thickened resin. After I read the label, I found it's polyester resin with fillers added. And it's about half the price of regular polyester resin. Just to be on the safe side, I also put a layer of fiberglass drywall tape on the joint. The mesh is open enough that you can press the filler right through it. Just before I put the deck on, I'm going to put a coat or two of resin on the inside to help seal the wood. This is a completed fillet. I used regular Bondo rather than thickened resin. After I read the label, I found it's polyester resin with fillers added. And it's about half the price of regular polyester resin. Just to be on the safe side, I also put a layer of fiberglass drywall tape on the joint. The mesh is open enough that you can press the filler right through it. Just before I put the deck on, I'm going to put a coat or two of resin on the inside to help seal the wood. |
|
 The first internal frame in the yak. A single 1/4" plywood panel with the center cut out to form a frame instead of a solid bulkhead. Don't worry, though; the cutout will reappear as the bulkhead just forward of this one. Waste not, want not. The first internal frame in the yak. A single 1/4" plywood panel with the center cut out to form a frame instead of a solid bulkhead. Don't worry, though; the cutout will reappear as the bulkhead just forward of this one. Waste not, want not. |
|
 This is the stock for the sheer clamps laying across the center of the hull. I was trying to get an idea of how to install the stringers to support the cockpit edges. I was laying the stringers out to get a visual sense of how they can be integrated into the framing. This is the stock for the sheer clamps laying across the center of the hull. I was trying to get an idea of how to install the stringers to support the cockpit edges. I was laying the stringers out to get a visual sense of how they can be integrated into the framing. |
|
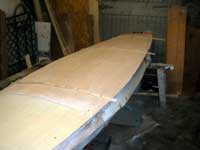
 After I joined the sheer strips together I cut them to length, buttered them up with construction adhesive and clamped them in place. I left about ½” of the sheer above the edge of the sides so that it could be planed down to the same angle as the bulkheads. Like so many others have said in the past – you can NEVER have enough clamps. After I joined the sheer strips together I cut them to length, buttered them up with construction adhesive and clamped them in place. I left about ½” of the sheer above the edge of the sides so that it could be planed down to the same angle as the bulkheads. Like so many others have said in the past – you can NEVER have enough clamps. |
|
 |
The sheer is planed to match the angle of the deck beams (almost). It still needs a little more work. |
|
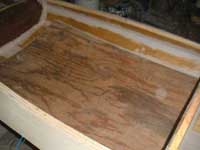 This is a piece of 1/4 in. plywood that I added to the bottom of the cockpit area for reinforcement. Steve suggested putting another layer in this area to withstand entry/exit pressures and I had this bit of ply laying around the garage. I cut it a little wider than the widest point of the bottom so that it would have a bit of curve to it to provide some additional comfort for MY bottom. I've got a piece of closed cell foam that I plan to attach for cushioning. This is a piece of 1/4 in. plywood that I added to the bottom of the cockpit area for reinforcement. Steve suggested putting another layer in this area to withstand entry/exit pressures and I had this bit of ply laying around the garage. I cut it a little wider than the widest point of the bottom so that it would have a bit of curve to it to provide some additional comfort for MY bottom. I've got a piece of closed cell foam that I plan to attach for cushioning. |
|
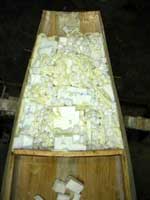 |
This is the rear compartment with styrofoam in place. I picked up a can of aerosol foam caulking. It seems to work pretty well as a binder for the small pieces. For that matter, I probably could have just put the deck in place and then pumped foam into the cavity from the end, but that would have required a couple of cans per end. |
|
| The final product - deck stringers glued and screwed in place. I applied a healthy dollop of adhesive to the bulkhead notches and the stringer ends, slipped them into place and put a screw into each joint. |
|
|
 |
This is the deck, trimmed to shape and placed on top of the hull to make sure that it will fit. Looks kinda like a coffin at this stage, doesn't it? |
|
 Here we have the deck glued and screwed into place. I used scraps to keep the screw heads from making indentations in the deck. Here we have the deck glued and screwed into place. I used scraps to keep the screw heads from making indentations in the deck.
I had a tough time getting the plywood to bend over the deck area, so I made several lengthwise saw kerfs on the underside to relieve some of the tension. Even so, it still took a lot of pressure to get the plywood to bend around the curve of the deck beams, so I left the screws in along the sheer. I’d hate for it to come apart while I’m out on the water. That could REALLY ruin your day.
|
|
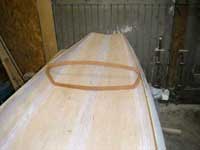
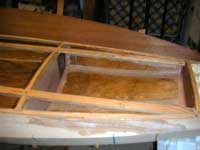
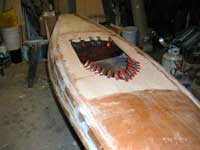 This is the cockpit opening with some reinforcing in place underneath the front and rear edges. The sides will be sanded flush with the stringers running fore and aft between the bulkheads. I took my time and measured very carefully when I laid out the opening. I must be either very good or very lucky (I tend to think the latter), because I got the sides cut within 1/4 inch of the stringers on the first try. This is the cockpit opening with some reinforcing in place underneath the front and rear edges. The sides will be sanded flush with the stringers running fore and aft between the bulkheads. I took my time and measured very carefully when I laid out the opening. I must be either very good or very lucky (I tend to think the latter), because I got the sides cut within 1/4 inch of the stringers on the first try. |
|
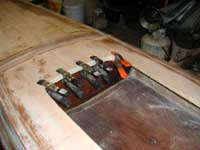 Here's a closer shot of the rear edge of the cockpit. I cut four strips of 1/4 in. ply about 1 in. wide and cut them to fit between the stringers. Then I clamped them up snug until the glue set up. That leaves about 1/4 in. to trim back in order to be flush with the opening in the deck. Here's a closer shot of the rear edge of the cockpit. I cut four strips of 1/4 in. ply about 1 in. wide and cut them to fit between the stringers. Then I clamped them up snug until the glue set up. That leaves about 1/4 in. to trim back in order to be flush with the opening in the deck. |
|
 This is the front edge. Same process, except that I only put 2 additional layers in instead of four. I took a bit of scrap and traced the outline from the point of the opening to the side then cut 4 strips about 1 in. wide. Then I capped the joint in the center with a single square of plywood about 1 X 1. I'm thinking (there goes that pain in my head again) about eventually putting a coaming with a lip of some sort around the outside of the opening so that I can attach a cover when I'm transporting the boat. Also to allow me to use some sort of spray skirt, if for no other reason than to keep the sun and the water that drips off of the paddle off my legs. But first, I want to get her launched, then I can worry about the nice-to-have details. This is the front edge. Same process, except that I only put 2 additional layers in instead of four. I took a bit of scrap and traced the outline from the point of the opening to the side then cut 4 strips about 1 in. wide. Then I capped the joint in the center with a single square of plywood about 1 X 1. I'm thinking (there goes that pain in my head again) about eventually putting a coaming with a lip of some sort around the outside of the opening so that I can attach a cover when I'm transporting the boat. Also to allow me to use some sort of spray skirt, if for no other reason than to keep the sun and the water that drips off of the paddle off my legs. But first, I want to get her launched, then I can worry about the nice-to-have details. |
|
 Once I got the cockpit done, it was time to start feathering the edges of the fiberglass tape. I got some 24 grit disks for my angle grinder. They really make short work of that chore. Once the edges were smoothed out, it was time to mop a coat of resin over the outside of the hull. Once I got the cockpit done, it was time to start feathering the edges of the fiberglass tape. I got some 24 grit disks for my angle grinder. They really make short work of that chore. Once the edges were smoothed out, it was time to mop a coat of resin over the outside of the hull.
It didn't turn out too badly, if I do say so myself. The only problem is that the filler looks pretty ugly against the wood. You can really see it in this shot. I guess I'll put a coat of paint on the whole thing once it's all done.
|
|
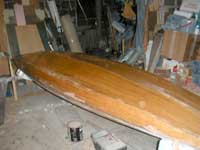
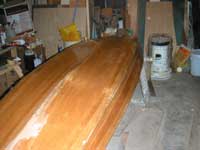 In any case, here are a couple of pictures of the hull in all its resin-coated splendor. The next step will be to turn the hull over and coat the deck with resin, then paint it and wait for a the weather to warm up enough to put her in the water and see how she floats. In any case, here are a couple of pictures of the hull in all its resin-coated splendor. The next step will be to turn the hull over and coat the deck with resin, then paint it and wait for a the weather to warm up enough to put her in the water and see how she floats. |
|
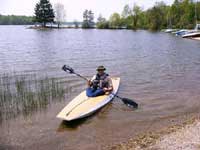
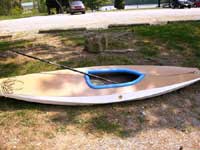 Here she is, ready to go into the water for the first time. The paint was less than the best quality, just some leftovers from an earlier home improvement project. It looks pretty good and has held up quite well, in spite of that fact. The bottom is white latex semi-gloss enamel and the top is brown flat wall paint. Both have help up fairly well, considering… The bottom has gotten some pretty rough treatment, in that the lake bottom at my favorite paddling lake is coarse gravel rather than sand or mud. Putting in and taking out have taken their toll on the paint, but the plywood has held up very well. Here she is, ready to go into the water for the first time. The paint was less than the best quality, just some leftovers from an earlier home improvement project. It looks pretty good and has held up quite well, in spite of that fact. The bottom is white latex semi-gloss enamel and the top is brown flat wall paint. Both have help up fairly well, considering… The bottom has gotten some pretty rough treatment, in that the lake bottom at my favorite paddling lake is coarse gravel rather than sand or mud. Putting in and taking out have taken their toll on the paint, but the plywood has held up very well.
|
|
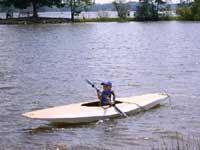
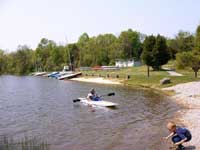 She handles pretty good overall. There is a lot of rocker in the hull, so it turns very quickly. As a matter of fact, I was able to make it pretty much spin on its axis. If you are paddling straight ahead and stop paddling, you start to slowly rotate; a lot like the whitewater boats that I’ve seen. I didn’t particularly care for this, so I later added a skeg. That kept it tracking straight when I stopped paddling. She handles pretty good overall. There is a lot of rocker in the hull, so it turns very quickly. As a matter of fact, I was able to make it pretty much spin on its axis. If you are paddling straight ahead and stop paddling, you start to slowly rotate; a lot like the whitewater boats that I’ve seen. I didn’t particularly care for this, so I later added a skeg. That kept it tracking straight when I stopped paddling.
|
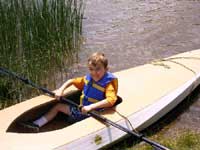
You might notice that I have my knees drawn up rather close to my body in these shots. That’s because I either 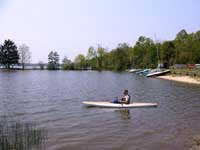 incorrectly measured the distance that I needed for my legs to stretch out or I put the bulkhead in the wrong place. In any case, there wasn’t enough room for my legs to extend fully and it was more comfortable to pull my knees up. I cut the bulkhead out when I got home, essentially converting it into a frame so that I can extend my legs. incorrectly measured the distance that I needed for my legs to stretch out or I put the bulkhead in the wrong place. In any case, there wasn’t enough room for my legs to extend fully and it was more comfortable to pull my knees up. I cut the bulkhead out when I got home, essentially converting it into a frame so that I can extend my legs. |
|
 The kids were fascinated with the boat and they all wanted to try it out. Since this was the only boat that I brought I didn’t think it would be wise to just let them loose on their own. So, I tied both of the painters together along with a 50 ft piece of rope that I had in the trunk, attached it all to the stern carry handle and put the boat on a leash. Then I let them paddle around in the little protected cove where the boat ramp was located. The kids were fascinated with the boat and they all wanted to try it out. Since this was the only boat that I brought I didn’t think it would be wise to just let them loose on their own. So, I tied both of the painters together along with a 50 ft piece of rope that I had in the trunk, attached it all to the stern carry handle and put the boat on a leash. Then I let them paddle around in the little protected cove where the boat ramp was located.
Here's my youngest, Pete, relaxing a bit after his first try at paddling.
|
|
 Next, it was Andy's turn. He REALLY seemed to enjoy it. He did a little better than his younger brother, but not much. The main problem was that the paddle, a Wal-Mart special, was way too heavy for them to handle easily. I have since made a paddle with a wooden shaft and fiberglass blades that is a lot easier for the kids to handle. Next, it was Andy's turn. He REALLY seemed to enjoy it. He did a little better than his younger brother, but not much. The main problem was that the paddle, a Wal-Mart special, was way too heavy for them to handle easily. I have since made a paddle with a wooden shaft and fiberglass blades that is a lot easier for the kids to handle.
|
|
 When I first found the design on Steve’s web site, it was for a 14 ft boat and I asked him if it was feasible to shorten it to 12 ft. He replied, “No problem”. And made the changes and had a set of offsets for me in a matter of days. I think shortening the hull was not the best idea that I’ve ever had. In doing so, it compressed the lines, especially the curve of the bottom and made it appear a bit stubby. If I were to do it all over again, I think I’d stick with the original length of 14 ft or maybe even a bit more. And I’d use 1/8” ply instead of the ¼” luan that I used on this one to reduce the weight. When I first found the design on Steve’s web site, it was for a 14 ft boat and I asked him if it was feasible to shorten it to 12 ft. He replied, “No problem”. And made the changes and had a set of offsets for me in a matter of days. I think shortening the hull was not the best idea that I’ve ever had. In doing so, it compressed the lines, especially the curve of the bottom and made it appear a bit stubby. If I were to do it all over again, I think I’d stick with the original length of 14 ft or maybe even a bit more. And I’d use 1/8” ply instead of the ¼” luan that I used on this one to reduce the weight. |
|
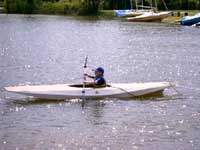
All in all, I’m pleased with the boat. It’s still a little heavier than I would like, about 50 or 60 lbs probably. I never got around to weighing it. It paddles nicely and is maneuverable enough for exploring the lakeshore and small feeder creeks. It may not be a true whitewater boat, but I’m sure that it could take a few hard knocks without suffering any damage. In short, I would not hesitate to recommend the design to someone looking for a sturdy kayak for exploring lakes without having to worry about rough bottom conditions at the put-in or surprises below the surface.

|