|
Cutting Gains |

|
| by Peter Croft - Christchurch,
New Zealand |
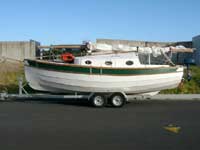
One aspect of John Welsfords’ designs which
seems to appeal to many people is the lap strake planking.
While it is not as demanding of the builders woodworking
skills as traditional clinker construction, those
overlapping planks leave one tricky detail that has
to be dealt with one way or another. What to do with
the planks where they meet the stem?
Study a few photos of “other people’s
boats”, and it soon becomes clear that there
are some creative solutions to this problem area.
One method involves the use of copious quantities
of filler to “blend” one plank to the
next. I think it really spoils the lines of the boat,
and it must use a lot of expensive epoxy filler.
 |
Filler
used to blend one plank to the next.
(click
images to enlarge) |
|
A substantial improvement visually is to simply let
the planks overlap all the way to the bow. To keep
the planks vertical at the stem though, each one needs
a packing piece – the higher the plank, the
thicker this needs to be. As well as creating more
work, this wasn’t quite the look I was after.
Planks
overlapping all the way to the bow.
Thanks to Steve Earley for permission
to use this photo. |
|
|
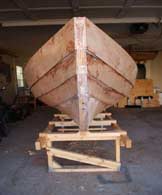
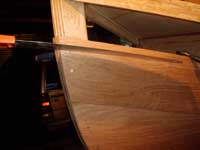
A nice alternative is the traditional method, where
each plank tapers progressively into the one below
so that they sit completely flush at the stem. This
is achieved by cutting a shallow ramp called a “gain”
into the top edge of each plank. It is easier to do
than it looks, and I think the result is well worth
the effort.
Trad craftsmen boat builders should probably start
their grave spinning now. The ideal tool for this
job is probably a rabbet plane, with the blade going
to the very edge of the body. I had to find another
way of cutting the gains on my Pathfinder. With a
bit of practise it only took about twenty minutes
per gain, and didn’t need gallons of epoxy to
look good.
You will need a hand saw, a SHARP chisel and a pencil.
A small plane and cordless driver are useful but not
necessary. Before cutting each gain, I found it really
helpful to dry-fit the next plank up, and trim its
bottom edge as accurately as possible. This meant
I could screw it in place periodically to check the
progress of the cut. It also saved a lot of work later
on, as it is far easier to trim the plank to a fair
curve off the boat than on.
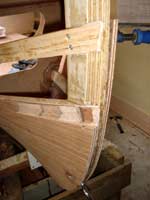
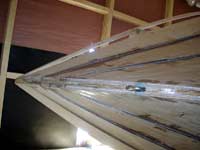
A related detail is housing the stringers in the
stem. This means a large bevel can be cut each side
of the stem for the planks to glue onto – the
traditional term for this is “faying surface”.
It takes a bit more effort, but makes the boat a bit
lighter and a lot stronger – that has to be
good!
 |
Stringer
housing cut into the stem.
|
|
Start off by marking a pencil line below the top
edge of the plank where the gain will be cut. It should
be parallel to, and slightly above the bottom edge
of the stringer. This is also where the bottom edge
of the next plank up will come to.
To get a consistent line I made a simple depth gauge
from a nail and scrap plywood. Trim the top edge of
the plank so that the nail can sit on the top edge
of the stringer.
It is worth marking the entire length of the plank
while you are at it, as it is a useful guide when
planing the bevel for the next plank to sit on.
| Marking the
line where the gain will be cut. |
|
|
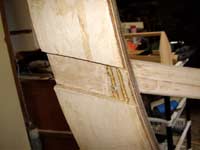
The next step is to figure out how long the gain
needs to be. To get a rough idea, run a straight edge
vertically from the plank you are about to cut into,
up to the next stringer. At some point it will sit
fairly flat on both the plank and the stringer. Put
a second pencil mark across the first line where this
occurs.
On my Pathfinder, this was about 40cm (16 inches)
back from the stem on most of the planks.
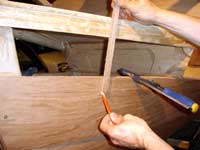
Now the fun bit. The aim is to make a saw cut which
angles through the plank about 3mm (1/8 inch) above
the horizontal line, entering at that second pencil
mark and just cutting through the full thickness of
the plank at the front edge of the stem.
I use a sharp hardpoint handsaw – they cost
all of $12 and go through ply like a hot knife through
butter – in fact all the planks on my Pathfinder
have been cut with one of these.
It is a bit awkward making this cut on one side
of the boat or the other depending on whether you
are left or right handed, hence the 3mm allowance.
Don’t worry if it is a bit wonky – it
will be fixed up later.
 |
Making
the first cut.
|
|
Once the cut is made, break out the bulk of the waste
with a chisel. I have no photos of this stage, but
trust me; it was pretty rough and looked very ugly.
As long as you don’t go deeper than the saw
cut in too many places there is no problem. To (mis)quote
Welsford's first law of boatbuilding, “the mistake
has yet to be made that can’t be fixed with
epoxy”. Use a sharp chisel or small plane to
clean up the gain. My tool sharpening skills are a
bit hit and miss, but it really is easier, faster
and safer if you can get a decent edge on your chisels
for this work.
 |
|
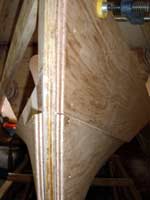
Two
views of the gain cut. |
|
One trick which I found worked quite well was to
use the saw as a long skinny rasp by dragging it diagonally
across the face of the gain. As the saw blade is so
long, it covers the entire length and only knocks
off the high spots, making it easy to get things straight.
If you are like me, that first cut along the bottom
edge of the gain probably drifted around a bit –
trying to make a straight 30cm cut with a horizontal
saw blade on a curved surface with your off hand isn’t
easy!
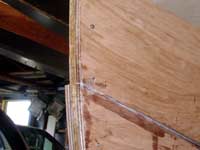
To clean this edge up, sit the saw vertically on
the little ledge along the bottom of the gain and
cut straight down to the first pencil line.
It pays to dry fit the next plank up a couple of times
during this process. I found that the rear end of
the gains had to be faired out a bit further than
I expected to avoid a lump in the higher plank. The
end result should look something like this. Pretty
cool eh!
| The gain glued
up. |
|
|
 |
One more
to go.
|
|
By now you are probably sick of planing, so here
is a speedy way of cutting the bulk of the plank bevels.
Simply saw off the waste, using the pencil line you
marked right at the start and the next stringer up
as guides.
It works really well where there is a decent angle
from one plank to the next (for example, the aft 2/3
of a Pathfinder) but be VERY CAREFUL as you get nearer
the bow. It is very easy to cut too low where the
planks flatten out. As long as the saw cut is above
the pencil line you are pretty safe, and it saves
a huge amount of planing.
| Beveling the
plank with a saw. |

|
|

|