|
Obsolete Outboards |

|
|
by Max Wawrzyniak - St Louis, Missouri - USA
Lower Units
Part 2 - Part 1 |
 |
If the engine is jumping out of gear and the linkage is adjusted correctly and is not overly worn or loose, then the problem is most likely in the lower unit and it will have to be disassembled. Odds are the clutch dog has worn or chipped teeth (Figure-11), and/or the forward and reverse gears have worn/chipped engagement lugs for the clutch dog. Start by draining the oil out of the lower unit. Although the lower unit can be disassembled without removing it from the rest of the engine, I prefer to remove the lower unit and clamp it upside down in a vise (padded well) or by clamping the anti-cavitation plate to the edge of the work bench. Either way, shift the engine into reverse before beginning the “tear-down.”
|
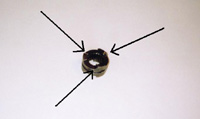 Figure - 11 Figure - 11
Dog clutch showing chipped and worn engagement lugs; the engine this dog clutch was removed from was “jumping” out of gear. Damage was most likely caused by improper linkage adjustment or improper shifting by the operator.
|
(click images for larger views)
|
Remove the propellor and the pivot pin screw that I mentioned earlier. Next, remove the (6) or (8) screws which hold the bottom (top, with the lower unit upside down) of the lower unit on; the half with the skeg (fin) on it. Slowly and carefully lift bottom of the lower unit up off the other half of the housing.. You should now be looking at all of the gears and shafts and other innards of the lower unit (Figure-12). This would be a very good time to start taking photos and making written notes of exactly how every thing goes back together (Figure -13).
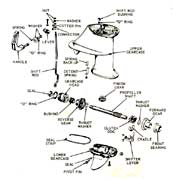
Figure - 12
Diagram of lower unit “transmission” and shift linkage for a smaller OMC outboard; larger outboards are similar with th exceptions that they have roller and ball bearings for shafts instead of bushings, and that there is a disconnect in the vertical shift shaft for removing the lower unit. |
|
|
The larger big twin engines will have roller and/or ball bearings on the prop shaft while smaller engines have their prop shafts running in bronze bushings, some of which are cast into the housings and are not replaceable. Other than that, all of these lower units look pretty much alike. Note the forward and reverse gears on the prop shaft and the dog clutch on the prop shaft between the two gears. You can lift the whole shaft up out of the housing but be alert that parts do not fall off of it. Check the engagement lugs on the dog clutch and also the corresponding lugs on the faces of the gears. Rounded or chipped edges on these lugs are a problem. Damage to these lugs is almost always caused by either improper adjustment of the shift linkage or by improper shifting technique by the motor’s operator (Figures 14 &-15). Outboard motors should be shifted “crisply,” and not “eased” into gear. Do not ever force an outboard into gear, however. An outboard motor being shifted too slowly will usually emit a rattling noise which is caused by the engagement lugs bouncing off each other before fully engaging. This bouncing of the lugs is what causes the damage.
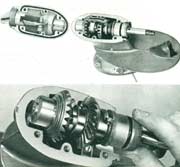 |
Figure - 13
Lower unit of a smaller outboard upside-down and “opened-up.” |
|
If excess wear is limited to the forward lugs on the clutch dog, often the dog can be removed from the shaft and turned around so that forward gear is now being engaged with the former reverse lugs on the clutch dog. This will probably cause the engine to jump out of gear in reverse now, but reverse if used much less often than forward gear and at much lower speeds. The best solution would be a new clutch dog, but that might not be available or if available might cost more than the motor is worth. Another option is used parts but be sure to inspect used parts to be sure they are in better shape than what you removed from the engine. Again, pay particular attention to the way everything comes apart so that you will know how to reassemble it later; photos and notes can be invaluable (Figure-16).
Figure - 14
Improper shifting technique by the outboard... |
|
|
If the engagement lugs on the gears themselves are rounded and/or chipped, or if the gear teeth are damaged, you will need new gears, or maybe another lower unit. Or you may elect to set the engine aside for use as a “parts engine” and seek a better specimen of the same model or a similar model. If the cast-in bronze bushings are worn, you will need to find another housing. It should be noted that a good machine shop could repair the chipped/worn clutch dog and gears, and worn bushings in the housing, but if you have to pay retail price for the machine work you are going to end up with a very expensive engine.
 |
Figure - 15
....motor’s operator can lead to major damage. |
|
If you have torn-down the lower unit to correct leaks, there are several areas that could be responsible. The propeller shaft seal is the most obvious place. Fishing line wrapped around the propeller shaft is a common seal-killer. The prudent outboarder will frequently check the lower unit for fishing line. The prop shaft seal can removed form the gearcase head by driving it out. There may be (2) small holes in the gear case head allowing the seal to be driven out with a pin or punch and a hammer. Otherwise, some type of puller will need to be utilized. Pay attention to which face of the seal old seal faces forward, and gently tap the new seal into place. If you bought a seal kit, you will have a new “O” ring to put around the gear case head, so you might as well remove the old “O” ring, clean it’s groove taking care not to nick the surface. A light coat of gasket sealer on the groove would not hurt.
Figure - 16
Parts diagram for the typical gear shift lower unit. |
|
|
Another potential leak is the vertical drive shaft seal located under the water pump. To replace this seal, you will need to remove the water pump housing, impeller key and wear plate. At this point the drive shaft should lift right out of the lower unit unless you have one of the few model engines which have a snap ring holding the pinion gear onto the bottom of the shaft which you will need to remove and which will require a pair of snap ring pliers. Once the drive shaft is out, remove the seal from the housing with a puller of some sort or by prying it out. Tap in the new seal, slide the drive shaft back in making sure it is fully seated in it’s pinion gear. Install the pump wear plate, impeller key, impeller, and pump housing.
 |
Figure - 17
Installation instructions for the “spaghetti” seal... |
|
Another source of leaks is the seal around the shift shaft; this is an “O” ring which is held in the housing by a retainer that must be driven out with a round bar of the proper diameter. Or the special tool which you don’t have, of course.
Figure - 18
....that seals the joint between the
two halves of the lower unit housing. |
|
|
The final place for leaks is the “spaghetti” seal between the lower unit halves. Note the service bulletin which explains the proper installation of this seal (Figures-17 & 18). After all of this, your lower unit still may leak a bit. It is difficult to get an old two-piece lower unit to seal as well as modern one-piece lower units and that is why I suggest that those perfectionists among you lower your standards a bit when it come to lower units.
 |
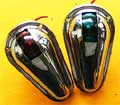
Figure - 19
Parts diagram of the non-shift "weedless" lower unit usually seen on the 3 hp models. |
|
By the way, the “non-shift” lower unit of the 3 hp models is a much simpler unit that is much easier to work on (Figure-19). The engine can swivel 180 degrees for reverse, and the lack of a neutral with such a small engine is not that big of a hardship, in my opinion.
Personally, I just prefer to frequently change the lower unit oil than to mess with all of the above, assuming the lower unit does not leak too bad. a shifts correctly. Only in extreme cases will I attempt to re-seal a lower unit. Your choice.

click here for a list of Columns by Max Wawrzyniak
|