Shallow Draft Boat Tents
by Robert West
illustrations by Claire West
Small Boat Journal #44 September 1985
Much is said about the merits of small cruising
boats — small cost, small upkeep, and small draft. However,
little is said about the smallest item of all, living space.
This can turn out to be the biggest problem in your cruising
experience, and generally shows up on the first night of your
first cruise. Only then do you face the reality of life crammed
amongst two weeks of tangled supplies, cameras, books, clothes,
and water. And wind. And rain. You and your mate better be very
good friends at this point.
Fortunately, there can be much more living space,
as we first learned in a West Wight Potter, and later, in a
Dovekie. We tried simple boom tents, and found they offered
basic protection, but were hardly satisfactory for really comfortable
nights, or extended weather watching. With a little more work,
you can make a larger tent that will increase the cruising range
of your boat, both on land and on water, and be even more comfortable
than many sailors in large craft. You might even be able to
quell that urge to “trade up,” at least for awhile.
Here are some things to consider:
1.Use
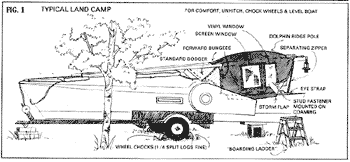
A well-designed tent can be used on the boat on
land (Fig. 1) as well as on the water. It’s a good way
to reduce traveling expenses and meet interesting, if land-locked,
people. We have enjoyed state campgrounds the best.
You might have to rearrange mast and boom storage
to accommodate your tent. Sometimes, as in the Dovekie, the
mast and boom are integral parts of the tent, ashore or afloat.
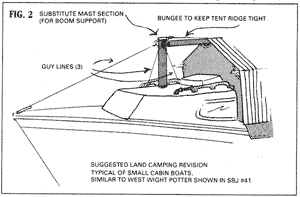
In a cuddy-cabin boat, like the Potter, you can design special
gallows to hold the boom in position, or provide a short mast
substitute (Fig 2). Don’t be limited by your current road
rig.
2. Setup Time
Your tent should set up fast - a couple of minutes
is long enough. It shouldn’t be tricky or complicated.
The fewer pieces of cloth and hardware needed, the easier the
whole design works. One of our first tents took over 20 minutes
to rig, had over 35 separate parts, and needed a checklist longer
than the boat. And it took two of us to do it. Our most recent
design takes one person less than two minutes to rig. That’s
what you should aim for.
3. Room With a View
You are not making a portable cave. Visibility
is not only entertaining, it is essential. Our first boom tent
was windowless. Once we woke to the ominous sound of splashing
water. After a frantic scramble to undo the tent, we found we
had dragged our anchor and were nearly impaled on some sharp
rocks. Better anchoring technique was our first revision; clear
vinyl windows was our second. The view is nice, and it lessens
the effects of cabin fever on rainy days. Try to have windows
all around.
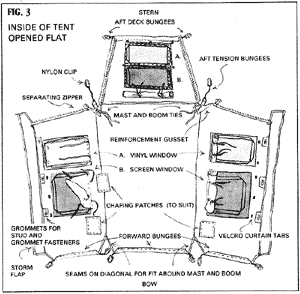
After windows, then screens. We found that separate
windows and screens worked best (Figs. 1, 3, 4, 5). Inland or
Ipswich, who needs mosquitoes or greenheads? Finally, sew some
curtains and keep them out of the way with simple ties (Fig
4). And keep your lanterns low unless you want to provide the
fleet with an interesting shadow show.
4. Keeping Dry
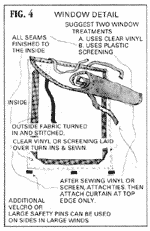 Fig 4. (click to enlarge)
 |
Water must be given a way down, or it will find
a way of its own, usually on your books, or camera, or into
your sleeping bags - wherever it will cause the great consternation.
Include a peak or high ridgepole, and arrange your seams to
shed water rather than collect it (Fig.4) Use storm flaps (Figs.
1,3) for those compound curves and angles so common small boats.
Also include half a dozen horse blanket pins for unexpected
leaks and similar emergencies.
5. Entry and Exit
Can you get in and out in a hurry? Check out the
differences between entry and exit on land and water. Land camping
will also require leveling gear (We use polypropylene utility
baskets and small lumber offcuts for shims.). Generally, you
will have to unhitch your car. Don’t forget to carry wheel
chocks (1/4 split logs great) and a cheap level to set up the
rig so you aren’t rolling into the bilges or slowly working
your way forward or aft through the night.
6. The Cooktent
If you plan to cook in your tent (where else?)
make provisions to avoid tent burning, a potential hazard that
could make any cruise more than memorable. We keep our stove
in the bottom of the boat away from the tent wall. If your stove
puts out a lot of heat, hanging deflector shields of do-it-yourself
aluminum might be helpful.
7. Loose Parts
The most successfully designed tent will be in
one piece, with no loose parts. If this is your first attempt,
you will probably think of screws and nuts, even wingnuts for
fasteners. Forget it. Why? Put your hands in the freezer for
10 minutes, then balance on the edge of your bathtub, on your
knees, leaning out as far as you can, and try to fit part A
(the screw) with part B (the nut), all the while imagining the
tub lurching in all directions, in a driving rain, one half
hour after sunset.
So how do you hold the whole apparatus together?
The old fashioned way - with ties. Or you can use Velcro to
get started, but the final security should be with reliable
century-proven knots. Large separating plastic zippers are great
fasteners, adding to the convenience and versatility of the
tent (Figs. 1, 3 & 5).
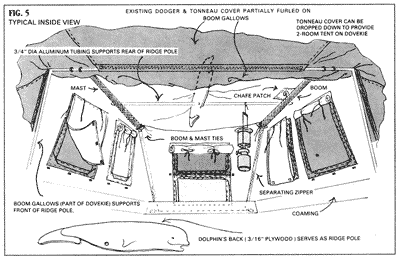
Fig 5. (click to enlarge)
Tent poles should be aluminum, of the same length,
with identical end fittings. Poles can be joined in the middle
with a dowel fixed in one segment. Its exposed end should be
heavily varnished for waterproofing and loosely fitted in the
other pole. (A loose fit will prevent the two halves from becoming
permanently joined when its rains.) Poles can be secured with
compression cords made up of line and bungees (see SBJ#41).
Decide where and how you will hang lanterns. Again,
watch the heat. Some lanterns have built-in deflectors; some
do not. Look for the simplest solution to whatever problem you
have. If the answer comes very quickly, be suspicious of it.
If the answer is too complicated, start over. Play What If?
What if I drop that piece over the side? What if it is wet,
will it come apart? Will it go together? What if I have to take
it down, or put it up alone? Although your final structure may
be as sound as the dollar in West Germany, there might be a
time before all is done that it’s very tender. Can parts
be blown over the side? How will those yards of cloth handle
in the wind?
8. Does It Fit...People?
So far we’ve only been talking about how
the tent fits the boat. It must fit you, too. Poles intruding
on what little space you have, lines running wild through living
spaces are not useful by any stretch of the imagination. You
want clear room wide open spaces.
In our Dovekie, we built for overhead clearance
and rain pitch by using a “dolphin” ridge piece
(Fig 5). The mouth of this 3/16-inch piece fits over the permanent
boom gallows. A hole in the lower rear part of the dolphin accommodates
a 3/4-inch aluminum tube, which spans and rests on top of the
boom and mast. This arrangement supports the tent with no center
poles or lines encroaching on the living quarters. The aluminum
pole slips out of the Dolphin, and both store flat against a
locker.
On cuddy cabin boats, you might consider using
large sail battens as crosswise inner tent bows. They are flexible
and store flat. You should use pockets and ties to keep them
in place, similar to those shown on the West Wight Potter tent
de- scribed in SBJ#41.
We have seen much larger boats than ours with
less living room than our tent provides. In fact, we are able
to use the standard road tonneau cover to help form a two-room
tent, at no extra cost (Fig. 6). This is not to suggest you
plan for three rooms and a sauna, but the peculiar construction
of your own boat may lend itself to unique solutions and directions
you may not consider at first. Take your time and think things
out.
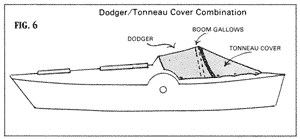
Fig. 6 (click to enlarge)
9. Sewing
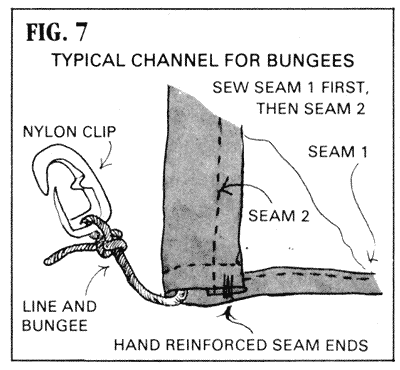
Can you sew it yourself? You need a machine, confidence,
and a willing and patient helper who will gather, hold and feed
shapeless gobs of material, vinyl, and screening. Just about
any machine or stitch will do. We used a 36-year-old Singer
and a straight stitch with a simple cap seam where we attached
the vinyl and screening and a folded seam elsewhere (Fig 7).
For truly inaccessible areas, fall back on a Speedy Stitcher
or a palm and needle. This is especially handy to retrofit chafing
gear, or in general repair work.
Our first two tents were of standard, sale-priced
awning material. Cheap, but heavy. Our next tent was made from
synthetic sail cover material, much lighter, much softer, much
more expensive, and worth every penny. Don’t use material
so waterproof that it will sweat.
10. Spare Parts and Repairs
For emergencies, wide duct tape, large safety
pins (also called horse blanket pins), and a hank of 1/8-inch
line are essential. Spare tent material and suitable chafing
material will be handy sometime. A Speedy Stitcher, sewing palm,
and needles should be included. Keep all the needles wiped with
Vaseline and in a separate container, perhaps a used pill bottle.
A small lump of paraffin will help lubricate zippers. Cheap
grommets will either rust or pull out. Get quality grommets
from sail material suppliers.
11. Dry Runs
After you complete your tent, plan several sessions
rigging and unrigging it in your driveway. Do it in the wind
and rain, going up, and coming down. Amuse the neighbors by
settling in for a night, and work the tent. Do all this well
before a trip to give yourself time to make and test changes.
This should also familiarize you with the road rig, getting
your shims, boarding stools, and wheel chocks together. Play
What If? with your leveling routines. This dry tenting will
save you a lot of headaches later.
12. One More Time
This is not a circus tent designed to amuse onlookers.
Keep it simple. Play What If? as you design it. Measure three
times (in place, on the boat), cut once. Have no loose parts,
if possible. Use it ashore and afloat. Plan for a fast set-
up and tear down, by one person. Arrange for a view, keep out
bugs, and stay dry. Do all this, and you’ll cruise with
the comfort of 40-footers in waters they can only dream about.


