Building Wee Rob
By Paul Kessinger
Building a small, glued-lapstrake craft is a wonderful
experience. Without a whole lot of internal structure, ribbands
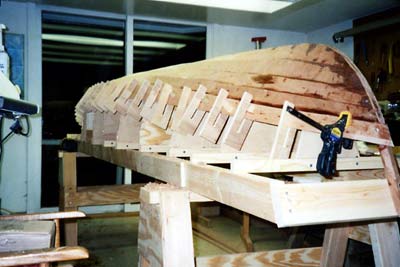
or framing, you move to planking quickly. Once you start planking,
the boat grows rapidly into a shapely, tight structure, thanks
to the wonders of indestructible marine plywood and only a half-gallon
or so of epoxy.
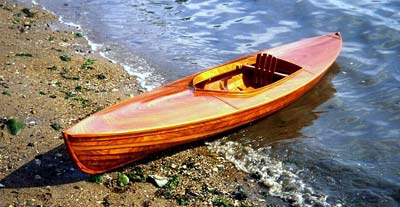
With glued lap you get a boat that looks like a boat, with beautiful
curves highlighted by multiple shadow lines. And its real wood
(well, kinda) that you can paint and varnish without constant
reference to a chemistry book.
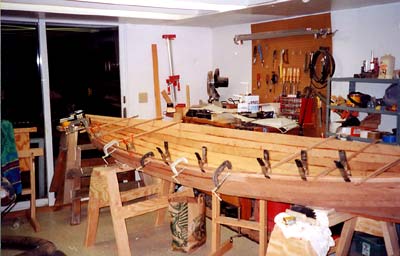
Here are some thoughts on the building process from the point-of-view
of a basement boatbuilder with an average shop and less-than-average
skills who has just finished a decked “Wee Rob” double-paddle
canoe designed by the glued-lap virtuoso, Iain Oughtred.
Tools of the Trade

Cutting out, cleaning up and adjusting planks to
fit takes the most time in building these boats, so coming up
with a fast way through the process is imperative. I’ve
tried three techniques and find that using a cordless 3.5-inch
circular “cutoff” saw turns out almost ready-to-go
planks. A regular circular saw is heavy and is meant to go straight;
a jigsaw wanders in my inexpert hands and leaves too much work
to plane back “to the line”; but these little saws
seem to take the sweeping curves inherent in small boats very
cleanly. And there is no cord to trip over, cut through or catch
in the saw kerf (I’ve done all three).
A decent plane is an absolute must for building these boats,
but you don’t have to go overboard – catalog quality
Records and Stanley’s are fine. But you must learn to sharpen
and sharpen frequently, because in this 12-foot boat, you will
be planing 144-feet of “lands,” the area where the
planks meet for glueing. You don’t need a sharpening system
or even a grinder. I use an inexpensive combination waterstone
and a Veritas jig to check to the angle between the stone and
blade. If I sharpen twice per land, the plane is happy and the
shavings fly off. If I don’t, one land takes forever to
hack off and I’ve lost all the time I saved by being lazy.
I firmly believe you have to have two battery-powered electric
drills, one with a bit and the other with a driver, available
at all times if you are going to build a glued-lap boat by yourself.
There are simply going to be times when a piece of wood has to
bend a half-dozen ways in three places and slippery epoxy is oozing
all over everything. Tossing in a self-tapping screw or two –
or six – to hold things together until gravity stops trying
to ruin your boat is essential. Changing from a drill bit to a
driver would require the fourth hand that you need when you are
already one short, so having two drill/drivers ready to go really
works – even if your drilling drill is a $19.95 Wal-Mart
special with a cord.
Scarfing – The Bad, the Ugly and
the Good
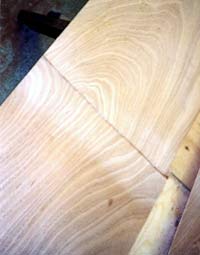
Good scarf |
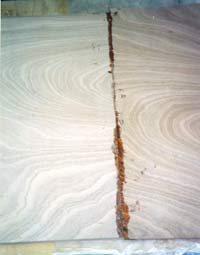
Bad scarf |
I made a hash of scarfing plywood panels together
into lengths long enough to make planks, and finally had to redo
them all. I learned three things in the nightmarish experience
that I thought would cost me $300 bucks worth of sapele plywood:
- 4 mil stock needs to be handled one scarf at a time, gently
and precisely. Take your time and sharpen your plane when it
starts to tear the least bit. A flat, stable material such as
plain old waxed paper on your bench and between scarfs works
much better to prevent sticking than crinkly plastic, which
leaves globs of epoxy on the scarf.
- You can’t sand out your mistakes. I used the Norm Abram
approach of a big ol’ orbital sander to try to smooth
up my first rough, ugly scarfs and tore through the veneers
in about 3 seconds, with the epoxy laughing back at me, untouched.
- Even less-than-perfect scarfs really don’t show on the
finished boat. Varnish or paint tends to blend them in, and
I think the small size and dramatic sweep of the planks tends
to run your eyes right past them.
The Gain-O-Matic
Once you’ve built your first glued-lap boat,
you will find spectators coming up to examine the “gains”
– the area where the plank overlaps magically disappear
into the stem and stern. This is done with what’s called
a “disappearing half lap.” You gradually plane and
chisel a half-inch rabbet seven or eight inches long into the
plank that's on the boat. Then you do the same to the inside face
of the plank that’s going to be attached to the boat. Voila,
the planks mate and become as one.
The problem is that hand-cutting gains is a delicate and time-consuming
job – and there are exactly 50 of them on this one little
boat.
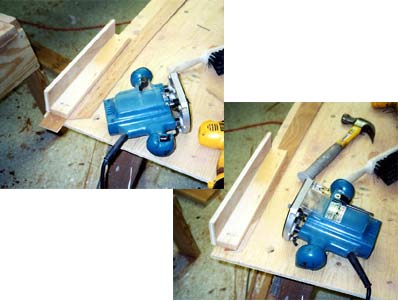
I determined to make a router-based “Gain-O-Matic”
to avoid the butchery that a chisel in my hand usually entails.
All you have to do is plane a piece of stock the width of your
router base from the edge to the bit that matches the length and
depth of the gain. Screw a piece of scrap to the edge of the stock
for the router to ride against. Screw (or clamp) the whole jig
to the plank and rout the outside edge. For the opposite gain,
put a piece of planking stock under the jig and rout the inside
edge. To keep the plank from moving while being routed, I nailed
it to the bench with brads.
Frozen Brown Snot and Other Delights
It is a very reassuring sight to see glue squeezing
out between the lands as you apply clamp pressure. It pretty much
assures a boat that will float. But if you don’t remember
to climb up into the mold and scrape the excess off before it
sets (or bribe your small children to do so), the clean-up process
will take as long as the planking. I think that a Dremel tool
with a rotary rasp is the best way to take off the missed spots.
It’s safer than a scraper or chisel, and (see above) a power
sander should not be allowed in the same shop as 4-mil plywood.
When you clean up the frozen snot squeezeout, any area of the
plywood that’s been touched will turn brown. But I was pleased
and surprised that after a light hand sanding, the solvents in
the varnish I used tended to blend in with the epoxy, and the
ugly brown splotches disappeared.
Torture Not Lest Ye be Tortured
In the United Kingdom, this type of building is
called “tortured ply.” It’s true with such thin
wood, you can twist and torture it down to the molds if you want
to. But every piece of plywood is a little different; every setup
is a little off. If the wood wants to assume a natural shape and
the planks meet in natural curves, don’t try to force them
down to the molds or you will surely get flat spots.
Iain Oughtred is not going to fly over from Scotland and give
you a hard time if your boat is a half-inch fatter than the plans.
If it looks good, it probably is good. If you can’t tell
what looks good, collect stamps.
For More Information
More opinions, pictures and tales of agony and ecstasy
are available at my Wee Rob building site:
https://www.geocities.com/pkessinger/WeeRob.html
|