Michalak Vamp
by Rick
Cunningham
About halfway through building
my Lewis LilJon,
I decided to do something constructive with all the rain delays
and try to read up on this boatbuilding business that had unexpectedly
turned into an obsession. Payson’s Build the New Instant
Boats found its way into our house to be followed shortly by
Michalak’s Boatbuilding
for Beginners (and beyond).
Within a few weeks I had both books nearly memorized, and had
decided the next boat would be stitch and glue. I’d used
taped seams in a few places on the LilJon and figured I’d
be ready.
 (click to enlarge)
 |
Just what now to build?
I wanted a rowing boat light enough to load in and out of the
truck alone. One that looks nice. And not too expensive [insert
appropriate Monty Python line here]. At a listed weight of 60
lbs, Michalak’s Robote
(plans are in the book) would fit the bill, but I was concerned
about beaching the hull’s 9” deep V on the gravel
landings at the lakes I usually visit. QT
Skiff was another possibility. Like Robote, the
plans were in the book, I could probably keep the weight down
a bit by building it stitch and glue, and the flat bottom would
be easier to beach. Both these boats are over 13’ long
though, and that’s a bit much for the bed of a Ranger
pickup. In the meantime I ordered plans for Vamp
and Rogue,
and spent several weeks with both plans layed out side by side
on the floor (all the while trying to get the LilJon finished).
 (click to enlarge)
 |
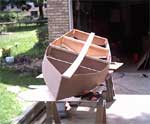
Vamp won out in the end. It’s
a shorter version of Robote with a shallower V, and required
fewer panels and less glassing than the multi-chined Rogue.
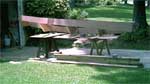
Wayne Farris and I live about 2 miles apart, and decided to
go in together on an order of 6mm Meranti marine ply. The plywood
stood in our dining room for several weeks before I finally
got up the nerve to carve up the expensive stuff, but the saber
saw did its job and I was off.
 (click to enlarge)
|
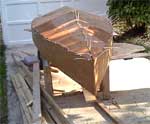
When the time came to screw the
forms to the sides, I was suddenly confused—Michalaks’
plans clearly state whether the front or rear edges of the forms
are to meet the lines on the panels, but which side was the
front? The side with the 1X2 sticks or the other one? After
installing all the forms backwards the first time and seeing
that the lines of the hull weren’t all that fair, I went
back through the book again, looked at the plans again, and
looked at as many Michalak construction photos online as I could
find. The front form ended up staying backwards as that’s
the only way I could get the sides and bottom panels to meet
at the bow. I must have measured something wrong, but it was
too late to fix it now… The trick of lining up a 1X4 along
the centerlines of the frames, stem, and transom works. I was
worried that with no flat bottom to keep everything shored up
square as I worked on the boat (all that rocker and V bottom
had me chasing the hull around on the sawhorses a few times!),
the hull would end up twisted. Nope, sighting down the forms
even after the taping was finished and the 1X4 removed it was
straight as an arrow—and giving my building skills, that’s
saying something.
 (click to enlarge)
|
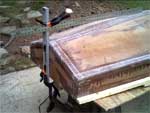
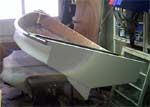
Getting the 6mm panels to bend
in two directions at once turned out to be more of a challenge
than I’d counted on, but they finally cooperated. Somehow
I ended up with gaps of nearly an inch in the area of the center
form when all the sweating and tie-wrapping was done. I hated
it, but I wasn’t about to order more $50/sheet plywood.
This would be a good test of fillets and taped seams. Somewhere
in the process I got tired of mixing up epoxy and wood flour
for the fillets and grabbed a handy can of Bondo. Worked great,
cured a lot faster, and didn’t squish around when laying
down the tape. Given that, I could put up with the smell.
 (click to enlarge)
|
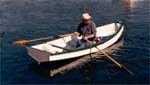
Rotator cuff surgery delayed
the finishing of the boat, but after a couple coats of Severe
Weather latex on the hull and oil enamel on the gunwales and
thwarts, she was finally ready to get wet. Up until the launching
of this boat, most of the rowing I’d done was in the LilJon
I’d built earlier in the year. I wasn’t sure what
to expect of a light V bottom skiff that was actually designed
for rowing.
 (click to enlarge)
|
Holy Smokes! Even without the
cleats to dig your heels into, this little boat would scoot
with very little effort. With the shallow V bottom and the plank
seat you have to keep your legs straight out in front of you
to keep them out of the way of the oars, but once that adjustment
is made the only hard thing is figuring out how far ahead of
time you have to stop rowing to be able to stop! A very responsive
boat, even for a novice rower.
 (click to enlarge)
|
By the time of the Lake Jordan
Messabout the cleats were in place, and I (and everyone else
there) was surprised at just how fast Vamp will go when you
can put your back into it. Several there, including Wayne and
our host Mikee gave it a whirl, and everybody had good things
to say about her. I made several mistakes in building this boat
(which aren’t hard to spot if you look close), but the
fact that it turned out to still look good and perform as well
as it does is a testament to Michalak’s plans.
 (click to enlarge)
|
My original plan was to fillet
all three seats in place instead of using removable planks as
Michalak recommended. This will work if you use the boat alone
and leave the center seat in permanently, but with 2 people
aboard the center seat needs to be removed to allow enough legroom.
So if your plans are to use your boat with 2 aboard most of
the time and the extra length isn’t an issue, Robote would
be a better choice.
If you’ve been thinking
about a good lightweight rowing boat, consider Vamp. Mine’s
a keeper.