A 14-foot Chesapeake Sharpie Skiff
A simple, strong, easily handled sailing
skiff of proven design
by HOWARD I. CHAPELLE, BOATS magazine, 1956
Edited by Craig O'Donnell
In 1956, Howard Chapelle penned
a five-part series called "The American Sharpie Yacht,"
in which he set out his case for shallow-draft flat-bottom pleasure
craft based on American working boats of about 75 years before.
He worked his way from discussing regional sharpie construction
methods to seaworthy sharpie cruisers based on Commodore Ralph
Munroe's famous Egret.
Today we may not associate Chapelle
with cheap daysailers and cruisers, but that is exactly what he
was about in his articles for the long-defunct magazine BOATS.
As an illustration he designed a Chesapeake skiff and wrote a
construction how-to. Because I live on the Chesapeake Bay I recognize
the value of small boats drawing no water to speak of, and when
I read this unfortunately obscure series I got fired up to present
it to a new audience (the prose was a little rough and ready and
parts read like a first draft). The ideas and discussion are just
as valuable today as they were in 1956, and if anything the designs
would be easier to build full-size using epoxy and plywood.
The skiff is Chapelle's own design,
based on a craft he measured at Coan, Virginia. You can order
large-scale plans from the Smithsonian -- # HIC-105. The skiff's
dimensions are: 14' by 5' with draft: 1' (cb down 2'6").
Sail area is 78 sq. ft.
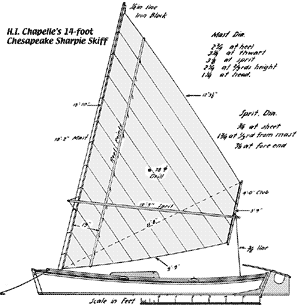
Sail plan of Chapelle's handsome sharpie
skiff. (click to enlarge)
BEFORE the motorboat replaced sail
in the Maryland fisheries a great many flat-bottom and V-bottom
skiffs were in use. The fourteen- or fifteen-foot flat-bottom
sharpie skiff with a single sail, fitted to row, was very common.
These had probably been used since colonial times but by 1890
a very fine hull and rig had developed. This moderate cost boat
made a useful sailing and rowing skiff.
Particular effort was made to get
good sailing qualities, for if there was anything an Eastern Shore
crabber and oyster tonger really despised (besides a state conservation
policeman), it was the labor of rowing. But when he had to row,
he wanted a boat that rowed easily even when heavily loaded.
Since he did a great deal of his
work standing up in his boat, he wanted a stiff craft, one not
easily heeled to a dangerous degree under sail, or at anchor,
by the crew weight on her side. When crabbing or tonging it was
necessary to stand near the side, as close as the coaming permitted,
to handle the gear. Since these skiffs were usually worked by
one man, they had to be very handy under sail.
Not least in importance was cost.
The boat had to be inexpensive and usually this means easy-to-build.
In fact, most were built by their owners, though there were some
boatbuilders who produced very fine sailing skiffs.
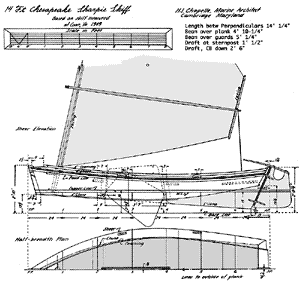
C2a -- Sheer and half-breadth plans. (click
to enlarge)
These factors are still important
today. This form of skiff, practically unchanged, is fit for modern
use. The square stern would take a small outboard, off-center,
to fit alongside the rudder -- with the standard shaft length
it would be desirable to cut down one side of the transom about
4 inches between stern post and coaming, to give the propeller
a good bite on the water. Engines in the 1 to 3 horsepower range
are suitable.
Body plan. (click to enlarge)
Construction is largely that employed
in small sharpies. [The heavy crossplanked bottom provides structural
strength and weight down low.] It should be properly lofted and
the molds set up securely, the boat being built upside down until
ready to deck. In Maryland, the sides are usually local hard pine,
as are stem liner, skeg, keelson, chines, cutwater, frames and
thwarts. The bottom plank, decking, and transom, are softwood,
cedar or juniper. The rudder, centerboard and stempost are sometimes
pine but more often oak. Spars are pine or spruce. Galvanized
iron boat nails are used wherever possible, small rod for bolts.
Where extra holding power is required, use galvanized iron or
steel carriage bolts. Materials are not specified since you would
use whatever is easily available locally. The skiff may be built
almost entirely of spruce, fir, cedar, yellow pine or other boatbuilding
timber as desired. Spruce spars are most desirable if they are
to be carried ashore often.
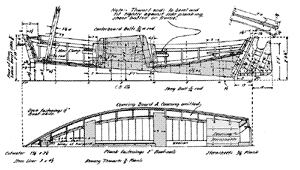
Construction details. (click to enlarge)
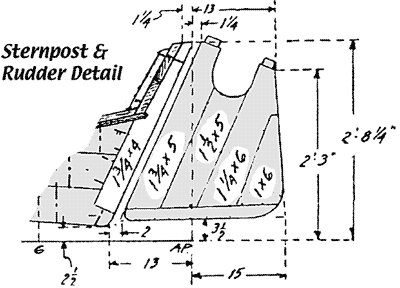
Rudder and sternpost dimensions. Today we'd
build the rudder and skeg
from laminated plywood instead of edge-bolting timbers.
In the hull, there are a number
of details which are useful ideas in building any flat-bottom
boat.
A common fault in a flat-bottom
skiff is leakage at the extreme bow and stern caused by these
parts being out of water when the boat is moored, which allows
the bottom plank seams to dry open. The old time boatbuilder used
to plank the bottom near stem and transom with tongue-and-groove
plank, or he inserted a spline in each seam by first grooving
each plank edge.
The frames are simple battens on
edge. These are wide at the head to support the covering board
without deck framing. Their heels overlap the chine logs but do
not come down to the bottom planking, in order to avoid interfering
with the scoop bailer usually employed. A smooth inside chine
enabled the bailer to scoop out water and dirt without having
to work between each frame or sponge out.
There is no rabbeted stem. The
side planks are nailed to a triangular timber, a stem liner. When
the sides are bent over the molds and temporarily secured, the
stem ends of the strakes are sawn off square along the pointed
edge. The outside cutwater is bolted on over white lead, well
spread out, over the plank ends. [Today, we'd use epoxy. Bolts
are still OK. Chapelle points out in an earlier installment that
a heavily-built skiff is easier to build and maintain than one
built to lighter scantlings, easier to keep caulked, and as a
side benefit, will be stiffer than a very light boat. If this
is built as a trailer-sailer by all means modify the bottom to
use two layers of 3/8" or 1/2" plywood.]
The skiff's club rig was most efficient.
For one thing, the mast could be easily raised and lowered to
pass under a bridge or when it was necessary (God forbid it happen
often!) to row against the wind. Today this is useful when an
outboard engine is used to drive the boat against a strong wind.
Anyone who has attempted to lift
an 18 foot mast into or out of the common small boat thwart and
step, in a breeze of wind, knows it is a most precarious operation
requiring strength and agility of no mean order. The Maryland
Eastern Shoreman took a dim view of such strenuous pastimes so
he devised a simple, effective solution. First, the mast thwart:
this was placed so its after edge, hollowed out in a half-circle,
came to the mast centerline when stepped. The mast was secured
by a "clamp"; strap iron shaped as shown in the plan,
secured by two staples made of rod driven into the thwart's after
edge. These staples would be 1/4-inch iron rod in this skiff and
would be driven into the thwart about 4 or 5 inches; suitable
pilot holes are bored for each leg. The clamp was slotted, passing
over these eyes and held there by iron or hardwood pins or wedges.
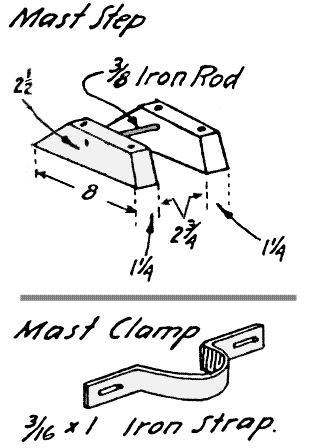
Eastern Shore mast step and clamp.
This clamp business left the fisherman
with the problem of getting the heel into the step. The Marylander
solved this by a simple design; the step was made of two fore-and-aft
plank chocks, each bolted to the bottom through the keelson, and
just far enough apart athwartships to allow the mast heel to fit
snugly between them. Through these chocks an iron rod was driven
athwartships -- near the top of the chocks -- as shown in the
plans. Now, the mast heel was slotted athwartships to fit snugly
over the pin. Well, to step the mast, you placed the heel of the
mast between the chocks with the slot over the rod and then walked
the mast up until it came home in the thwart -- after which you
put the clamp into place, holding the mast in position by one
shoulder. To lower the mast you reversed the process, with everything
under control. It was all very simple.
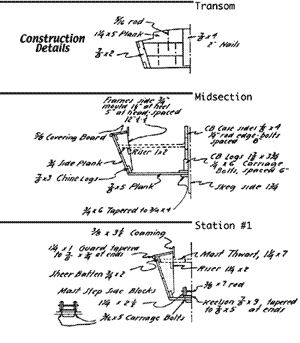
Sections showing construction. (click to enlarge)
The sail requires a few words also,
as it is quite different from the modern dinghy sail but just
about as efficient. It is laced to the mast with a spiral lacing.
A good dodge is to secure small brass thimbles to the luff by
lashing each to a grommet with its eye up-and-down the luff; use
marline round-and-round, ending with turns over-and-over between
thimble and sail roping. This makes the thimbles stand rigidly
with their openings up-and-down. A spiral lacing around the mast,
through these, will not jam while hoisting or lowering sail.
The sail has no boom proper, being
spread with a sprit. The heel is forward alongside the mast. Here
it is secured by a line spliced in a loose eye round the mast;
the tail is brought through a vertical slot cut in the sprit's
fore end and then brought down and around the mast below the sprit
and tied there. [Today we'd probably use a small tackle leading
aft for simpler adjustment.]
The reef stands vertical and parallel
to the luff. To reef the sprit is let go before lowering sail,
allowed to go forward but held by tail of the snotter around its
fore end. Lower the sail by its single part halyard. After tying
the head cringle to the luff with a short piece of marline, you
tie in each reef point, around the luff rope, beginning with that
nearest the head of the sail. After each point is tied, the sail
is hoisted a bit. Finally the foot cringle is lashed to the luff
with marline and the sail is reefed. The reason for this form
of reef is to keep the rolled sail as dry as possible, for a bundle
of sailcloth along the foot in a small boat is heavy, gets wet
rapidly and so becomes a great nuisance.
At the leech there is a club to
enlarge the sail area enough to properly balance sail and hull.
Otherwise the sprit would have to be longer. This club is laced
on by a spiral lacing and removed from the sail only at the season
end. The sprit is secured to the club by a short line fast to
the club; this passes through a hole athwartships near the sprit's
after end and the tail turned up and tied there. The sheet is
a single piece of line made fast to the sprit end and the fall
or tail is commonly secured to a cleat inside the coaming -- but
held in the steersman's hand in strong winds.
Here is how the sail is handled.
To hoist, the sprit end is secured to the club, then the sprit's
fore end is brought to the mast and loosely secured by the lanyard
there. With the club laid athwartship in the sternsheets and the
sprit dangling loosely in place, the sail is hoisted and the halyard
belayed to the pin in the mast thwart. Next the sprit is set up
against the club by pushing it aft with a shoulder against the
fore end and setting up on the mast lanyard or "snotter."
[Or using the tackle.] Thus the sail is set quite flat. To furl,
the sprit is taken off and the sail wrapped around the mast with
sprit stowed inside of the boat. Or, the sail may be lowered and
stripped from the mast and taken ashore. You will find this sail
a handy one.
One more good feature: since there
are no shrouds or stays, you can let the sheet go when the wind
is aft and the sprit and sail goes forward of the mast to spill
the wind, if the snotter is not set up excessively hard. This
allows you to control boat speed downwind, something that can't
be done with the usual dinghy rig.
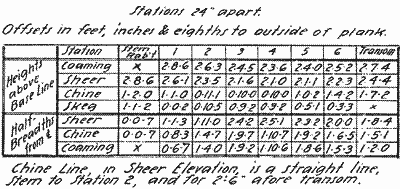
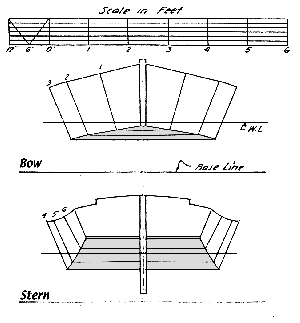
Offsets for setting up molds or plugging
into a
computer program. (click to enlarge)
An amateur builder of moderate
experience can construct her without great difficulty. Or your
boatbuilder can do the job. This is a good boat for many purposes;
fishing, picnicking, afternoon sailing, picking up ducks or just
snooping around.

|