Mayfly
At long last, my Michalak Mayfly
is finished. Pictures below.
I deviated in the plans in these
respects: I added cockpit frames, cockpit seating and side decks.
I went with a standing lug rig and jib instead of the balanced
lug, for reasons noted below. This ended up working great in the
end, although I wasn't the happiest camper when I had to bid adieu
to the balanced lug as noted below. I also used a different style
leeboard bracket than is called for in the plan.
Initially, I was torn between a
centerboard and leeboards. I went with leeboards. I built a centerboard
box, but didn't like the way it looked, and it took up a lot of
cockpit room. It was very heavy, too. I made the leeboards from
1/2 inch marine ply. I wish I had used 3/4 inch. I don't know
if the 1/2 inchers will stand up under use or not. The 1/2 inchers
work fine so far, but I have not been in a heavy blow yet. Even
if these snap, I now have a pattern on hand, so making replacements
would not be so bad.
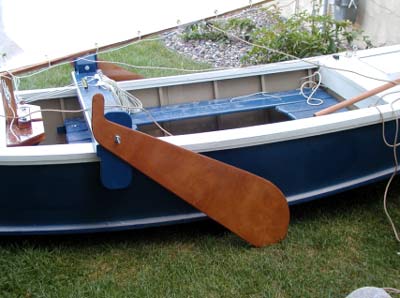
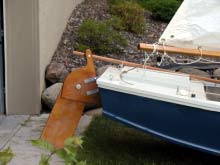
A
nice shot of the leeboards. Note the frames and sidedecks. I
needed the frames to support risers for the seating. Once the
frames were there, adding sidedecks was easy. The blue, interior
seating pivots upward and is removable in one piece. This should
make cleaning and upkeep easier. I built the seating mainly
for my boys. If I were out sailing with older folks, I might
leave it at home. I still have a lot of sawdust to clean up,
as is evident from this picture!
I used luaun plywood for the sides,
but marine ply for the bottom and decks. Other wood parts are
made from oak, cedar, and some pine. The construction grade wood
around here was very bad. It cracked and fell apart very easily.
I ended up using wood from the "good" stuff as needed.
For glue, I used Titebond II, epoxy,
PL polyurethane (thick and immediately very tacky), and Gorilla
polyurethane (thin, but easily spreadable). Each has advantages
in certain situations. I found the Titebond II only worked well
for wood to wood joints where the fit was very good. Titebond
II failed on some wood to luaun bonds, and I redid those with
Gorilla glue. Epoxy was used for all fillets and some parts up
by the stem, etc., where I wanted tried and true performance.
The PL glue is messy, but forms great, gap filling bonds between
decks and the chines/gunwhales. I edge trimmed the resulting bond
and edge capped the joint with 1/2 by 1 inch oak strips held on
with Gorilla glue and lightly countersunk screws. It is not a
glue to use where the joint will be visible or not edge trimmable.
In fact, when PL glue fully cures, it is tough to sand even with
a belt sander. Screw holes were filled, fairing, etc. was accomplished
with Bondo autobody filler per the advice of Stevenson Projects.
Polyurethane caulk was used at all corners where epoxy fillets
were not used.
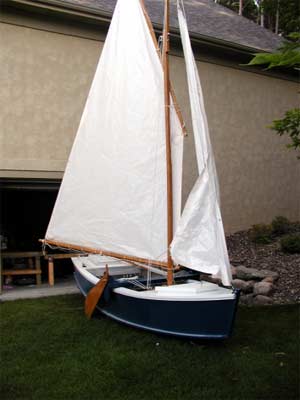
Well,
here it is August 12 and she's finally done. And I thought I
would be done by the end of April! The head sail has a brail
line to close it against the forestay. A cheap guy's version
of roller furling. It works nicely in light winds. I have not
been out in heavy winds yet.
I used a standing lug rig and a
jib as shown in the pictures. Basically, my 11 foot boom and yard
for the balanced lug called for in the plans each had nasty bends
in them after gluing up. Fortunately, the worst curvature was
toward the end of each. After trimming off the nasty parts, I
was left with a 9 foot boom and an 8 foot yard. The boom is pretty
straight now, but the yard has about 2 inches of curve in it.
Because of the way the leeboards are adjustable, I have good balance
sailing with both sails or with main alone. Lowering the standing
lug can be tricky! That yard likes to move about! Any techniques
here?
I made the hatch on the foredeck
too wide as I look back. Will water get in during a capsize? I
have a couple thoughts on how to fix this, e.g., using some filler
pieces in the wider hatch corners, or perhaps wedges to compress
the hatch downward onto its framing. The lower part of the hatch
has a 1/8 foam laminate bonded to it, and this foam could act
like a gasket.
The
rudder blade is held to the rudder housing using galvanized
gate strap hinges. All you can see from this side is the through
bolts. The strap hinges are seen in a picture on the last page
below. A trick was to contour the top of the blade and the inside
of the housing to provide a solid foundation for these bolts
while still allowing the blade to pivot up and down between
stops. This took a lot of trial and error to get right. Yesterday,
I realized I forgot to build a tiller! So I scavenged a handle
from a large shovel. I’ll have to build a real tiller.
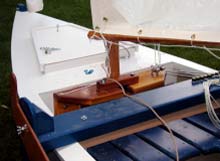
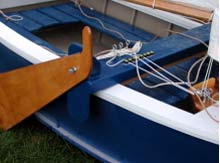
The leeboard bracket is easy to see here. This does several
things, besides mounting the leeboards. The top of it provides
a place for halyard jam cleats and bolt pairs (only one set
is installed here) to store rope coils. I need two more sets,
as I have three coils to store. The leeboard bracket is very
adjustable forward and back to get the right helm balance. And,
it stiffens the boat.
The seating structure is easily
removable to sail with it or without it. Support rails for the
seats are firmly braced between frames, so it does not move underway.
Yet, it pivots up and lifts out easily. The frames and
sidedecks seem to add a lot of strength to me.
The sails are made from white polytarp
and white duct tape, using the technique taught by Stevenson Projects.
Note the reinforcement patches at all the corners. I hope the
white duct tape is as good as the silver kind in terms of water
resistance! Time will tell, but so far so good.
I also used white duct tape to
"whip" the ends of my lines as I cut them. This is fast
and shows good water resistance to date. Easy to do: identify
the spot where the line is going to be cut. Tightly wrap the spot
with white duct tape ( a 1 inch by about 3 inch wide strip of
tape makes a good wrap. Then, cut through the middle of the wrapped
section. Squeeze the tape on the resulting two ends after the
cut is made. Seems to work well.
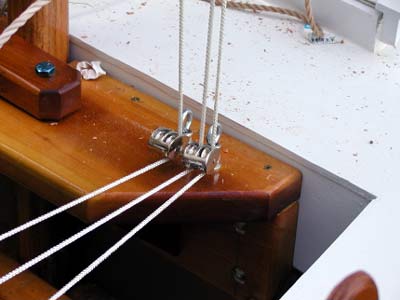
I
made real capable, compact halyard leads from double pulleys
and eye bolts. I can handle up to four halyards in a real compact
area. These halyards are for the main, jib brail, and jib. The
halyards head out to jamb cleats on the leeboard bracket. See
the big pivoting pin behind the mast? It opens to make mast
stepping and unstopping easier.
Note the halyard leads at the base
of the mast. These are double pulleys secured onto the shaft of
an eye bolt. A stack of nuts creates space between the deck and
pulley. The pulley is constrained to be horizontal, but rotates
freely about the eye bolt. I originally used bolts instead of
eye bolts, but the tops of bolts hurt more when you hit them.
I used the same set up in the stern deck for handling the jib
sheets.
The main sail is sized so it can
run boomless if desired. I want to try this, but it took a bit
of time to lace that boom on!
A very fun project, and Jim's
book made the whole thing approachable at the very
outset.
David B. Kagan
Hudson, WI (near Minneapolis/St. Paul)
dkagan@kaganbinder.com
|
A
nice picture of the strap hinges used to mount the rudder.
The bottom of the rudder blade is as rounded as the top.
It is funny how just a couple leaves in the way makes the
blade bottom look flat. |
A
good look at the leeboard bracket and the mast partner.
The leeboard bracket is very sturdy but weighs less than
ten pounds. Look how I crowded all the jam cleats at one
end of the bracket. What was I thinking? |
|
|
A
good view of the huge mess of line looped on the leeboard
bracket. This is a good reason why I need a couple more
places to store coils of line. |
|