|
|
Bath-tub Steam boats
by Derek Waters
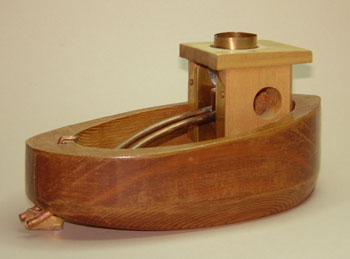
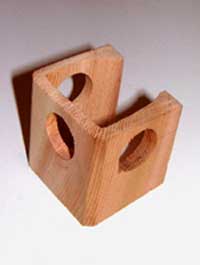
Although just over six inches long, this little tug has a
working 'live steam' engine. With a hull easily carved from
scrap wood, it uses a spirit lamp heating a simple flash boiler.
Once the 'boiler' has been filled with water and the fire
lit the boat will pause for a minute before puttering off
across the bathtub, making the 'putt putt' noise that gives
these boats their name.
Putt-Putt or Pop-pop boats have been around for a long time;
tin toy versions which have scarcely changed in the last century
can still be found in the stores. The undisputed home of Pop-pop
boats on the web is the
Pop-pop pages. Collected there is information on the theory
of (and patents relating to!) pop-pop boats, a list of retail
suppliers and more.
Getting
started:

(click image to enlarge) |
In addition to the wood for the hull, you will need a couple
of copper end caps of the type soldered in place to close
off 1/2" diameter copper piping. They cost pennies at just
about any plumbing or hardware store. Craft shops or model
stores sell the 1/8" inside diameter (5/32" OD) copper pipe
which carries the steam. The same stores will have the thin
brass sheet used for the heat shield 'funnel'. If you have
a choice of thicknesses, 5 mil (0.005") works well.
Building these little boats can be done 'by eye' - the rough
plans shown here (click for a full size version) are intended
as a starting point for your own experimentation. The bold
gridding is inches, subdivided into quarters; print the diagram
as 6" by 8".
The wood used should be light in weight. Where I live, knotty
cedar is sold rough for use as fenceboards. It sands to an
attractive finish, and it's easy to find enough clear stock
for a project as small as this one. Use whatever you can find
locally as long as it is lightweight. Basswood or even balsa
would do. Any waterproof wood glue will work.
Making
the hull:
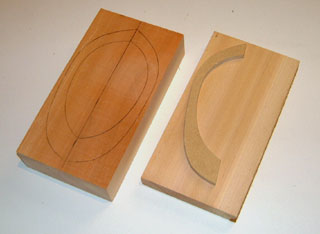 Square up a piece of wood an inch and a half thick and long
and wide enough to fit your hull. A seven inch length of '2
by 4' will work. From stiff card or thin MDF cut a plan view
template. Mark a centreline as shown. Draw round your template
and flip it across the centreline to draw a symmetrical plan.
Square up a piece of wood an inch and a half thick and long
and wide enough to fit your hull. A seven inch length of '2
by 4' will work. From stiff card or thin MDF cut a plan view
template. Mark a centreline as shown. Draw round your template
and flip it across the centreline to draw a symmetrical plan.
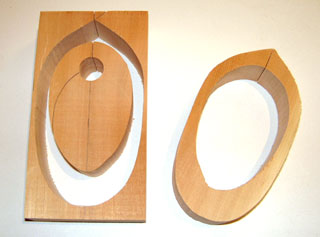
Using a coping saw, bandsaw or jigsaw cut around inside and
outside. The example was cut on a bandsaw - note the cut through
the bow on centreline. Other saws can have their blades passed
through a hole drilled in the waste wood and so will not need
this cut. Once the cut is closed by gluing and clamping it
becomes almost impossible to see.
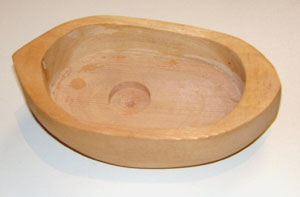
 Once the glue joint at the bow is set, glue the topsides
onto a suitably sized piece of three quarter inch thick
board (nominal '1 by 4'). While the '1 by 4' still has
straight sides, mark the topsides for a sheer line and
cut or sand down to shape. When you are happy with the
sheerline, cut around the outside of the topsides to
remove excess stock. Sand the basic hull to refine its
shape. Note that deck house and boiler weight is concentrated
towards the bow; looking at the plans you will see that
the forefoot of the hull is shown deeper than the run
aft, leaving enough wood below the waterline forward
to create buoyancy to support this weight.
Once the glue joint at the bow is set, glue the topsides
onto a suitably sized piece of three quarter inch thick
board (nominal '1 by 4'). While the '1 by 4' still has
straight sides, mark the topsides for a sheer line and
cut or sand down to shape. When you are happy with the
sheerline, cut around the outside of the topsides to
remove excess stock. Sand the basic hull to refine its
shape. Note that deck house and boiler weight is concentrated
towards the bow; looking at the plans you will see that
the forefoot of the hull is shown deeper than the run
aft, leaving enough wood below the waterline forward
to create buoyancy to support this weight.
|
 Drill two 5/32" holes through the hull, one on either
side of the centreline aft, to emerge just below the
waterline. The twin pipes from the boiler will be glued
through these holes later. Once you have checked that
everything fits together as expected it is a good idea
to drill a shallow recess in the deck into which the
lamp can nestle. Otherwise when the motor is running
there will be enough vibration to shake the lamp out
from under the boiler.
Drill two 5/32" holes through the hull, one on either
side of the centreline aft, to emerge just below the
waterline. The twin pipes from the boiler will be glued
through these holes later. Once you have checked that
everything fits together as expected it is a good idea
to drill a shallow recess in the deck into which the
lamp can nestle. Otherwise when the motor is running
there will be enough vibration to shake the lamp out
from under the boiler.
|
 |
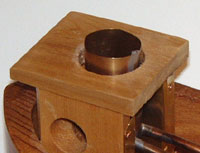 Walls for the deckhouse can be cut from one piece as
shown, or assembled from 5/16 thick 'boards'. A roof
for the deckhouse looks good with slightly more overhang
at the front than at the sides or back. Note that the
hole in the roof for the 'funnel' needs to be large
enough not to touch the metal heatshield.
Walls for the deckhouse can be cut from one piece as
shown, or assembled from 5/16 thick 'boards'. A roof
for the deckhouse looks good with slightly more overhang
at the front than at the sides or back. Note that the
hole in the roof for the 'funnel' needs to be large
enough not to touch the metal heatshield.
|
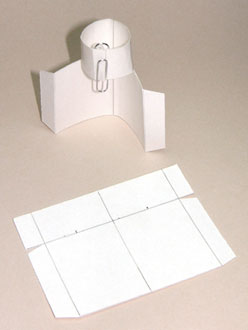 The
'smoke stack' is cut from thin brass or copper sheeting
with a tubular top section formed by crimping and soldering.
Two and a half by three and a half inches is a good
size, but check against your deckhouse to be sure. Make
a stiff paper or thin cardboard template to check the
fit. Metal sheet as thin as the 5 mil suggested can
be cut with ordinary scissors. The completed 'funnel'
can be attached to the deckhouse with small nails or
tacks. The
'smoke stack' is cut from thin brass or copper sheeting
with a tubular top section formed by crimping and soldering.
Two and a half by three and a half inches is a good
size, but check against your deckhouse to be sure. Make
a stiff paper or thin cardboard template to check the
fit. Metal sheet as thin as the 5 mil suggested can
be cut with ordinary scissors. The completed 'funnel'
can be attached to the deckhouse with small nails or
tacks.
At this point the deckhouse can be glued down onto the
deck and a coat or two of waterproof varnish applied,
but do not attach the deckhouse roof yet. It would be
in the way while fitting the plumbing. |
Propulsion:
The simplest 'pop-pop' motor would be a metal tube, closed
at one end like a test-tube, and filled with water. The open
end of the tube is placed under water and heat is applied
to the closed end. As the end of the tube heats up some of
the water boils into steam. The expanding steam forces water
out of the open end of the tube, and Newton's laws suggest
that whatever the motor is attached to will experience a push.
There's a fuller explanation of the theory available here.
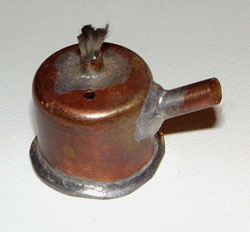
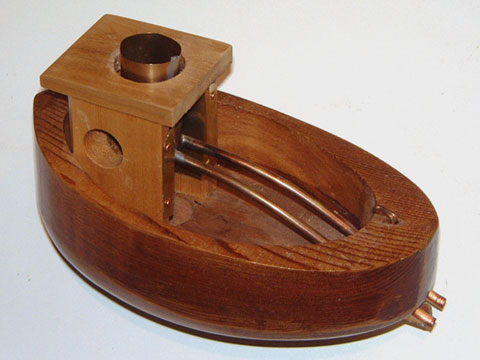
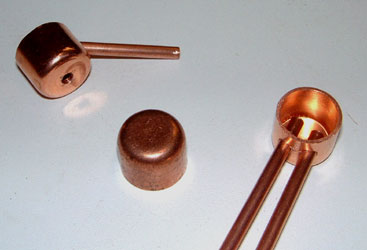 The motor shown without its top on the right here is
slightly more complicated than the test tube example,
but not by a lot. Having two pipes rather than one makes
it much easier to prime the system with water, since
the second tube allows air to escape as water is poured
into the first. Making a 'Boiler' from the end cap for
standard 1/2" copper plumbing pipe allows for a top
in very thin brass shim stock. Once soldered in place
the thin brass can be gently pressed into a dished shape
which will click in and out with each pulse of the motor,
producing a much more dramatic 'sound effect'. At the
left of the picture is an unsoldered lamp as described
below.
The motor shown without its top on the right here is
slightly more complicated than the test tube example,
but not by a lot. Having two pipes rather than one makes
it much easier to prime the system with water, since
the second tube allows air to escape as water is poured
into the first. Making a 'Boiler' from the end cap for
standard 1/2" copper plumbing pipe allows for a top
in very thin brass shim stock. Once soldered in place
the thin brass can be gently pressed into a dished shape
which will click in and out with each pulse of the motor,
producing a much more dramatic 'sound effect'. At the
left of the picture is an unsoldered lamp as described
below. |
As with any soldering job good preparation is key to good
results. Sand the open end of the caps square for a good fit,
and remove any oxidation with fine wire wool before making
the joints. Although I've silver soldered some of these little
motors, soft solder is more than adequate. If your motor gets
hot enough to melt its own solder, it is trying to tell you
something. Plumbers paste flux works fine. Plumbers solder
works too, although it is easier to solder some of the small
joints tidily if you use fine electrical size solder wire.
To make the clicker top for the boiler you will need a little
scrap of very thin sheet brass - anything much thicker than
one mil [0.001"] will be too stiff for the steam pressure
to flex. If there's no thin stock available just use some
of the leftover material from the funnel, or a small copper
coin; your motor won't make the same noise but it will run
just as well.
With the boiler soldered together, test fit it into your hull.
If the boiler is sitting up in the air gently curve the pipes.
The idea is to bring it down to a height where it will just
clear the spirit lamp's wick tube by enough to allow a small
flame. remember that the ends of the tubes must
be consistently below the waterline when the boiler is mounted
in the hull.
It is a good idea to rig up a test for your motor at this
point before gluing it into place in the hull. The test rig
need not be very sophisticated...
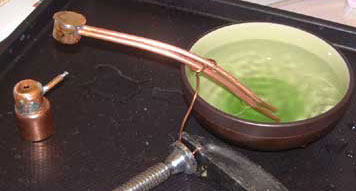
|
 A source of heat for the boiler is needed. This can
be very basic; a bottlecap full of olive oil crimped
up to hold a cotton string wick will work. The commercially
made tin-toy boats are sold with a bag of tiny little
candles. A simple spirit lamp gives more controllability;
Too much heat is a bigger problem than too little. Time
for another plumbing cap. With its filling tube at one
side and wick on top of the lamp, this one needs to
be placed under the boiler, placing the weight further
forward than is desirable. By placing the wick down
an extended side tube the lamp can be moved further
back, as shown in the plans.
A source of heat for the boiler is needed. This can
be very basic; a bottlecap full of olive oil crimped
up to hold a cotton string wick will work. The commercially
made tin-toy boats are sold with a bag of tiny little
candles. A simple spirit lamp gives more controllability;
Too much heat is a bigger problem than too little. Time
for another plumbing cap. With its filling tube at one
side and wick on top of the lamp, this one needs to
be placed under the boiler, placing the weight further
forward than is desirable. By placing the wick down
an extended side tube the lamp can be moved further
back, as shown in the plans.
|
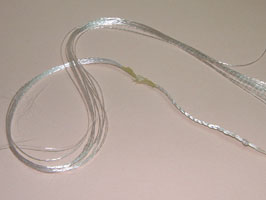 Wick
can be as simple as piece of cotton string but braided
glass is much more durable. Craft stores sell glass
wick for decorative oil lamps, but it is easy to make
your own from strands taken from a scrap of glass cloth
left over from boatbuilding. If you do not know how
to plait just ask someone with long hair to show you.
The glass braid will do its best to unravel before you
can install it in the lamp, and knots just come undone.
The trick is to dip the ends of the braided section
in to molten candlewax. Wick
can be as simple as piece of cotton string but braided
glass is much more durable. Craft stores sell glass
wick for decorative oil lamps, but it is easy to make
your own from strands taken from a scrap of glass cloth
left over from boatbuilding. If you do not know how
to plait just ask someone with long hair to show you.
The glass braid will do its best to unravel before you
can install it in the lamp, and knots just come undone.
The trick is to dip the ends of the braided section
in to molten candlewax.
|
After a few seconds when the wax solidifies the braid can
be cut to length; the wax will burn off once the wick is installed.
Almost any combustible liquid will burn in these little lamps.
Methyl alcohol (Methanol, Methyl Hydrate, sold as fuel for
fondue sets amongst other things) works well and is reasonably
safe; just do not get it near your mouth since it is very
toxic.
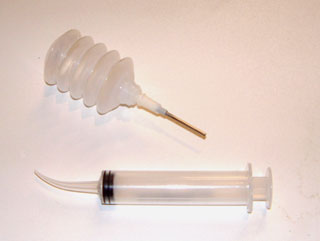 Two
squeezy bottles or syringes will be useful; one to contain
fuel and the other for priming the boiler with water.
To start your finished boat first fill the lamp and
trim the wick to length. Set the lamp aside unlit and
hold the boat so that the open ends of the pipes from
the motor are facing upwards. Gently pour water into
one pipe until it flows out of the second pipe. Tilt
the boat around to be sure there are no air bubbles
inside the boiler. Place a finger over the ends of the
pipes to prevent the water running out and set the boat
in the bath; the ends of the pipes must stay under the
water surface. Two
squeezy bottles or syringes will be useful; one to contain
fuel and the other for priming the boiler with water.
To start your finished boat first fill the lamp and
trim the wick to length. Set the lamp aside unlit and
hold the boat so that the open ends of the pipes from
the motor are facing upwards. Gently pour water into
one pipe until it flows out of the second pipe. Tilt
the boat around to be sure there are no air bubbles
inside the boiler. Place a finger over the ends of the
pipes to prevent the water running out and set the boat
in the bath; the ends of the pipes must stay under the
water surface.
|
Place the lamp into position and light it. After a minute
or so you may see a few bubbles escape from the ends of the
pipes and shortly after that the motor will start its cycle
and your boat will be on its way with a 'pop pop pop'.
Derek
Waters
|
|
|
|
|