Containing
1. an account of a sail shaped like
a bear's paw
2. a method for sailing downwind with
a boomless sprit sail
3. a light daggerboard case and sprit
for camping
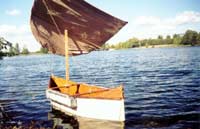
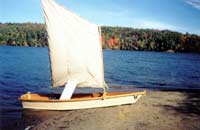
 Here
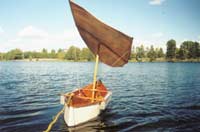
is a sail which is really a kite. It sits on the top
of a short mast where it is free to rotate and twist.
It is controlled by a downhaul attached to the front
and by a continuous main sheet attached to the two sides
near the back. The boat in the photo is not really sailing.
It is just being blown sideways in front of the camera.
The breeze is coming from the left. The white office
building hiding in the trees opposite is the headquarters
of Canada's notorious tax bandit bureaucrats (Canada
Customs and Revenue Agency). I suspect they have someone
on the roof scanning the water for boats that don't
gibe with reported incomes. Here
is a sail which is really a kite. It sits on the top
of a short mast where it is free to rotate and twist.
It is controlled by a downhaul attached to the front
and by a continuous main sheet attached to the two sides
near the back. The boat in the photo is not really sailing.
It is just being blown sideways in front of the camera.
The breeze is coming from the left. The white office
building hiding in the trees opposite is the headquarters
of Canada's notorious tax bandit bureaucrats (Canada
Customs and Revenue Agency). I suspect they have someone
on the roof scanning the water for boats that don't
gibe with reported incomes.
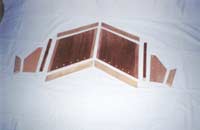
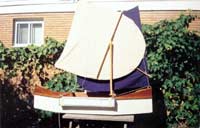 Two
sails have been rigged on the boat at the same time
to show their relative size and location. The blue canvas
sail is a 5x4.5 boomless sprit sail with a mast sleeve.
The beige nylon sail is a 5x4.5 polynesian crab claw
sail which looks more like a bear's paw than a crab's
claw. We don't have any crabs in the woods of Ontario
where I imagined using the sail on camping trips. But
we do have bears. Both sails are cut from standard 5ft
wide fabric store cloth. The mast for the blue sail
is right at the bow. The mast for the beige sail is
at the front thwart and puts the front of the sail right
at the bow. Both of these sails are located so the boat
can be sailed with the existing daggerboard and no rudder.
Both are well balanced fore-and-aft. Two
sails have been rigged on the boat at the same time
to show their relative size and location. The blue canvas
sail is a 5x4.5 boomless sprit sail with a mast sleeve.
The beige nylon sail is a 5x4.5 polynesian crab claw
sail which looks more like a bear's paw than a crab's
claw. We don't have any crabs in the woods of Ontario
where I imagined using the sail on camping trips. But
we do have bears. Both sails are cut from standard 5ft
wide fabric store cloth. The mast for the blue sail
is right at the bow. The mast for the beige sail is
at the front thwart and puts the front of the sail right
at the bow. Both of these sails are located so the boat
can be sailed with the existing daggerboard and no rudder.
Both are well balanced fore-and-aft.
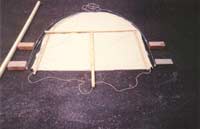 The
bearpaw sail is a nylon bag made to fit over two bent
fibreglass tent poles. The idea is to carry the sail
on a camping trip without having to carry a long mast
and sprit. And to use the tent poles to avoid carrying
extra weight. Since a sail and a tent are not needed
at the same time on a camping trip it should be operationally
feasible. The mast is just long enough to let the sail
be drawn in close hauled without hitting the side of
the boat. The sail was made last winter. As soon as
it was tried on the water it became abundantly clear
that if tent poles are flexible enough to bend in a
semicircle at the front of the sail then they will also
bend at the back of the sail. As soon as the wind filled
the sail it became baggy at the back and lost much of
its power. The solution so far was to cut one 1/4"
plywood batten for each side, put loop of wire in the
ends, and slip them over the tent poles where they are
not supposed to bend. A big improvement but not ideal.
In the photo there are bricks holding the flexible tent
poles in at the sides. The 8 ft 2x2 stud was put in
the photo to show the scale but it got cut out of the
photo at one end. Note the unfair kink in the curve
of one of the tent poles at the top right. That is the
repair described below. The
bearpaw sail is a nylon bag made to fit over two bent
fibreglass tent poles. The idea is to carry the sail
on a camping trip without having to carry a long mast
and sprit. And to use the tent poles to avoid carrying
extra weight. Since a sail and a tent are not needed
at the same time on a camping trip it should be operationally
feasible. The mast is just long enough to let the sail
be drawn in close hauled without hitting the side of
the boat. The sail was made last winter. As soon as
it was tried on the water it became abundantly clear
that if tent poles are flexible enough to bend in a
semicircle at the front of the sail then they will also
bend at the back of the sail. As soon as the wind filled
the sail it became baggy at the back and lost much of
its power. The solution so far was to cut one 1/4"
plywood batten for each side, put loop of wire in the
ends, and slip them over the tent poles where they are
not supposed to bend. A big improvement but not ideal.
In the photo there are bricks holding the flexible tent
poles in at the sides. The 8 ft 2x2 stud was put in
the photo to show the scale but it got cut out of the
photo at one end. Note the unfair kink in the curve
of one of the tent poles at the top right. That is the
repair described below.
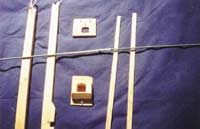 On
the left is the mast with its loop at the top for the
sail to twist and turn on. Two holes were drilled through
the mast so the loop would not drop down one side with
the weight of the sail. Not apparent in the photo is
a thin hole through the mast just under where the partners
go. A piece of stiff wire (a bicycle spoke) goes through
the mast to keep it from lifting out of the boat. The
sail is, after all, a kite and tries to leave the boat
vertically under some conditions. Next to the mast is
the, um, yard or boom or whatever its called. A loop
of string in a hole on each end ties it to the sail.
The end does not need to be notched as shown. The notch
is left over from another method I tried of attaching
the sail. Two blocks have been screwed on at the middle
to keep the loop on the mast from moving off centre.
Top centre in the photo is the mast "partners"
that I've been using while testing the sail. It screws
onto the thwart on the boat. This is the third "partners".
The other two were of thinner plywood. They broke when
the boat capsized. The mast step is the usual wooden
block with a hole in it. The hole is odd shaped because
the mast is a piece of stairwell handrail. A previous
mast step of lighter construction broke when the boat
capsized. On the right are the two plywood battens which
keep the back of the sail from bending. On
the left is the mast with its loop at the top for the
sail to twist and turn on. Two holes were drilled through
the mast so the loop would not drop down one side with
the weight of the sail. Not apparent in the photo is
a thin hole through the mast just under where the partners
go. A piece of stiff wire (a bicycle spoke) goes through
the mast to keep it from lifting out of the boat. The
sail is, after all, a kite and tries to leave the boat
vertically under some conditions. Next to the mast is
the, um, yard or boom or whatever its called. A loop
of string in a hole on each end ties it to the sail.
The end does not need to be notched as shown. The notch
is left over from another method I tried of attaching
the sail. Two blocks have been screwed on at the middle
to keep the loop on the mast from moving off centre.
Top centre in the photo is the mast "partners"
that I've been using while testing the sail. It screws
onto the thwart on the boat. This is the third "partners".
The other two were of thinner plywood. They broke when
the boat capsized. The mast step is the usual wooden
block with a hole in it. The hole is odd shaped because
the mast is a piece of stairwell handrail. A previous
mast step of lighter construction broke when the boat
capsized. On the right are the two plywood battens which
keep the back of the sail from bending.
Across the centre of
the photo is one of the fibreglass tent poles showing
a repair. The metal tubing at the end of one of the
sections split along a seam. It was repaired by winding
wire around the end and embedding it in epoxy adhesive.
The fibreglass on the adjoining section also split.
That was repaired by winding polyester twine around
and embedding it in epoxy adhesive. The repair is far
from perfect. I asked about tent poles on the rec.camping
newsgroup. There are better quality fibreglass tent
poles. On some expensive tents flexible aluminum poles
are used. To discourage more splits a bead of epoxy
adhesive was run along the seam of each metal tube on
the tent poles. There have been no more splits.
 I'm
not sure this bearpaw sail is practical for camping
trips, but it sure is fun trying to learn how to sail
with a kite. In Polynesia the ocean winds are steady
and the downhaul at the front of the sail is set and
cleated off. On the small waters where I sail the wind
is never steady so the downhaul is wrapped once around
the mast and cleated temporarily in the teeth, under
a foot, or held in one hand. It takes two hands to work
the mainsheet, pulling in on one side and easing out
on the other. In the light winds where I dare use the
sail it seems to work best at about a 45 deg angle to
horizontal as in the photo. When the wind picks up the
boat heels but the sail does not twist off and spill
wind like a sail laced to the mast does. The bearpaw
sail just lifts one side and draws stronger than before
which accounts for the capsizing. I have not capsized
this boat with the blue sprit sail. I have been out
with the blue sail in winds so strong that I could not
paddle into the wind. Its quite amazing. I lie down
as low in the boat as possible and give it its head.
Such a small boat surging along in such strong winds.
The blue foam sponsons help, of course. I'm
not sure this bearpaw sail is practical for camping
trips, but it sure is fun trying to learn how to sail
with a kite. In Polynesia the ocean winds are steady
and the downhaul at the front of the sail is set and
cleated off. On the small waters where I sail the wind
is never steady so the downhaul is wrapped once around
the mast and cleated temporarily in the teeth, under
a foot, or held in one hand. It takes two hands to work
the mainsheet, pulling in on one side and easing out
on the other. In the light winds where I dare use the
sail it seems to work best at about a 45 deg angle to
horizontal as in the photo. When the wind picks up the
boat heels but the sail does not twist off and spill
wind like a sail laced to the mast does. The bearpaw
sail just lifts one side and draws stronger than before
which accounts for the capsizing. I have not capsized
this boat with the blue sprit sail. I have been out
with the blue sail in winds so strong that I could not
paddle into the wind. Its quite amazing. I lie down
as low in the boat as possible and give it its head.
Such a small boat surging along in such strong winds.
The blue foam sponsons help, of course.
 But
the centre of effort on the bearpaw sail is high, the
rig is heavy, and its sailing characteristics too unfamiliar
and powerful to go out in any but the lightest winds.
Polynesian crab claw sails are estimated to be up to
40% more powerful on a beam reach than other kinds of
sails. I believe it. To reef a crab claw sail the sides
are pulled together making the sail loose and baggy.
I do not dare pull the tent pole sides together as the
poles might break. To reef the bear paw sail I pull
the pin, lift the mast up out of the step and partners,
and toss it overboard where it floats on the surface
until the wind calms down. Next season I plan to move
the bearpaw sail to a bigger boat, the Dogskiff, that
can cope with its power. I've already tried the sail
on the Dogskiff but the mast must be moved aft to balance
the sail fore-and-aft. If anyone is interested in trying
such a sail I'd recommend tying off any rudder amidships
to have both hands free to work the lines. I'd suggest
flexible plastic electrical conduit for the bent front
and broomsticks for the straight sides of the sail. But
the centre of effort on the bearpaw sail is high, the
rig is heavy, and its sailing characteristics too unfamiliar
and powerful to go out in any but the lightest winds.
Polynesian crab claw sails are estimated to be up to
40% more powerful on a beam reach than other kinds of
sails. I believe it. To reef a crab claw sail the sides
are pulled together making the sail loose and baggy.
I do not dare pull the tent pole sides together as the
poles might break. To reef the bear paw sail I pull
the pin, lift the mast up out of the step and partners,
and toss it overboard where it floats on the surface
until the wind calms down. Next season I plan to move
the bearpaw sail to a bigger boat, the Dogskiff, that
can cope with its power. I've already tried the sail
on the Dogskiff but the mast must be moved aft to balance
the sail fore-and-aft. If anyone is interested in trying
such a sail I'd recommend tying off any rudder amidships
to have both hands free to work the lines. I'd suggest
flexible plastic electrical conduit for the bent front
and broomsticks for the straight sides of the sail.
For more information
on crab claw sails look at schachtdesign.com.
The prototype for my sail is the John Rowland drawing
at the bottom of this
page . David Beede's experimental polytarp sail
based on the Rowland drawing can be seen at simplicityboats.
The boat used with the bearpaw sail is the Loonie which
appeared in Duckworks last year. A building plan and
description can be found on
this
website.
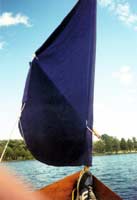
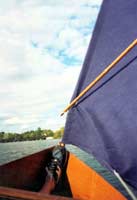 When
I first started sailing with the blue canvas sprit sail,
every time we got hit by a gust downwind the boat would
do a snap 90 deg turn to the side. Try as I might I
could not muscle the little boat back on course in the
gust. The best I could do was force the boat to go downwind
sideways. The phenominum is called broaching. It's quite
a problem with small sailboats. One day I discovered
I could control the boat downwind by letting the sail
fly out in front. One photo shows the boat sailing close
hauled toward an open dam. The other photo shows the
boat running down wind away from the dam. The sail has
done a 180. The sprit is out in front of the boat. The
bottom of the sail is pulled back into a pocket or bag.
It's much easier to control the sail that way than straight
out to the side in the normal downwind position. You
can only get a bag like that on a boomless sprit sail
with a rotating mast. I can avoid both broaching and
the dreaded dead man's roll with the sail in that position.
And I can avoid power gybing by reaching forward and
passing the whole mainsheet around the front of the
mast. I've used the technique on a larger boomless sprit
sail on my Dogskiff. On that boat I've come down river
on a windy day between high banks which compressed the
wind like a wind tunnel. It was an exciting controlled
sleigh ride with the sprit sail bagged out front like
a spinnaker. This downwind technique must have been
known previously to others but in all my reading I've
not come across it. When
I first started sailing with the blue canvas sprit sail,
every time we got hit by a gust downwind the boat would
do a snap 90 deg turn to the side. Try as I might I
could not muscle the little boat back on course in the
gust. The best I could do was force the boat to go downwind
sideways. The phenominum is called broaching. It's quite
a problem with small sailboats. One day I discovered
I could control the boat downwind by letting the sail
fly out in front. One photo shows the boat sailing close
hauled toward an open dam. The other photo shows the
boat running down wind away from the dam. The sail has
done a 180. The sprit is out in front of the boat. The
bottom of the sail is pulled back into a pocket or bag.
It's much easier to control the sail that way than straight
out to the side in the normal downwind position. You
can only get a bag like that on a boomless sprit sail
with a rotating mast. I can avoid both broaching and
the dreaded dead man's roll with the sail in that position.
And I can avoid power gybing by reaching forward and
passing the whole mainsheet around the front of the
mast. I've used the technique on a larger boomless sprit
sail on my Dogskiff. On that boat I've come down river
on a windy day between high banks which compressed the
wind like a wind tunnel. It was an exciting controlled
sleigh ride with the sprit sail bagged out front like
a spinnaker. This downwind technique must have been
known previously to others but in all my reading I've
not come across it.
 Last
winter a small daggerboard case was made for the narrow
paddling and sailing Dogskiff. The Dogskiff and the
Loonie share the same daggerboard. I wanted the daggerboard
case to add as little weight as possible to the hull
which has to be picked up and carried over portages,
and lifted on and off the roof of a car. I was delighted
when it only added 2 pounds to the hull. Another goal
was to keep the daggerboard case out of the way when
paddling and when sleeping on the boat under its homemade
tent. The boat is paddled transom first for speed and
directional stability. That puts the daggerboard slot
on the high side of the heeled boat opposite a right
hand paddler and clear of the water. Water splashes
up the case into the boat when paddling in a chop. I
plan to make a plug for the top to block the water.
The case is braced low to the side where it doesn't
flex the thin plywood. Last
winter a small daggerboard case was made for the narrow
paddling and sailing Dogskiff. The Dogskiff and the
Loonie share the same daggerboard. I wanted the daggerboard
case to add as little weight as possible to the hull
which has to be picked up and carried over portages,
and lifted on and off the roof of a car. I was delighted
when it only added 2 pounds to the hull. Another goal
was to keep the daggerboard case out of the way when
paddling and when sleeping on the boat under its homemade
tent. The boat is paddled transom first for speed and
directional stability. That puts the daggerboard slot
on the high side of the heeled boat opposite a right
hand paddler and clear of the water. Water splashes
up the case into the boat when paddling in a chop. I
plan to make a plug for the top to block the water.
The case is braced low to the side where it doesn't
flex the thin plywood.
 Its
the usual construction for a daggerboard case. Some
daggerboards go in at an angle like this one. Some are
installed straight up and down. These two photos are
included for anyone who has not made a daggerboard case
and would like to see how one goes together. This one
was made of cheap, light lauan underlayment plywood
which many boatbuilders would not use, and light red
cedar wood. Its
the usual construction for a daggerboard case. Some
daggerboards go in at an angle like this one. Some are
installed straight up and down. These two photos are
included for anyone who has not made a daggerboard case
and would like to see how one goes together. This one
was made of cheap, light lauan underlayment plywood
which many boatbuilders would not use, and light red
cedar wood. 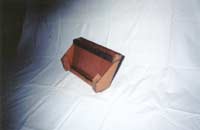 The
interior of the case was given two thin coats of polyester
resin and two coats of polyurethane varnish for abrasion
and water protection. The edges of the plywood were
sealed with two coats of polyester. The rest of the
case got two coats of linseed oil which will be renewed
each spring along with the rest of the interior of the
boat. The glue used was PL Premium construction adhesive.
The glue lines at the slot in the hull were sealed with
two coats of epoxy adhesive. The
interior of the case was given two thin coats of polyester
resin and two coats of polyurethane varnish for abrasion
and water protection. The edges of the plywood were
sealed with two coats of polyester. The rest of the
case got two coats of linseed oil which will be renewed
each spring along with the rest of the interior of the
boat. The glue used was PL Premium construction adhesive.
The glue lines at the slot in the hull were sealed with
two coats of epoxy adhesive.
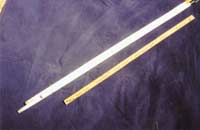 The
purpose of this sectional sprit was to replace a 12
ft pole sprit with something shorter and lighter for
camping. Three tubular steel handles from discarded
brooms did the trick. The 3 ft ruler in the photo shows
the scale. At the lower left pieces of dowel wrapped
in sheet aluminum cut from soft drink cans were glued
with epoxy into the ends of two tubes to provide something
for the open ends of the middle tube to fit over. The
open ends were reinforced by gluing collars on them
which do not show up in the photo, cut from the tube
and split open to fit. Foam rod insulation was shoved
inside so the sections would float if any fell overboard.
Barely visible in the upper right, the ends of the broom
handles had ready made holes for tying the mast and
sail to the sprit. The sprit was painted white, unfortunately
causing the photo to be overexposed. A couple of photos
taken during construction were lost when the film was
in a capsize of the Loonie while trying out the bearpaw
sail. The
purpose of this sectional sprit was to replace a 12
ft pole sprit with something shorter and lighter for
camping. Three tubular steel handles from discarded
brooms did the trick. The 3 ft ruler in the photo shows
the scale. At the lower left pieces of dowel wrapped
in sheet aluminum cut from soft drink cans were glued
with epoxy into the ends of two tubes to provide something
for the open ends of the middle tube to fit over. The
open ends were reinforced by gluing collars on them
which do not show up in the photo, cut from the tube
and split open to fit. Foam rod insulation was shoved
inside so the sections would float if any fell overboard.
Barely visible in the upper right, the ends of the broom
handles had ready made holes for tying the mast and
sail to the sprit. The sprit was painted white, unfortunately
causing the photo to be overexposed. A couple of photos
taken during construction were lost when the film was
in a capsize of the Loonie while trying out the bearpaw
sail.
 It
was a cool and windy fall day on a crystal clear northern
lake when the new daggerboard and sectional sprit were
tested together. Both performed above expectation. A
canoeist discouraged by the high wind went home after
a short paddle. Before the photo was taken the boat
had been slipping through whitecaps and gliding over
streaming foam with ease. The daggerboard case is so
fortuitously placed that the boat can be steered by
raising and lowering the board. If the board is raised
3/4 way the boat rounds up into the wind and tacks. It
was a cool and windy fall day on a crystal clear northern
lake when the new daggerboard and sectional sprit were
tested together. Both performed above expectation. A
canoeist discouraged by the high wind went home after
a short paddle. Before the photo was taken the boat
had been slipping through whitecaps and gliding over
streaming foam with ease. The daggerboard case is so
fortuitously placed that the boat can be steered by
raising and lowering the board. If the board is raised
3/4 way the boat rounds up into the wind and tacks.
The photo shows a blue
sports bag used as a back rest when sailing from a reclining
position. The bag is stuffed with gear and clipped to
lines through holes just under the gunwales aft of the
daggerboard as seen in the photo. I made the mistake
of sailing in a strong wind without back support early
in the season, pulled a muscle, and could hardly walk
for two weeks.
The modified nylon canoe
and kayak sail from TF Jones "Boats To Go"
is in its fourth season. The double layer of fabric
store nylon is stretched and baggy and showing its age,
but still moves the boat along at a good clip. The hull
is in its third season. It is better now than when first
built. I think its finally the way I want for paddle
and sail camping. There is more information on the history
of the Dogskiff in files at www.ncf.ca/~ag384.
- END - |