|
Part 1
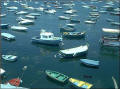
The old (30 years+) strip planked 10’ tender I’ve been using to get
out to my boat was getting beyond economical repair and the more I patched
it up the heavier it got; great in terms of stability, but it was
impossible to haul ashore whenever bad storms where forecast.
So, I looked around for an alternative tender and eventually settled for
an 8’ fibreglass dinghy. Bad mistake! Looked pretty enough but the damn
thing turned out to be so unsteady and skittish that I ended up in the
water twice trying to get off it along the hard concrete jetty. It just
slides from under you without as much as a hint! The second time it threw
me I hurt myself quite badly as I smacked into the landing steps with my
chest and elbow, bouncing off into the sea in the process. As I was
hauling myself back ashore, cursing and nearly in tears with pain, I
decided there and then to get rid of it. A few onlookers had gathered by
then and in between the expletives something made me shout, “anybody want
to by a nice little dinghy on the cheap?” To my surprise, someone half my
size shouted back “yes, how much?” – and the deal was done in a flash.
 I still had the
old tender at least, which gave me some time to organize something else in
the meantime. I looked hard, but I kept coming back to the idea of
building myself the type of tender I needed and not some stock compromise.
I wasn’t at all certain really as I’ve never built anything like a boat.
Still, I was willing to have a try and see what results. I had a good look
around and try as I might, the D4 looked ideal for my needs as I reckoned
I could beef it up a bit for the use I was going to put it to. I still had the
old tender at least, which gave me some time to organize something else in
the meantime. I looked hard, but I kept coming back to the idea of
building myself the type of tender I needed and not some stock compromise.
I wasn’t at all certain really as I’ve never built anything like a boat.
Still, I was willing to have a try and see what results. I had a good look
around and try as I might, the D4 looked ideal for my needs as I reckoned
I could beef it up a bit for the use I was going to put it to.
The version of the D4
I built is intentionally heavy duty; in fact the finished weight of 55
kilograms (about 120 lbs) was over twice the original design weight, but
still very manageable single- handed. My tender for the inner harbour
mooring would need to be tough, as it would get knocked about a lot. It
had to be unsinkable, sturdy and somehow be light enough to haul ashore on
my own and, drag along on the hard. My version of the D4 fulfilled all my
requirements and am very satisfied with the end result. I’m not too fussy
about looks, as anything I put together has to be functional first and
foremost. But having said that, the D4 is a cracking good looker too, so
I’m doubly pleased. Naming it wasn’t too hard! Time was a bit at a premium
and I was always rushing around trying to get things done – I was in a
right tizzy at times, which led me to name my version of the D4 ‘TIZZY’…
As the D4 plans
are free, I availed myself of them (…thanks Mr Goosens). They’re very good
considering they’re free, with building instructions included as well – no
wonder they’re so popular. Having said all that, one can’t expect to have
something for free and expect it all to be 100% complete in every detail.
I chose to mess about with the design details (in AutoCAD) mainly to get
the best nesting and cutting configuration in order to keep waste down to
an absolute minimum. I think I succeeded to work things out quite neatly
with a bonus thrown in for later on – unbeknown to me at the time – that
would help me complete yet another little boat on the cheap. (Please refer
to the cutting/nesting templates).
(click to enlarge)
As this was my first project I was a bit apprehensive about making a
right mess of things. So I did some research and found plenty of
instructions on how to stitch and tape. My worries were unfounded and as I
got on with it, skepticism turned into enthusiasm and pleasure. Take it
from me; having a go is the best way to learn. As long as the measurements
and actual cutting is done fairly accurately, adjustments can be carried
out as you build because the stitch and tape system can make many a
mistake disappear! My build photos are proof of that. I’m not saying that
you should be sloppy, but you needn’t be too fussy either. OK then; let’s
get on with the actual building sequence of ‘Tizzy’ itself. By the way,
I’m no wised up mariner, so pardon me if I don’t use all the proper
boating terms for the appropriate parts etc., but I do hope you can manage
to understand what I mean anyway – the photos should help.
Transferring the plan’s measurements onto the ply is straightforward
enough, but check that the following measurements are as follows:
measuring from the top to bottom: Bow Transom (front end) measurements
should be 3”, 10 ¾” and 5 5/8”; Stern Transom (back end) measurements
should be 3”, 10” and 4”. I used proper (expensive) fibreglass tape to do
the seams and the end result is very obvious, albeit strong. Buying the
fibreglass cloth and cut it into strips is much cheaper and neater as I
found out later. I went a bit mad with covering the boat with too much
resin and could have used much less, especially as I used marine ply – no
regrets though, that’s for sure.
(click thumbnails to
enlarge)
 |
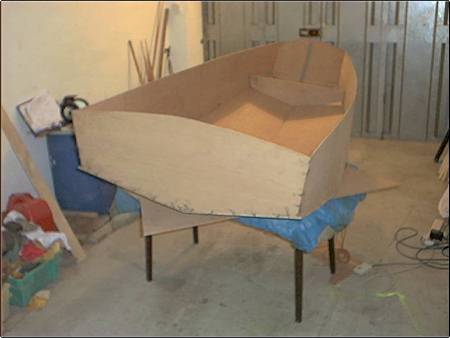
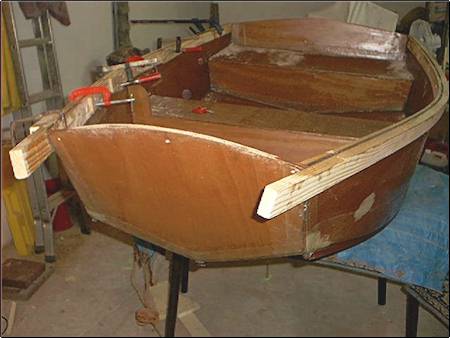
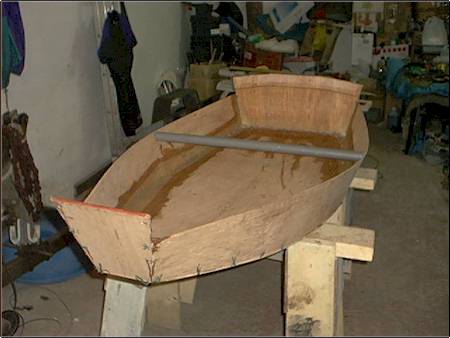
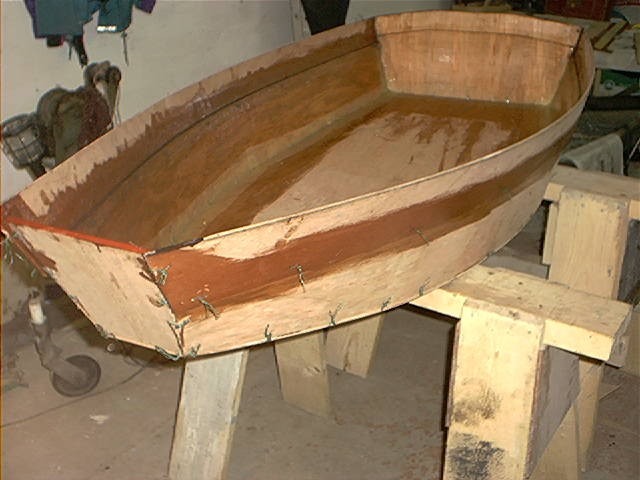
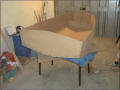
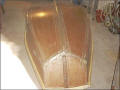
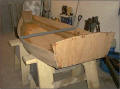
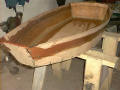
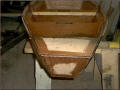
As can be seen from the pics. I didn’t quite
follow the original building instructions. I just stitched the
bottom, sides and bow/stern transoms together into a shell for an
instant boat form. I used plastic covered gardening wire, first in
single strand but then I started to double it up as it broke on
twisting. (Note kitchen table!). |
 |
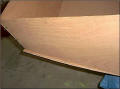
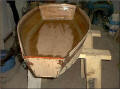
Obviously my measurements weren’t all that
accurate or perhaps my cutting was wonky. Remedial action was in the
form of simply grinding off the offending parts to make everything
fit neatly. |


 |
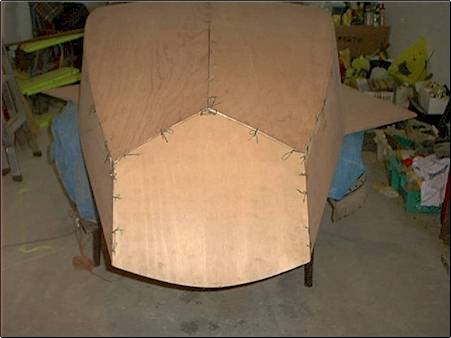
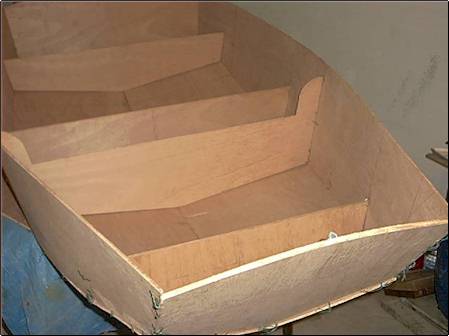
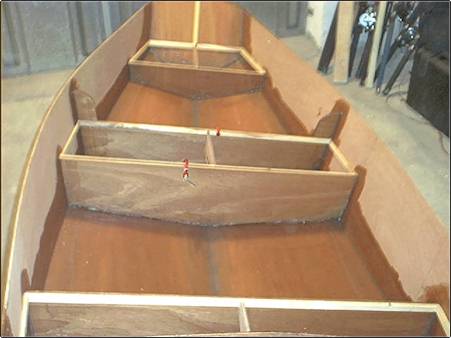
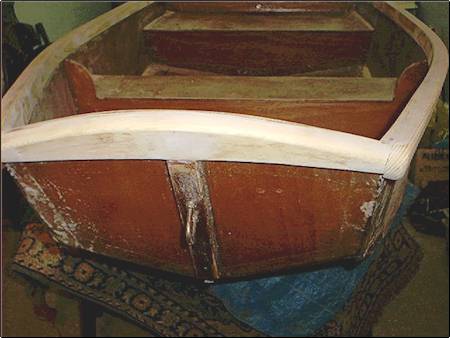
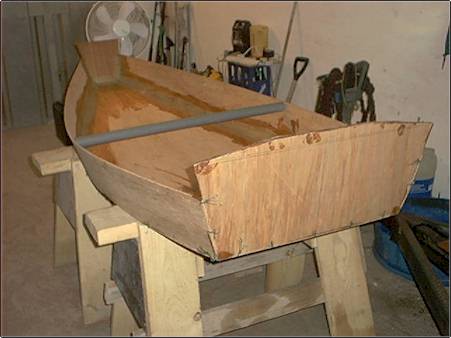
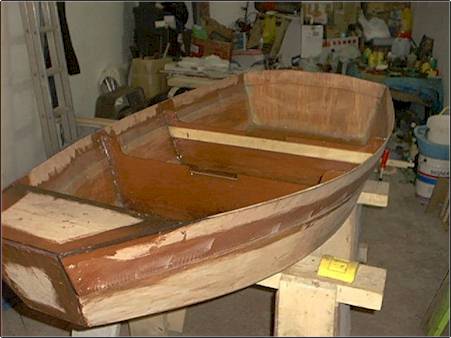
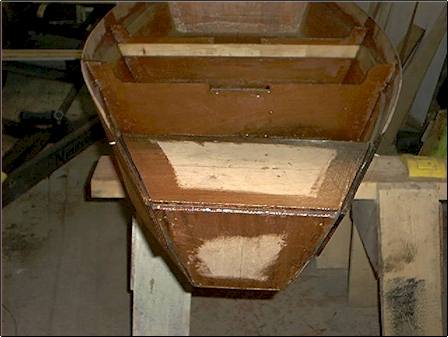
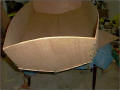
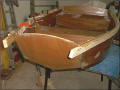
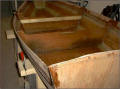
Frames in place prior to filleting and taping.
These I had to wire in through the sides to ensure they stayed in
place while I filleted and taped. |

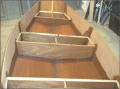 |
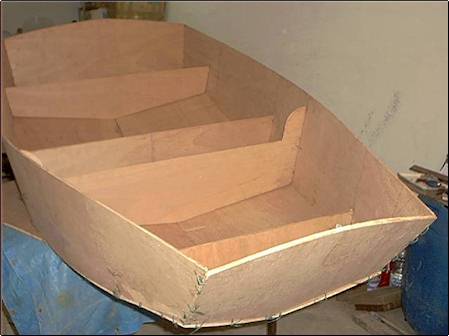
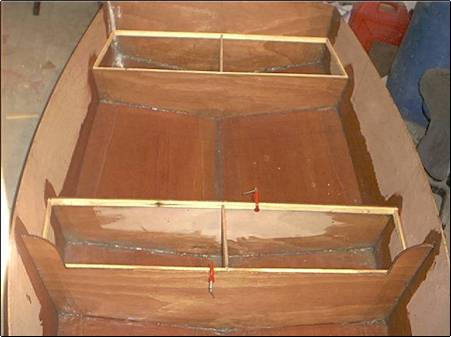
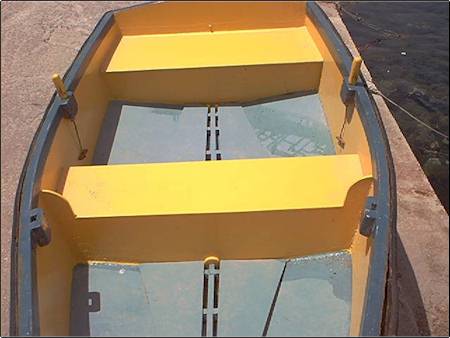
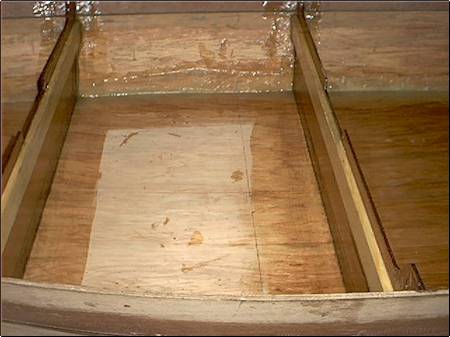
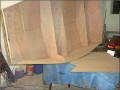
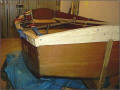
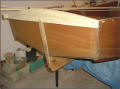
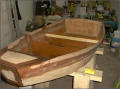
Frames reinforced with 1” x ¾” battens glued in
place with resin putty. Before tops were clamped on, the sections
were filled to the top with chopped polystyrene to aid flotation.
All three compartments were filled just to make sure. |
 |
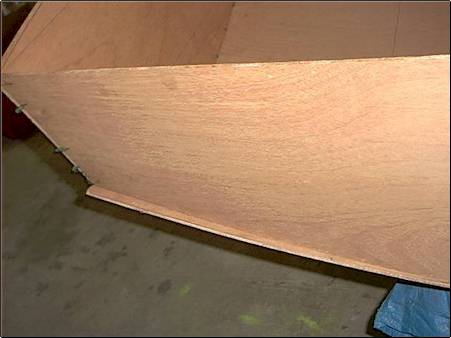
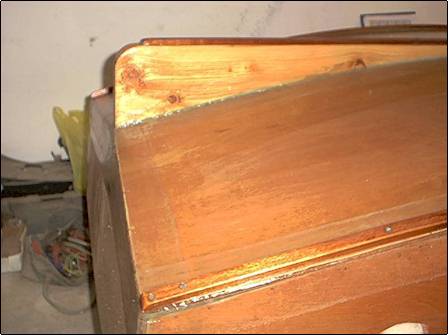
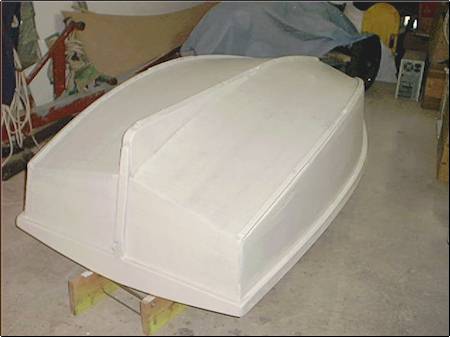
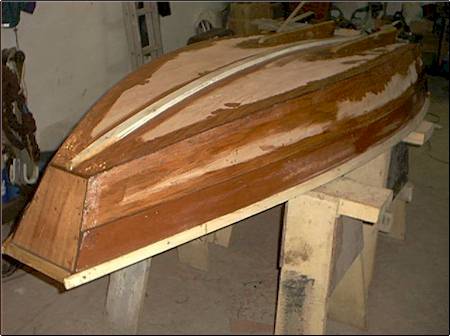
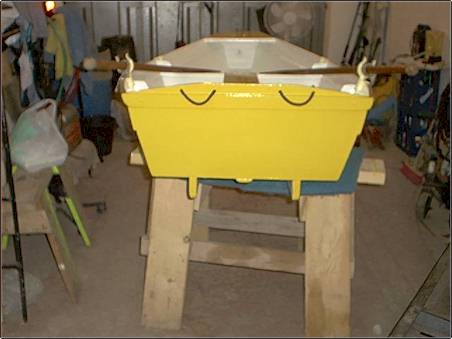
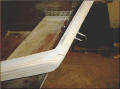
Note over size skeg (1 ½” wide) topped with a
full-length hardwood batten. The reason why I wanted an oversize
skeg, apart from directional stability, was that it had to be strong
enough to support a pair of small wheels – the end result can be
seen in the final project photo. Similarly, side strakes were also
made out of hardwood. All was aimed at enhancing directional
stability and durability for the rocks/concrete environment Tizzy
would be put to use in. I acquired the hardwood strips, which were
off-cuts, from a carpenter friend; otherwise I would have used any
old wood seeing that they were going to be covered with resin and a
bronze-rubbing strip. |
 |
Keel strake is topped with full-length bronze
rubbing strip, but side strakes only have about 2’ of bronze strip
placed centrally. |

 |
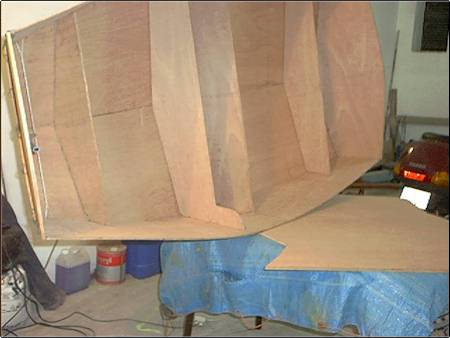
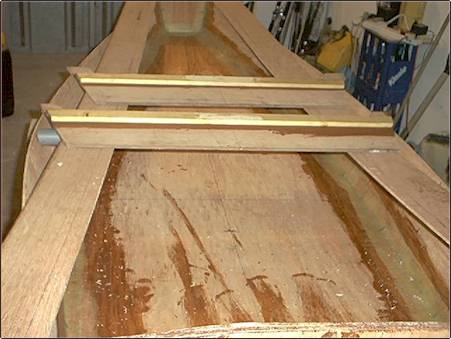
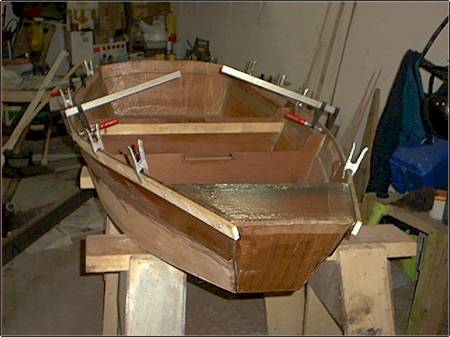
The almost impossible achieved single handedly,
plus a few clamps, determination and lots of patience. Thick ½”
battens on the outside and thinner ¼” ones on the inside. I half
expected the thicker battens to break, but they didn’t; maybe that’s
because I cut in several ¼” deep slits where the bend was at its
most acute. Mind you, it was a bit of a messy job! |

 |
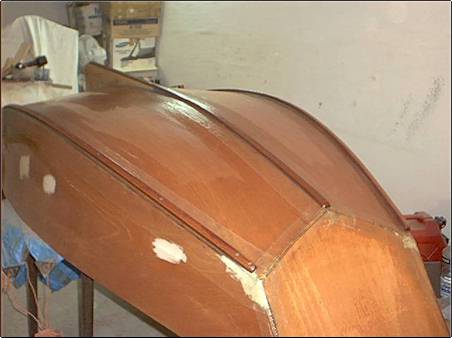
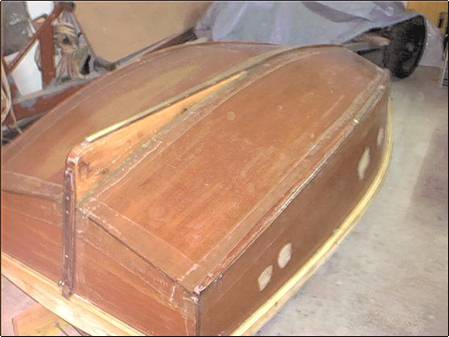
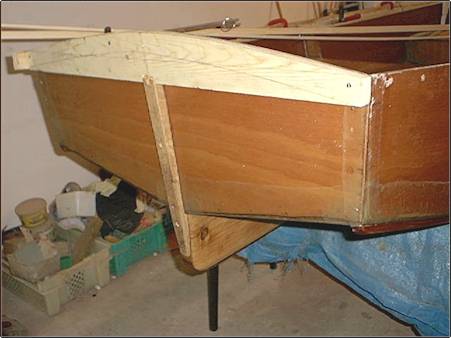
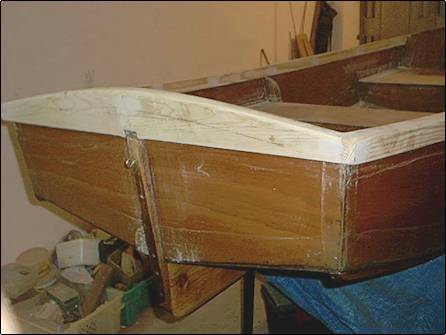
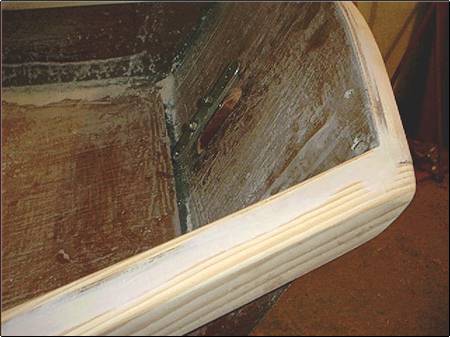
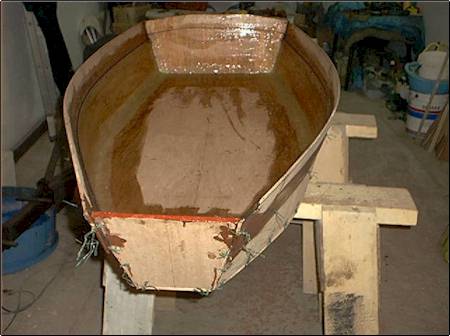
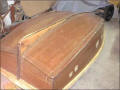
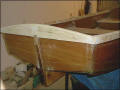
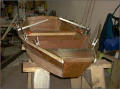
These pictures show how it all came together and
how the bow and stern all blended in into one robust job. Note the
extra hardwood pieces joining the top of both bow and stern transoms
to the centre strake and skeg respectively. My ‘Tizzy’ was intend to
get the better of any other similar sized boat should they have to
fight it out! |
 |
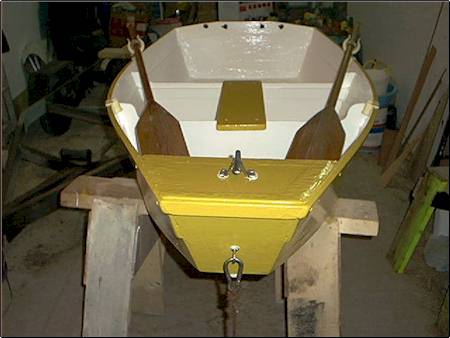
Hefty ‘U’ bolt at the front which serves as a
cleat on the inside because I bolted on a small piece of stainless
steel flat bar atop a hardwood spacer. Can also be seen quite clear
in the finished boat. Stern has a simple eyebolt for when I need to
tie up from both ends. |
|
|
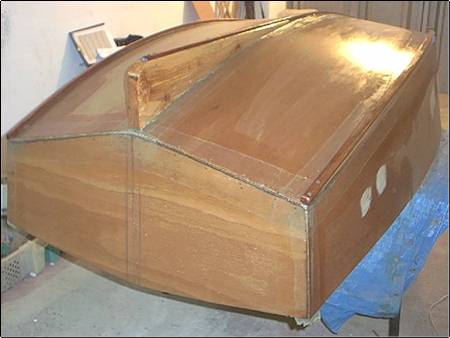
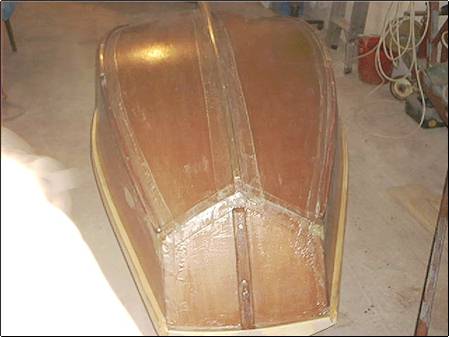
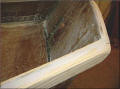
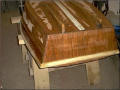
Some filling with car body filler and then
covered in resin all over. The edges of the fibreglass tape are very
evident and not easy to feather out. |
 |
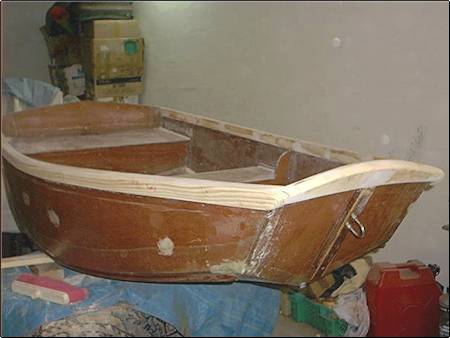
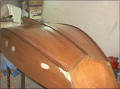
After a good sanding down, two coats of undercoat
were applied. The only job that I definitely did not consider as
enjoyable is the sanding. One really should do all that is possible
to get as smooth a finish first time around in order to minimise
sanding. |
 |
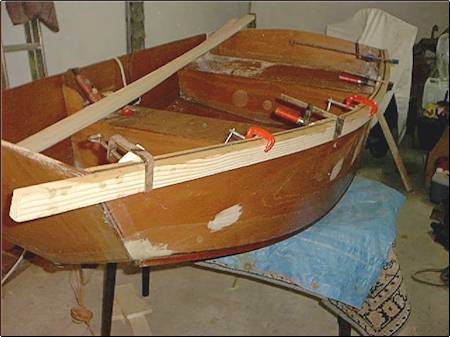
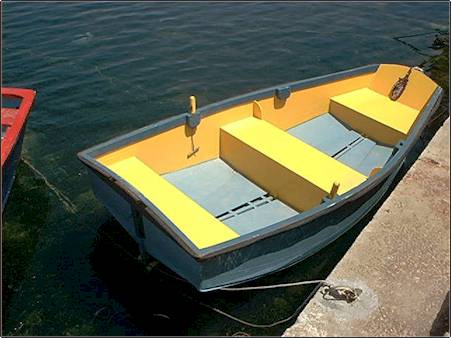
Oar locks of own design to suit Maltese style of
rowing arrangement – facing forward when manoeuvring in tight spots
and backwards when the way ahead is fairly clear and/or when two
people are on board. The oars are fitted with pieces of rope just
wide enough to hook over the rowing pins. Ordinary rowlocks would do
fine of course.
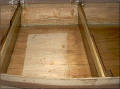
Notice odd shaped floorboards, made out of scrap ply and some
battens, placed centrally. The co-ordinated paint job wasn’t planned
– it’s just a result of the paint I had available. The floor and
floorboards were painted with non-slip deck paint. |
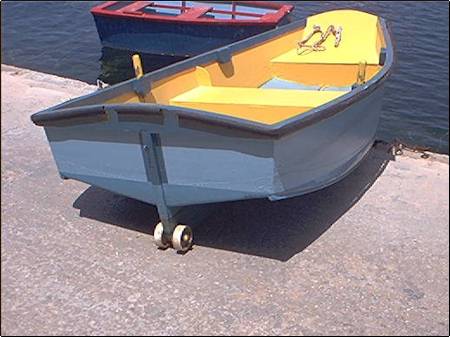
 |
Now you know why the Skeg needed to be heavy duty
– the nylon wheels come in handy when dragging the boat over
concrete. The wheels run freely on a ½” well-greased galvanised bolt
which runs through a ½” by 1 ½” length of copper tubing that is
intended to act as a bush. |
 |
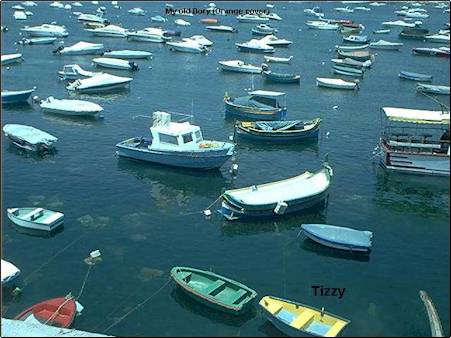
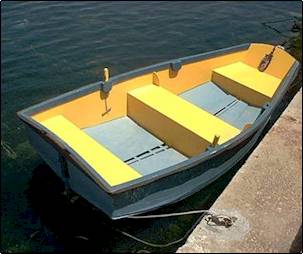
As can be seen from these photos, Tizzy is on her
mooring and I expect that it would give me many years of good
service. Being my first ever self-built boat, I can’t help being a
little bit protective about Tizzy and woe befall anybody who dares
harm or criticize it! I’m only kidding… hell, it’s only a few pieces
of wood scrambled together… or is it really? Maybe I’m going soft,
but you do sort of get a bit sentimental about something that you
created yourself. |
Part 2
Now on to the building of an alternative to the
One Sheet
Skiff – based on the generous donation of certain critical parts Tizzy
had no use for…
The building of an alternative to the One Sheet Skiff was out of necessity
rather than anything else. I must admit though, I didn’t need much of an
excuse to get building another boat after having such a great and
pleasurable experience building ‘Tizzy’.
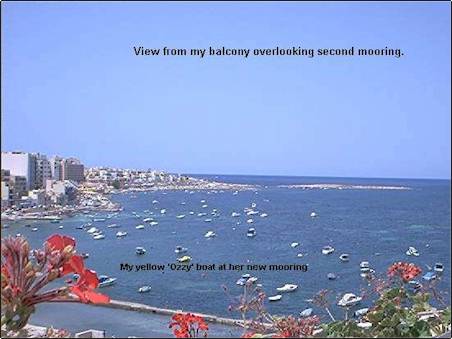
As
luck would have it, we had moved to live much closer to the sea – not that
one is ever more than 5 miles away from the sea on this tiny 17 miles by 9
miles island of ours. But anyway, my proper mooring had always been some 2
½ miles away; but why go that distance to my boat when I can just as
easily – in summer at least - walk about three hundred yards and get to my
boat more conveniently. So, while retaining my original mooring in a
rather sheltered bay for use between late September to February (best of
the fishing season), I decided to fix another mooring in a not so
sheltered bay for use between May and early September just a matter of a
few hundred yards from where I live.
Unfortunately
‘Tizzy’ is too heavy for me to handle on a regular basis and I couldn’t
risk leaving it in the water close to shore in the open sea as I do at the
other mooring site. We don’t have tides or currents, so I would normally
swim out to the boat, although it’s a bit of a nuisance having to swim out
about 150 yards to the boat and then go out for a days fishing all sticky.
It’s much more fun jumping in the sea after a day’s fishing; that way you
can at least get showered soon afterwards. Anyway, I digress…
The access point to the sea is sandy, so I toyed with the idea of
buying myself one of those little plastic inflatable dinghies, but then I
remembered the misadventures I had with the puny fibreglass tender; plus
this plastic dinghy I had in mind would end up punctured soon enough
anyway, even on sand. No way, my best option was to build yet another
tender specific to my needs. This time my needs were lightness and
compactness so it would fit on the roof rack, or in the small hatchback
car I have. I weigh nearly 190 lbs, so a toy boat was out of the question
too. Herb McLeod’s
One Sheet
Skiff (O.S.S.) caught my eye, but the seating/freeboard arrangement
wasn’t going to be quite right. The sea can often have a short chop so the
freeboard needs to be adequate and my age/size/agility combination
requires that I sit in a fairly comfortable position – as we used to say
in the army, any fool can be uncomfortable!
 It
is said that “Necessity is the mother of invention” or something like
that. That’s how I arrived at the thought of utilizing some of the ply
left over from the D4 project, which might be enough to make a few
alterations here and there. Once again I messed about with the design
details, as I was sure I could come up with a reasonable and workable
compromise. So I set to work on re-designing the O.S.S. to suit my needs
based on including the D4 left overs. It
is said that “Necessity is the mother of invention” or something like
that. That’s how I arrived at the thought of utilizing some of the ply
left over from the D4 project, which might be enough to make a few
alterations here and there. Once again I messed about with the design
details, as I was sure I could come up with a reasonable and workable
compromise. So I set to work on re-designing the O.S.S. to suit my needs
based on including the D4 left overs.
What was I after in a boat this size? More freeboard, more beam, flat high
bow and higher stern transom, some rocker would be nice, higher seating
position, dual forward/rearward rowing position, more rigidity, lightness
and a good measure of toughness. Stability was always going to be suspect
in a boat this size, but I was sure to get a bit more stability than the
original OSS.
Yes I know, I’m asking too much, but as you will see, I got very near to
what everything I wanted thanks to that extra left over ply I had! OK,
it’s not quite the original one-sheet-skiff, but for near enough an extra
4x8 sheet to that needed to build the D4, you can have yourself a neat
little boat for the kid(s) to mess about in or, like me, an extra tender
for special occasions. It’s lightness and overall size makes for easy
carrying and storage too.
This time I did go easy on the resin and used fibreglass cloth cut in
strips to do the taping with. I suggest you get hold of Herb McLeod’s
original
design and follow that building sequence if you wish, but remember I
have two frames and not just the one. However, the design details in my
plan should be self evident and easy enough to follow. Some might say that
I’ve altered Herb McLeod’s original design far too much and we now have
quite a distinct alternative design. Whatever, does it really matter -
because if it weren’t for Herb’s original design, we wouldn’t now have yet
another nifty little boat to build. Even so, I named it ‘Mini Cloud’ (or
MC), after Herb
McLeod.
Material wise, in plywood at least, you’ll need the original OSS 4 x 8
sheet plus the two left over bits of ply from the D4 bottom/side sheets.
These two left over bits measure 8’ long by about 11” for the most part
and up to 19” at the one end. As you can see from the plan, the ‘Mini
Cloud’ (M.C.) bottom, lower side panels and stern transom are cut from the
full 8 x 4 sheet and the upper side panels, frames and bow transom/cover
are cut from the D4 left overs.
The building sequence is as for the D4 and once again time was at a
premium. But, as it turned out, the building of ‘MC’ lends itself
perfectly to short sharp building sequences because you just can’t hurry
the drying of the resin where it needs to set hard as opposed to just
tacky for certain applications.

 |
Stitched up the basic shell in a jiffy and
filleted/taped the inside. Note the use of a piece of plastic tubing
as a temporary spreader while the resin sets. |
 |
Each of the two frames are reinforced with a 1” x
2” batten glued with resin putty. The ply is only ¼” so I’d rather
play safe and add some extra stiffness, and that’s what the seat
will be resting on anyway. Note also the two upper side panels ready
cut and awaiting stitching on. |
 |
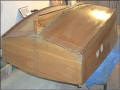
Upper side panels stitched and glued on with
resin putty. The upper side panels overlapped the lower ones by
about 1 ¼”, which resulted in an overall freeboard amidships of 12”
after the two panels are joined together. I had a dry run first to
drill the stitching holes and line things up correctly. No clamps
used because I didn’t have any that big! However, once in place and
everything tightened up (using double wire), it all came right,
after which I taped the lower and upper panels on the inside only at
this stage. |
 |
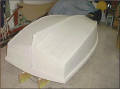
Frames filleted and taped in place. Note the cut
out central to the frames – this is for the seat (3/4” x 6” x 25”)
to slot into later on. I’ve not bothered to build in any buoyancy in
MC, but I’ve closed in the bow from the top to give me some
protection if the nose dips. This would also give rigidity at this
end too. I suggest that buoyancy is built in somehow more of safety
aid than anything else. Well, to my thinking, once you’ve turned
turtle in a boat this size, you’ll have a hard job getting back on
board without swamping time and again. The sea where I’ll be using
it in is fairly shallow (and warm), so if I do topple over, it’s no
big deal. I strongly recommend that if such a small boat was to be
used in deeper water some form of buoyancy should be built in, not
to mention the wearing of a personal buoyancy aid. I do not
recommend this sort of boat for use in tidal waters or where any
sorts of currents exist – it’s definitely not that stable! |
 |
Slight improvement on the old fitting-of-gunwales
trick by using thinner battens. Just the outside this time, as the
sides are quite rigid owing to the lower/top side panels
overlapping. |
 |
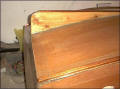
Stern transom is reinforced on the inside by a 3”
wide piece of ¼” ply shaped and glued in place. On the outside it’s
simply finished off with a straight 1 ¾” x ½” batten. The Bow
transom is dealt with in the same way. Here you can also see the
twin skeg configuration with a ½” by 2” central rubbing strip fixed
on – this would serve me well enough on the sandy access ramp.
Bottom will be resin coated but I don’t intend to fix any wheels
etc. I’ve even decided not to tape the two side panels from the
outside, as I’m sure it’s plenty strong enough as it is. Unlike
Tizzy, MC won’t have to fight it out with other tenders or be
exposed to concrete! |

 |
Eyebolt fitted to bow although I’ll be using the
oversize cleat to tie to and, it would also serve as a grab handle
(I got it for free, so I had to use it!). Nothing fancy at the rear,
just two holes either side of centre where rope passes through for
grab handles. Seat is only screwed in place and not glued,
just in case it proves too short and/or narrow in practice. In which
case I’ll fix on a longer/wider piece or do some other alteration no
doubt. |
I used plastic oarlocks this time because MC won’t be doing any
heavy duty hauling. They too are not glued/screwed permanently in place as
yet, as I might need to re-position them after I’ve had a good trial run.
While a fair approximation of where the seating/oarlocks combination can
be given at the design stage, much depends on the rower’s stature.
Therefore, the seating/oarlocks configuration in the design should not be
adhered to rigidly, but rather arrived at if possible through trial and
error to suit the rower. (Note: After a good trial row I did move the
oarlocks back so that they’re now 20” away from the transom and, I’ll most
probably be making appropriate changes to the seat for comfort’s sake. By
the way, MC is a nifty rower.)
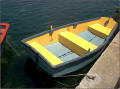
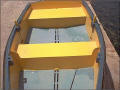
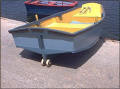
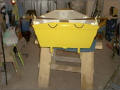
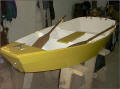
MC in her mainly yellow livery; this time specifically designed to match
my boat of course. Plus, it’s my most favourite and luckiest of colours.
The oars are actually my emergency ones which belong to my proper big
boat; so here they’re serving a dual role.
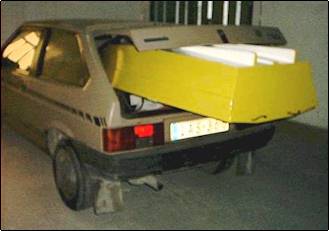 MC fits
neatly in the hatchback, so no need for a roof rack. I also tried it the
other way up and it fits even better. Now I just bung my bits and pieces
in the boat, lift its nose up to the boot edge and push it into the car
and close boot lid on it and secure – hey presto… couldn’t be better by
design if I tried! MC fits
neatly in the hatchback, so no need for a roof rack. I also tried it the
other way up and it fits even better. Now I just bung my bits and pieces
in the boat, lift its nose up to the boot edge and push it into the car
and close boot lid on it and secure – hey presto… couldn’t be better by
design if I tried!
If I was slightly sentimental about Tizzy, I’m more so when it comes to
MC. Why? I don’t know exactly why, but maybe it’s because I had more of a
hand in creating MC than I did with Tizzy; or maybe because MC is cuter.
All I know is that I feel good about myself through having built Tizzy,
now I feel even better on account of having built MC – and when all is
said and done, isn’t feeling good about having achieved something positive
that is most important… which can only be bettered by sharing such a
pleasant experience with others.
Finally, I wish to thank Chuck Leinweber, Mertens Goosens and Herb McLeod
for their generous contributions to all of us amateur boat builders and
wannabees.
Safe boating to all…
Regards, Pius |