|
APPENDIX
Mathematics
The Pram is developed from a Double-Ender.
The Overall Length of the Double Ender is LOA =15 ft.
At Beam the (ideal) width of the Double-Ender is
¼ x LOA = ¼ x 15' = 45". Just
as the designer chooses the Overall Length, the Flare Angle of
the hull is a personal choice. In
this case, the guiding factor for these two choices, the Overall Length
and the Flare Angle, is the limitation of the available parts.
By making the Profile height at Beam 6.75", the ratio
Profile height/half-Breadth becomes: Profile height/half-Breadth
= 6.75"/22.5" = 0.3. = Tan flare angle.
The Flare
Angle is: 16.7º, or 16º 41' 57".
This may seem like an odd, complicated figure, but,
in the calculations, the ratio figure 0.3 is simplicity itself.
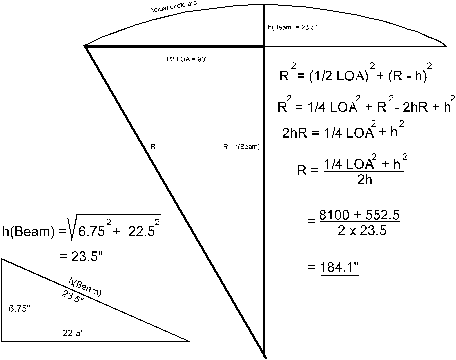
 In the Body view, at Beam, the horizontal, long leg of the
half-Breadth of the right triangle is 22.5", and the short
leg is 6.75". With
the theorem of Pythagoras, we find that the hypotenuse is:
In the Body view, at Beam, the horizontal, long leg of the
half-Breadth of the right triangle is 22.5", and the short
leg is 6.75". With
the theorem of Pythagoras, we find that the hypotenuse is:
 =
=
 = 23.5" (23.49").
See the right triangle in the illustration below.
= 23.5" (23.49").
See the right triangle in the illustration below.
The 23.5" hypotenuse
of the right triangle represents the (maximum) height of the sheer line
circle arc segment. The
chord, on which the circle arc stands, is the Overall Length of the
Double-Ender: LOA = 15' = 180".
In the next illustration the radius R is calculated with
the theorem of Pythagoras again: The
height of the (actual) circle arc is 23.5". In
the right triangle below, the radius R is: R2
= (½ LOA2) + (R – hBeam)2,
or R = {(½ LOA)2 + (hBeam)2}/
2 x hBeam.
In this formula ½ LOA
= 90", hBeam =
23.5". R - h Beam = R – 23.5".
Worked out, the answer is that the radius R of the
sheer line arc is R = 184.1".
Station Locations
With the radius R =184.1" known, it is
easy to determine the height of the actual sheer line at each station.
Note that the heights for the stations that are at equal distance
from station #8 (Beam) are equal, i.e. h(6) = h(10), h(5) = h(11).
Only one half of the actual sheer line has to be drawn to
illustrate the calculations. To
keep the drawing clear in the figure below only one calculation is
illustrated.
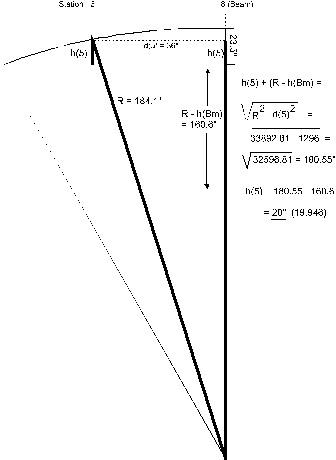
With the formula h(n) + (R – h(Beam) =
√{R2 – d(n)2} the exact length of the
station locations is calculated.
Because of the limitations of the parts’ box, the location of BBaC
is set at 56" fore of Beam, or d(BBaC) = 56",
and BBaS is located at 67.5" fore of Beam.
The location of TBaC
is against and aft of station #11.
The location of TBaS is 4" aft of station #11.
The extra four inches give the transom board a fine rake.
Once the exact length of h(n) for each of
these locations is known, the offset table is compiled easily.
Each half-Breadth value is found with the formula:
h(n)
x cos flare angle = h(n) cos 16.7º = h(n) x 0.9578225.
The
Profile heights are: Profile
height = 0.3 x half-Breadth because the flare ratio is:
Profile Height/half-Breadth = tan 16.7º = 0.3.
The offset table on page 6 was compiled in that
manner. However for the
cross frames, the figures of h(n) have to be reduced by the thickness
figure of the material: 0.25".
That way, the layout table for the actual measurement of
the cross frames is obtained.
Bevel Angle
Cross Frames
The bevel angle on the sides of the cross
frames is equal to the middle point angle between the radius
at that station and the radius at Beam.
The bevel angle of the cross frames at stations #5 = #11 is found
with the simple formula d(5)/R = sin bevel angle.
In this formula d(5) is: d(5) = 36" and the radius R
is: R = 184.1".
Sin bevel angle = 36/184.1 = 0.1955459.
The bevel angle is then 11.277º, or
11º 16' 35".
This setting is neatly rounded off to the practical figure 11.25º
(11¼º).
The sin of the bevel angle at the cross frame at station BBaC is 56"/184.1"
= 0.3041825. The bevel
angle is 17.71º. The
setting of the table saw blade to 17.75º (17¾º) for this bevel
angle would be more than accurate enough.
Offset Table
All measurements are in inches. The bevel angles in the bottom line are in degrees.
The figures with an asterisk (*) are adjusted to
the tangent at the sheer at that location.
| Station # |
BBaS |
BBaC |
5 |
8 |
11 = TBaC |
TBaS |
| d(n) |
67.5 |
56 |
36 |
0 |
36 |
40 |
| h(n) |
10.68 |
14.77 |
20 |
23.5 |
20 |
19.1 |
| - 0.25" |
10.43 |
14.52 |
19.75 |
23.25 |
19.75 |
18.85 |
|
hlf-Brdth
x 0.9578 |
10.5* |
13.9 |
18.9 |
22.25 |
18.9 |
18.5* |
|
Pfl
Hght
x 0.3 |
3.15* |
4.2 |
5⅔ |
6⅔ |
5⅔ |
5.5* |
| Bvl Angle |
17.7* |
17.7 |
11.25 |
--- |
11.25 |
11.25* |
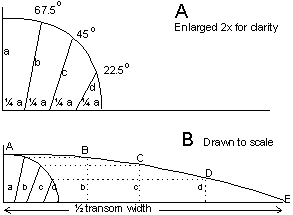
Practical Method for Construction of a Cambered Curve
On the next page, the practical method is done with the
help of two battens, three nails, and a piece of scrap plywood.
The battens are at least twice as long as the total width of the
cambered line.
Place the battens over the three nails
as the drawing of figure A shows.
Fasten
them together on a piece of scrap plywood at their cross point in such a
way that the angle between the battens is fixed and cannot be
changed.
Remove
the nail in the middle and replace it by a sharp pencil.
Move
the whole setup first toward one side, and then the other.
The
resulting pencil line is the camber line. See figure B.

Mathematical Construction of a Cambered Curve
The
mathematical method is shown in the drawing on the next page.
1.
Draw the first quadrant of a circle with a radius equal to the
maximum camber.
2
Divide the circle segment in four equal parts.
3.
Set out four equal parts on the horizontal radius.
4.
Connect these points and the points on the circle segment with
the lines b, c, and d.
See figure A.
5.
Divide the half-width of the board in four equal parts.
6
Erect additional vertical lines at the first three division
points (figure B).
7.
With the divider compass set out the length of the lines b,
c, and d.
8.
With a flexible batten, or a French curve, connect the plotted
five points A, B, C, D, and E.
Note:
The length of the lines b, c and d cannot be measured accurately
with a ruler.
Always use the divider compass for the precise transfer of these
dimensions.
|
