|
"Good stories don't come
cheap"
Here's the story of my first boat building experience. It begins many, many years ago and it continues right up to this day. Someday it may have an ending. I'm hoping that it will be a happy one. One thing I know is this:
"Good stories don't come cheap."
That was the motto of my first ship in the Navy. It is especially applicable to boat building. Whenever something goes grievously wrong, I am comforted by the fact that I am going to get a good story out of it.
 I don't remember exactly when I first decided to build a boat. As a child growing up in Michigan on the shore of Lake Erie, I spent a lot of time on boats. My brother and I always spent a week each summer at Sailing Camp. Sailing Camp was a week of camping out on our family’s Bristol 22’ and long, hot summer days spent flailing about on a fleet of very old and very tired Flying Juniors (“F.J.s”). I don't remember exactly when I first decided to build a boat. As a child growing up in Michigan on the shore of Lake Erie, I spent a lot of time on boats. My brother and I always spent a week each summer at Sailing Camp. Sailing Camp was a week of camping out on our family’s Bristol 22’ and long, hot summer days spent flailing about on a fleet of very old and very tired Flying Juniors (“F.J.s”).
As the aging F.J.s slowly fell out of commission due to years of use and abuse, our boat club was left to identify replacements. The club ultimately decided to build a fleet of El Toro dinghies. Before long, the back room of the clubhouse was filled with boat hulls in various states of completion. I was amazed that rational people would attempt such a thing.
The following summer, the El Toros were quickly christened the boat of choice by summer campers. Unlike an F.J., they were light and easy to rig. A single person could lug them in
 and out of the water. By comparison, an F.J. took a team of 6 or more just to budge. The El Toro was elegantly simple, yet they were also fun and challenging fleet racers. and out of the water. By comparison, an F.J. took a team of 6 or more just to budge. The El Toro was elegantly simple, yet they were also fun and challenging fleet racers.
A decade or so later, I was living in sunny San Diego, California. I remember looking out at the bay and imagining how nice it would be to have an El Toro for bopping about the bay. I fantasized about spending lazy afternoons sailing the sheltered harbor channels. I didn't want the burden, maintenance or expense of owning a real yacht. My dream was for something pure and simple like the El Toro.
This fantasy marked the beginning of my boat building adventure. Shortly thereafter, I began searching the Internet for "El Toro". I soon stumbled across a set of free plans
(download at right) for a dinghy known as a "D-4".
The D-4 was remarkably similar to an El Toro -- simple, easy and reportedly build-able for about $200.
I printed the free plans and struggled to decipher the tiny measurements. There was just enough detail that I could imagine myself taking on such a project. I was undeterred by my lack of wood working experience, which consisted mainly of pounding nails into wood in a more or less rudimentary fashion. I had been a little less naive, I might never have considered the idea.
 Over the next several weeks, I spent many enjoyable hours pouring over every tiny detail of the free plans. I made exploratory trips to the Home Depot to estimate the cost of lumber and materials. In my mind, I constructed the D-4, piece-by-piece, start to finish. When my dreamboat was complete, I took lazy sails of imagination on hot summer days, enjoying wind and water in a world without cares. Over the next several weeks, I spent many enjoyable hours pouring over every tiny detail of the free plans. I made exploratory trips to the Home Depot to estimate the cost of lumber and materials. In my mind, I constructed the D-4, piece-by-piece, start to finish. When my dreamboat was complete, I took lazy sails of imagination on hot summer days, enjoying wind and water in a world without cares.
Unfortunately, real life has a habit of crashing into dreams like a pack of icebergs. I had multitudes of other projects competing for my time and attention. I also had plenty of other hobbies. Most significantly, I had almost no disposable income. Days turned to weeks and weeks to months during which my dreams remained pure fantasy. The free plans eventually migrated from my briefcase to my filing cabinet, waiting for a day when things changed.
As it was, things didn't change for quite a while. But in December 1999, a simple event revived my boat-building dream. I received a gift of $50 for Christmas. As a rule, gift money cannot be saved or spent on anything sensible. I had a compelling need to spend it on something that I would normally never buy for myself. Then I remembered the D-4. I was soon back on the
Mertens-Goossens web site and ordering a complete set of detailed plans for $35.00.
 I was keenly aware that I didn't really need the detailed drawings to start building my boat. I already had the free plans. But I also knew that investing $35.00 in those plans was a commitment to actually build the boat. I was "invested." I was keenly aware that I didn't really need the detailed drawings to start building my boat. I already had the free plans. But I also knew that investing $35.00 in those plans was a commitment to actually build the boat. I was "invested."
The plans arrived and for the second time in a decade, I began pouring over every detail of D-4 construction. The plans suggested that a D-4 could be built in about 20 hours. A sailing version was estimated to take two or three times as long. I toyed with the idea of building the rowing version first, just for practice, but then abandoned that idea. I am a sailor. If I was going to build a boat, then it must sail. Besides, it was only 60 hours. It was March 2000 and I figured that I could be sailing by mid-June.
Despite my ambition, it was May before I even started my project. I finally found a Saturday with nothing better to do. My wife was away on business and I was free to get into trouble. Off I went to the Home Depot.
"You can't make anything foolproof because fools are so ingenious."
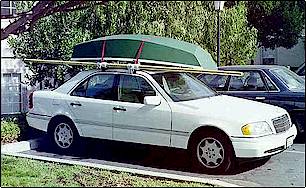
My first challenge was getting my supplies home. I don't own a truck and I was too cheap to rent one. So there I was tying several sheets of plywood onto the roof of my small sedan. Terrified that the plywood sheets would catch an updraft and send my entire car flying skyward, I crept nervously along ten miles of back roads to get home.
 My next challenge was to transfer my plans onto the wood. This sounds simple, and it is, unless, like me, you really insist on making it difficult. The Mertens-Goossens web site explained how easy it was to transfer key measurements to the plywood and then draw smooth lines in between those points using a batten. Unfortunately, this advice made no sense to me at time. I didn't understand what they were talking about. Even if I had, I didn't trust myself to accurately transfer the measurements or draw curves that would even approximate the desired result. My next challenge was to transfer my plans onto the wood. This sounds simple, and it is, unless, like me, you really insist on making it difficult. The Mertens-Goossens web site explained how easy it was to transfer key measurements to the plywood and then draw smooth lines in between those points using a batten. Unfortunately, this advice made no sense to me at time. I didn't understand what they were talking about. Even if I had, I didn't trust myself to accurately transfer the measurements or draw curves that would even approximate the desired result.
I concluded that full-size patterns would be required. My wife returned home to find me meticulously tracing plans onto huge sheets of paper, which I then cut out into full size patterns for each of the panels and frames. The one advantage of this insanely laborious process was that I could experiment with various options for nesting all of the pieces into the smallest possible area of wood. The advantage was illusory however. I quickly tired of experimenting and stopped worrying about nesting everything efficiently. I was eager to start sawing wood.
Standing in my garage surrounded by sheets of plywood adorned with huge paper patterns, I was now facing the realization that I lacked any real woodworking tools. All I had was a tool box full of the typical odds and ends that people accumulate over time – a hammer, a screwdriver or two, a couple of crescent wenches and that mechanical miracle of modern engineering, a pair of vise-grip pliers.
 I had been fortunate enough however to acquire a used circular saw from a neighbor who had purchased a new saw and was throwing the old one out. While still technically operable, this world-weary saw would probably have scared many a high school shop teacher into retirement. All that mattered to me was that it was worked -- at least well enough to get me started. In the coming months, I would add a jig saw, a sander and a grinder to my tool inventory. On occasion, I am now seen wandering the aisles of the Home Depot with a tool-hungry gleam in my eyes. Basic boat building may not require a lot of tools, but the more you have, the easier it gets. I had been fortunate enough however to acquire a used circular saw from a neighbor who had purchased a new saw and was throwing the old one out. While still technically operable, this world-weary saw would probably have scared many a high school shop teacher into retirement. All that mattered to me was that it was worked -- at least well enough to get me started. In the coming months, I would add a jig saw, a sander and a grinder to my tool inventory. On occasion, I am now seen wandering the aisles of the Home Depot with a tool-hungry gleam in my eyes. Basic boat building may not require a lot of tools, but the more you have, the easier it gets.
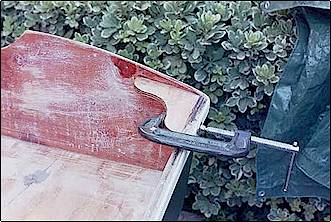
After re-tracing my patterns onto the plywood sheets, I started sawing. Rather than investing in proper sawhorses or constructing a jig, I secured the plywood sheets to my plastic patio table and secured them with couple large C-clamps. Once again, three-fingered high-school shop teachers were rolling over in their graves. I'd make a cut, shift the plywood to avoid cutting through the table, make another cut, shift again, and so on. It was a slow process but the frequent adjustments helped me to fully consider each new step.
By the end of the afternoon, I had completed most of the hull panels and frames. It gave me a huge sense of accomplishment to finally take these first steps toward turning my dream into reality. That is, until I stepped back and looked around my garage.
 Every horizontal surface was covered with sawdust. The vertical surfaces were coated too, but only half as thick and not as noticeable. The remainder of my day was spent sweeping dusting, vacuuming and scooping sawdust. It was clear that my garage had reached the end of its short association with the boat building industry. Every horizontal surface was covered with sawdust. The vertical surfaces were coated too, but only half as thick and not as noticeable. The remainder of my day was spent sweeping dusting, vacuuming and scooping sawdust. It was clear that my garage had reached the end of its short association with the boat building industry.
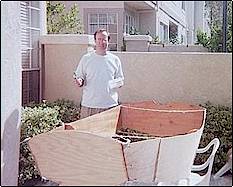
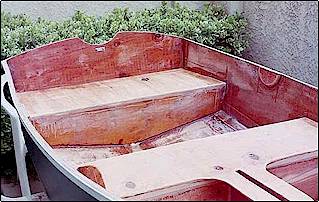
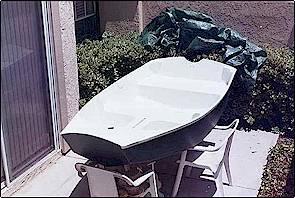
Fortunately, our townhouse also had a small back patio. The entire patio was about half the size of the garage but that was still more than enough room for the D-4. Sweeping sawdust was also a lot easier on the patio. If I did a sloppy job, the breeze would carry the evidence away in a day or so. The patio location also meant that my project wouldn't have to be moved each evening in order to park my car.
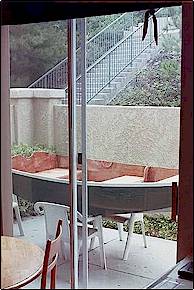
The biggest problem with the patio was that it was completely surrounded by a six-foot high stucco wall. Wood, tools and any other boat building materials therefore had to be transported through the middle of my house. This wasn't a big deal so long as my wife wasn't looking. Helpful friends were also quick to point out that my boat might have exit via this route as well. I wasn't worried. I figured that my completed D-4 wouldn't be any more trouble to move than a large couch. Failing that, I could always maneuver it up and over the wall.
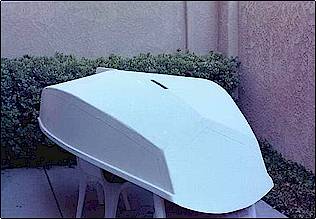
 The patio location was also favored by the fortunate circumstance that I live in San Diego, California. The weather in San Diego is very agreeable to outdoor boat building. It rarely rains from April to November and for that matter, it rarely rains the rest of the year as well. Just the same, I thought it wise to invest in a plastic tarp to protect my project from the elements. This proved to be a good investment. Over the first six months, regular downpours were commonplace. Between bouts of bad weather and a busy personal schedule, I was reduced to working on my project about four to six hours a month. It became clear that I wouldn't be sailing any time this year. The patio location was also favored by the fortunate circumstance that I live in San Diego, California. The weather in San Diego is very agreeable to outdoor boat building. It rarely rains from April to November and for that matter, it rarely rains the rest of the year as well. Just the same, I thought it wise to invest in a plastic tarp to protect my project from the elements. This proved to be a good investment. Over the first six months, regular downpours were commonplace. Between bouts of bad weather and a busy personal schedule, I was reduced to working on my project about four to six hours a month. It became clear that I wouldn't be sailing any time this year.
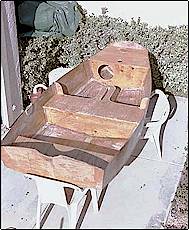
Initial stages of construction went about as well as could be expected. The stitch and glue construction method didn't require a masterful degree of precision. If it was "in the neighborhood," then I could fill in the gaps with epoxy putty and slap a piece of fiberglass tape over the top. I'd never used epoxy or fiberglass before but the instructions were straightforward and the pumps made the measuring almost foolproof. Which reminds me of another favorite saying:
"You can't make anything foolproof because fools are so ingenious."
Over the following weeks and months, I was able to demonstrate my "ingenuity" in many memorable ways.
 My first big goof involved mixing batches of epoxy putty to build fillets on interior seams. I had purchased a Systems-3 epoxy kit from the Mertens-Goossens web site. The kit included wood floor for thickening the epoxy to a putty-like consistency. When mixing early batches, I added flour until I had a stiff mixture. "Like peanut butter" what most sources suggested. Unfortunately, achieving this standard proved deceptively difficult. While the putty initially stayed where I put it, minutes later it would drool out of the seams, forming a neat epoxy puddle on the ground. Lesson learned: No matter how thick it looks, another scoop of wood flour won't hurt. My first big goof involved mixing batches of epoxy putty to build fillets on interior seams. I had purchased a Systems-3 epoxy kit from the Mertens-Goossens web site. The kit included wood floor for thickening the epoxy to a putty-like consistency. When mixing early batches, I added flour until I had a stiff mixture. "Like peanut butter" what most sources suggested. Unfortunately, achieving this standard proved deceptively difficult. While the putty initially stayed where I put it, minutes later it would drool out of the seams, forming a neat epoxy puddle on the ground. Lesson learned: No matter how thick it looks, another scoop of wood flour won't hurt.
Even when I achieved an effective consistency for the putty, I had a heck of time getting it from the mixing cup to the spot where I needed it. More often than not, I slopped putty just about everywhere but the desired location. This taught me another valuable lesson: Once epoxy sets, it's harder than iron. You can sand yourself silly and hardly make a dent in the stuff.
In an attempt to more effectively apply the putty fillets, I employed a web-site suggestion to put the putty in a zip-lock bag, cut off a small corner and then squeeze the epoxy into seams like a pastry chef with a bag of frosting. From this experiment I learned that the combination of a hot day and a warm pair of hands holding the round little bag of epoxy greatly accelerates the speed of the hardening process. Before I could apply even a tiny amount of the mixture, my hands were burning from the heat of reaction and pouch had hardened into a solid little ball.
 The end result of these early mistakes was that I wasted a lot of materials. I ran out of wood flour before I had even completed half of the interior seams. This led to my next disastrous goof. A call to System-3 revealed that additional wood flour was cheap, about three dollars for a bucket, but shipping costs were outrageous, about $10 more. Once again, my cheapskate nature got the best of me. I concluded that my piles of sawdust ought to be an adequate substitute for the wood flour. The end result of these early mistakes was that I wasted a lot of materials. I ran out of wood flour before I had even completed half of the interior seams. This led to my next disastrous goof. A call to System-3 revealed that additional wood flour was cheap, about three dollars for a bucket, but shipping costs were outrageous, about $10 more. Once again, my cheapskate nature got the best of me. I concluded that my piles of sawdust ought to be an adequate substitute for the wood flour.
As I stirred up my first batch of sawdust-based putty, it was clear that sawdust and wood flour are very different substances indeed. Wood flour is extremely fine dust generated by sanding wood. My sawdust was much more coarse, resulting in a lumpy paste of uneven consistency with visible bits of wood in it. My epoxy supplies were dwindling however so I remained determined to make the sawdust putty work. With dogged determination, I slopped the putty along several seams, splattering it on several other undesired locations as well. The disagreeable glop immediately began to sag and rivulets of epoxy ran out of the slurry and down the panels. It was a mess.
"You can't polish a turd."
Frustrated by my own incompetence and bad judgment, I tossed everything that was toss-able into the trash and quit for the day. When I returned to my project, I was faced with several ugly, lumpy fillets that hardened into cast-iron. Many, many hours of sanding, grinding and swearing were required before I was able to smooth the surface enough to lay a new fillet and tape over the seams. While I'm confident that the end result is structurally sound, these seams remain the worst looking on my whole boat.
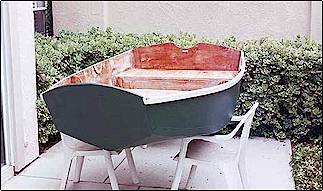
 Despite each of these setbacks, I can honestly say that have genuinely enjoyed the project from beginning to present day. With each new step, the boat takes one step closer to completion. Admittedly, on several occasions over the past year, the boat has lingered untouched and forgotten under the ugly, green tarp on the back patio. These delays most often occurred when I ran out of critical supplies or was facing a particularly difficult point in the construction. Despite each of these setbacks, I can honestly say that have genuinely enjoyed the project from beginning to present day. With each new step, the boat takes one step closer to completion. Admittedly, on several occasions over the past year, the boat has lingered untouched and forgotten under the ugly, green tarp on the back patio. These delays most often occurred when I ran out of critical supplies or was facing a particularly difficult point in the construction.
One of the best motivators for getting the project moving again has always been telling others about it. Every time I tell someone: "I'm building a boat in my backyard!", it creates a bit more pressure to actually get out there and do it. Occasionally, when I need an extra nudge back into action, I return to the Mertens-Goossens web site and start reading the boat building message boards. Realizing that others are facing similar challenges in their projects is often enough to get me moving again.
The message boards are also a treasure trove of boat building information. In many ways, they are more valuable than any book or set of plans. I regularly find simple answers to any construction problem. Too often, I find the answers too late to prevent my mistakes. If only I had know then what I know now. Hindsight is 20-20.
 It's now been over a year since I began construction and my D-4 is finally approaching completion. It might actually be ready for launching in another month or so. The final steps involve painting the hull. After much thought, I elected to paint the hull with exterior porch paint from the Home Depot. It's not an ideal solution but it provides a reasonable compromise between price, durability, and ease of application. I have few illusions that my D-4 is ever going to look like the glassy-hulled yachts in the harbor. Here's another bit of my grass roots wisdom for you: It's now been over a year since I began construction and my D-4 is finally approaching completion. It might actually be ready for launching in another month or so. The final steps involve painting the hull. After much thought, I elected to paint the hull with exterior porch paint from the Home Depot. It's not an ideal solution but it provides a reasonable compromise between price, durability, and ease of application. I have few illusions that my D-4 is ever going to look like the glassy-hulled yachts in the harbor. Here's another bit of my grass roots wisdom for you:
"You can't polish a turd."
As you can tell, this story goes on and on and I still haven't even got the boat in the water. I know that there are many adventures still ahead -- certainly enough for a few more good stories. But before I get back to sanding and painting, I'll offer my top-ten tips for the would-be, first-time boat builder:
1. Buy the full set of plans. It's a small cost. They are worth it.
2. Get a ruler and plot out the measurements. Don't bother with patterns. Trust yourself. It will all work out fine.
3. When it comes to epoxy putty for fillets, thicker peanut butter is better.
4. Fillets need to be just big enough. Bigger is not better.
5. Always mix less epoxy than you think you'll need. You can always make more.
6. Find message boards about boat building and read them. All of them. Several times.
7. If you make a mistake, scrape off all evidence of it before it sets.
8. Any mistake can be fixed. No matter how bad. Trust me. Epoxy and plywood can be amazingly versatile stuff.
9. Don't expect to finish your boat-building project any time soon. I'm not sure you ever finish a boat. There's always something more to do.
10. Have fun!
Epilogue:
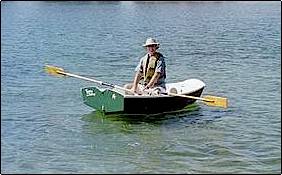
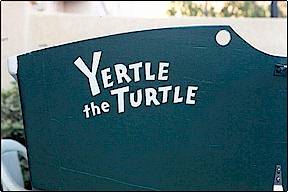
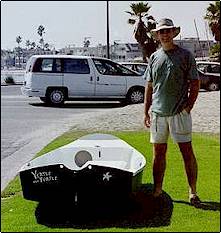
On October 21, 2001, after approximately 18 months under construction, my D-4 dinghy was launched for the first time onto the waters of Mission Bay in San Diego, California. The boat has been affectionately dubbed “Yertle the Turtle” after a beloved Dr. Seuss poem.
 On the far-away island of Sala-ma-Sond, Yertle the Turtle was king of the pond. -- Dr. Seuss. On the far-away island of Sala-ma-Sond, Yertle the Turtle was king of the pond. -- Dr. Seuss.
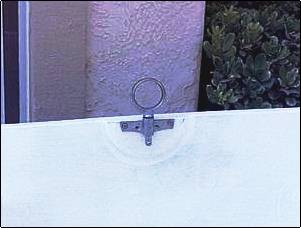
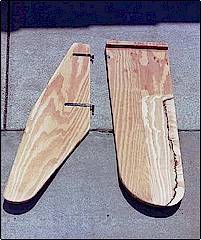
Like almost every major step forward in my boat building process, the launching required a “leap of faith.” Everything was not quite ready. The daggerboard, rudder and spars had only a base coating of epoxy to protect them from the elements. The hull could probably use another coat of paint and a finish coat of wax. I was still trying to determine the best method for attaching the sail to mast and boom. But the time had come. I was anxious to launch and these small details could wait. (Or at least I sincerely hoped they could…)
The morning fog lifted, the sun came out and a nice 8-10 knot breeze was present on the flat waters of San Diego's Mission Bay. My wife and a couple friends had come to witness the spectacle. A friend brought a video camera on the off-chance that a catastrophic disaster might result in fabulous prizes from “America’s Funniest Home Videos”.
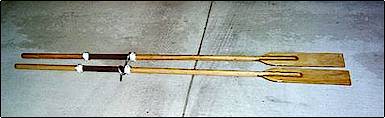 With a minimum of ceremony, we slid Yertle into the water. My homemade oars were quickly attached and I scrambled aboard. A few easy strokes propelled the boat swiftly away from shore. I looked around for leaks. (There weren’t any.) I spun around in circles. Then I grinned at my wife and friends like a fool. I was a “boat builder”! With a minimum of ceremony, we slid Yertle into the water. My homemade oars were quickly attached and I scrambled aboard. A few easy strokes propelled the boat swiftly away from shore. I looked around for leaks. (There weren’t any.) I spun around in circles. Then I grinned at my wife and friends like a fool. I was a “boat builder”!
I rowed about for a while and took my wife for a spin. She sat in the stern and flapped her arms like a bird. A friend took a spin but quickly returned to shore to ask: “Are we ready to sail?”
 I had purchased an El Toro dinghy sail off eBay for $26. My spars had been laminated and rounded from pine boards and I had constructed an experimental goose-neck out of a piece of PVC pipe. It took us about ten minutes to assemble it all and drop the mast into place. With another quick shove off from shore, Yertle was sailing! I had purchased an El Toro dinghy sail off eBay for $26. My spars had been laminated and rounded from pine boards and I had constructed an experimental goose-neck out of a piece of PVC pipe. It took us about ten minutes to assemble it all and drop the mast into place. With another quick shove off from shore, Yertle was sailing!
The dream was complete. I had built my own boat. The sun was out, the wind was warm and I was sailing. There were still things to be done, but they could wait for another day. Good stories don’t come cheap but sometimes you have to shut up long enough to enjoy them. So I did.

About the Author:
 Shawn Payment lives in San Diego with his wife and two dopey dogs. His lovely wife is blessed with a sardonic wit, the patience of a saint and just enough morbid curiosity to make her stick around and see what Shawn does next. Shawn currently spends his days managing a law office and his free time on a plethora of seemingly random pursuits. These currently include: boat building, jogging, reading, writing, and making odd noises with a guitar. Despite all evidence to the contrary, he is not currently under the care of any recognized medical professional or taking any prescription or non-prescription drugs. All things being equal, life could be a lot worse... Shawn Payment lives in San Diego with his wife and two dopey dogs. His lovely wife is blessed with a sardonic wit, the patience of a saint and just enough morbid curiosity to make her stick around and see what Shawn does next. Shawn currently spends his days managing a law office and his free time on a plethora of seemingly random pursuits. These currently include: boat building, jogging, reading, writing, and making odd noises with a guitar. Despite all evidence to the contrary, he is not currently under the care of any recognized medical professional or taking any prescription or non-prescription drugs. All things being equal, life could be a lot worse...
 |
Editor's note:
Shawn made a video of the launch of "Yertle the
Turtle". Click the Quicktime link at left to view
it. |
|

