|
Bill's Oldshoe Report
by Bill Nicolay NicolayB@BioTek.com
| The report below was first sent
to the now defunct "Bolger List" in December of 1999. I am now in my second
season of sailing and have not discovered anything in the original report that I would
change (I did clean up the spelling a bit). I hope it is of help to others. ...Bill |
Over the course of a year and a half, I built the Bolger design Oldshoe from plans
purchased at Common Sense Designs. The winter-time work was done in a basement workshop
that has only a small door to the outside. In summer weather, outside assembly and
finishing were completed under a plastic tarp shelter. I did not keep an accurate
accounting of time or money, but the outboard motor, sails, and used trailer cost about
$1500; and everything else (including taxes and registration) cost about another $1500.
All work was done alone except for rolling the hull upright, for which I enlisted three
friends at a cost of one six-pack of beer. |
Modifications
to the purchased plans:
- 1/4" marine grade fir was used for
all plywood except the bottom which is 3/8" marine grade fir. The entire bottom can
be made from two sheets -- 4' aft section, 4' middle section, and port and starboard
halves of the forward section. The entire bottom was made up (left about two inches bigger
than necessary all around) with surface grain running crosswise, and all joints made with
fiberglass tape on both sides of butt joints. These joints were not very strong, but held
things together until the bottom was applied to the boat. The portions of the fore and aft
wells, and the cockpit well, that would be exposed in the completed boat were coated with
polyester cloth in epoxy for abrasion resistance.
- An arch was added over the transom. It
has a 6" crown and the opening for the outboard is 16" wide. This works fine for
a 2HP Honda (but the motor cannot be pivoted 180 degrees). The main sheet block is mounted
in center of the arch and the mizzen sheet cam cleat is 6" off center to starboard.
|
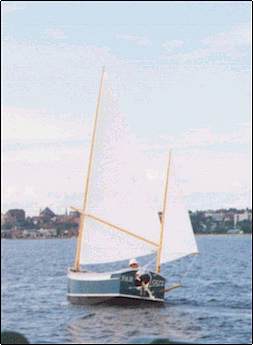 Oldshoe Photo - Sailing in Lake Champlain
This rather distant
and grainy photo shows "FAR OUT" sailing in Lake Champlain towards Burlington
Vermont on a light day in 1999. The photo is from a friendship sloop. |
|
- The free-flooding portions of the keel
were made solid (zebra muscles in lake), and a 3/4" strip of wood was built into the
bottom edge of the keel (between the plywood sides) so the lead is not exposed. The entire
keel, with rudder post was assembled separate from the hull and sheathed with polyester
cloth in epoxy. The complete keel assembly with the sternpost, fits over the laminated
keel strip attached to the bottom. The keel assembly was attached to the hull with nails
and epoxy after the boat was upright.
|
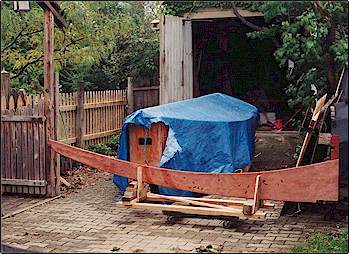 Oldshoe Photo - Keel Assembly Oldshoe Photo - Keel Assembly
The completed keel assembly containing the lead casting and rudder post has been sheathed
with polyester cloth and epoxy resin and is sitting in front of the hull (covered by the
blue plastic). The keel assembly fits over a 1.5" square stringer that is firmly
attached to the bottom of the hull. This is not the way the plans describe the
assembly of the keel to the hull. Shortly after this photo was taken, the hull was
jacked up on blocks. The keel was rolled underneath the hull. The hull was lowered onto
the keel assembly and held in place with epoxy and bronze nails. A large epoxy fillet was
also added to the joint. |
- The bulkhead frames were placed on the
forward side of bulkhead 'A' and the aft side of bulkhead 'D' to make the watertight wells
easier to keep clean.
- The stringers along the outboard edges of
the seats run the full length of the boat.
- Stringers were added along the edges of
the cockpit seats and 3/4" below the plane of the seat.
- Stringers along the upper outboard edges
of the storage compartment start at the bow transom and end about eight inches aft of
bulkhead 'B' where they are tapered so as not to create a hard spot in the side panels
- A second small storage compartment was
added aft of the cockpit 2' wide, 1' long, 5" to 6" deep. Hinged cover similar
in style to the main storage compartment cover; drains into the cockpit. This is for easy
access to things like horn, etc.
- The main storage compartment cover is
hinged at forward edge, has wooden turn-stops on the deck to keep it from falling open if
inverted, and a locking hasp on the aft edge.
- A 1/4" by 1-1/2" Inwale was
added to the sheer.
- A row of 3/8" holes, about a foot
apart, were drilled immediately under the gunwale/inwale for tying on fenders, etc.
- The gate that holds the main mast was
redesigned completely -- fiberglassed 3/8" ply deck with a swinging aluminum gate.
When the gate is closed, a stop on the mast prevents it from falling out (if upside down).
- Rudder and rudder mounting were modified
(rudder dimensions, including end plate, are unchanged). A 3/8" bronze pin protrudes
from the bottom of the rudder post to engage a hole in a 1" x 2" x 12" shoe
(with epoxy/graphite bearing) let into the lower aft end of the keel. Upper bearing is
made of PVC pipe and epoxy/graphite.
- A tiller head was made of hardwood blocks
and 1/4" aluminum stock and was bolted together -- very smooth and sturdy.
- Two part tackles are needed on both
snotters and on the main sheet.
- The main snotter line starts at the
becket on a block mounted on the forward side of the mast. It proceeds out through a hole
in the end of the main sprit, back through the block, through a turning block on the
starboard side of the deck, through a thimble on the forward edge of the storage
compartment deck, to a cam cleat on the aft edge of the storage compartment deck. This
makes it easy to use the snotter to adjust the camber of the main sail while underway.
- The floorboards are made of 3/4"
pressure treated wood and are divided into 3 sections, they can be lifted onto the seat
stringers to form a big level platform.
- Navigation lights powered by a 12 volt
deep cycle wheelchair battery (Sears) are being added this winter.
- The stringers that run lengthwise under
the seats seemed a bit fragile, so to prevent them from cracking if someone jumped on a
seat, I fastened a 1.5" strip of plywood to their lower edges.
Assembly sequence:
- Bulkheads, transoms, rudder, hatch
covers, spars, were assembled in my basement over the first winter.
- The profile of the rebate/chine line was
lofted to get the shape of the lower edge of the cockpit sides and the keel sides which
were then made as subassemblies.
- The lead ballast casting was made
(pouring the lead was an adventure all its own).
- The keel assembly with the lead installed
was completed and sheathed.
|
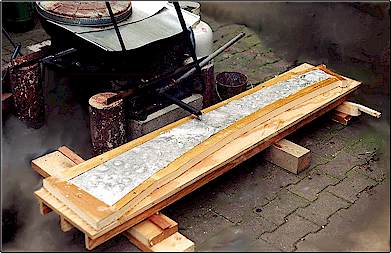 Oldshoe Photo -
Casting the Lead Ballast Oldshoe Photo -
Casting the Lead Ballast
This photo shows the molten lead filling the wooden form. It's not very
visible, but a propane burner is sitting under a crude steel container made
from an old water heater tank cut in half.
|
- The cockpit sides, bulkheads 'A', 'B',
'C', & 'D, and the storage compartment deck were assembled then moved outside.
- With the transoms and bulkhead/cockpit
side assembly upside down, side stringers were added, then the sides, then chines, then
bottom.
- The bottom was sheathed with polyester,
and sides with 4oz fiberglass. The 1-1/2" keel strip was laminated in place.
- The bottom was finished to where it was
ready for paint.
- The hull was turned upright.
- The seat tops, gunwale, and inwale were
added & all interior work was made ready for paint.
- The rub strakes were added and the
topsides made ready for paint.
- The keel assembly was attached. A
1-1/4" radius fillet was placed in the keel to hull joint.
- All painting was done and hardware was
attached.
|
Miscellaneous:
- The motor is a use 2HP Honda outboard
with short shaft.
- The sails were from Common Sense Designs
(T & A Sailmakers in California ?!). One reef in main. I added four 1/2" hot pink
draft stripes to the main.
- Spars are laminated and scarphed from
pieces of spruce staging planks, per plan. I am not unusually big or strong, but the main
mast is easy to raise and lower, either on the trailer or in the water.
- The main sail is hoisted on a track made
from a strip of aluminum sitting on a hardwood strip (per designers suggestion). The
mizzen sail is lashed to the mast.
- System 3 epoxy was used throughout, with
various fillers as needed.
- On the interior, all surfaces are epoxy
coated, and all horizontal surfaces covered with 6oz fiberglass cloth.
- Topside and interior paint:
- Interlux 404/414 - 1 coat
- Interlux Brightside Primer - 1
coat
- Interlux Brightside - 3 coats
with flattening agent and nonskid in some areas
- Bottom Paint
|
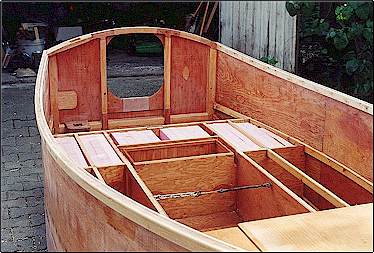
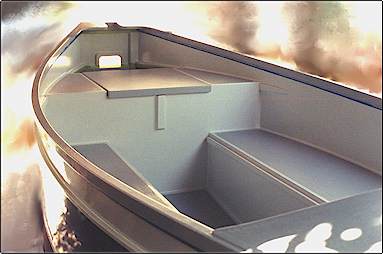 Oldshoe Photo - Painted Interior Oldshoe Photo - Painted InteriorThis is a view of the interior from the port
quarter looking forward. A piece of blue masking tape is still under the inwale. The
1/4" by 1-1/2" inwale was not on the plans. The forward deck is different than
the plans, as is the upper storage compartment stringer that extends clear to the bow and
a bit aft of the storage compartment. The rail seen slightly below the edge of the seat
allows the floorboards to be placed up level with the seats thereby creating a big
sleeping platform. |
Sea Trials:Background:
The boat is kept in a slip on Lake Champlain. This lake is big: about 10 miles across and
100 miles long (but very skinny at the ends). It is deep (400'), bordered by
mountains in some areas; has few sandy beaches and many solid rock shores. Winds above
35Kt are very rare, total calm is common. The prevailing winds tend to blow lengthwise, so
it can build up large waves. As the reviewer/builder/owner I sailed this boat for three
months, but have owned a variety of sailboats for more years than I like to count. I
occasionally race and cruise in larger boats. I tend to sail alone, and at 145lb am fairly
light, but on several occasions have had three adults or two adults plus two kids onboard.
I keep a Danforth anchor, chain, and 200' of 3/8 nylon line in the forward well, and a
gallon of spare gas for the outboard in the after well.
High Wind Performance: Oldshoe
is a very tough boat. My full length stringers, extra inwale, 3/8 bottom, polyester
sheathing on bottom, & transom arch make it even tougher, but are not really
necessary. Sailing wing-and-wing down-wind, with full sail in a 20 knot wind &
partially developed sea, the boat was clearly over pressed. The bow wave was covering the
hole in the bow transom (I'd stuffed it a rags, to stop the flood) and stern wave slopping
over the transom. The helm felt very light but did not lose control. In circumstances
almost as bad, I've dived into a wave of solid water at least six inches over the bow. The
boat does not noticeably flex, the spars do, but not so much as to be of concern. In a 25
knot wind, no waves (inside a breakwater), and one reef in the main, this boat is really
fun. Everyone else is running for cover and I can go anywhere -- singlehanded -- jibing
and tacking with ease. If I want time to think, I flatten the mizzen, tie the tiller in
the middle, and start the motor. Depending on the throttle setting, we move straight
upwind, or slide straight backwards. In less extreme circumstances, flattening the mizzen,
tying the tiller, and releasing the main is equivalent to heaving-to in a sloop. The boat
will settle down at an angle to the wind that depends on where the tiller is tied.
Light to moderate wind: In a
falling wind and motorboat chop, it becomes apparent that Oldshoe is a 12 foot long, flat
bottom boat with a shallow keel. It makes a lot of leeway, especially if pinched. It will
not sail particularly close to the wind. Short choppy waves stop it, and it ends up
bobbling around out of control. In light air, it is definitely under canvased. As the
speed picks up, the shallow keel and rudder become more effective. Without the
mizzen, the boat has a strong lee helm. As might be expected, the helm is easily
influenced by the mizzen and by the trim and loading of the boat. It easily self-steers,
but is very sensitive to trim, and makes a lot of leeway.
|
 Oldshoe Photo - Aft interior - no seats Oldshoe Photo - Aft interior - no seatsThis photo shows the foam flotation and my
modified transom the "deck" over the arch is not present yet. The turnbuckle
between the sides of the footwell is to pull them into shape while fastening the seats.
The storage compartment aft of the footwell is only about 6" deep at the forward end
(5" at aft end) and one of its drain holes is barely visible. NOTE: The mizzen
could easily be moved more toward the centerline. This transom cutout fits
the Honda 2HP just fine - even when tilted, but does not allow it to be
rotated completely around. |
| Under power the 2HP Honda, at about
half throttle, moves the boat at hull speed. Getting started is a bit tricky as the Honda
has no neutral and without some way on, there is minimal directional control. (Get it
aimed where you want to go, pull the starting rope, and hang on)! Initial stability
is very high. I sail alone, sitting on the low side, with minimal anxiety in light to
moderate conditions. The righting moment does not appear to build as the boat heels. Most
keel boats I'm familiar with give the feeling they don't want to roll beyond a certain
point. As the rail approaches the water, they get very stiff. Oldshoe does not seem to
have this characteristic although I have not pushed it too hard. Whenever sailing enough
wind to get the rail down, the hair on the back of my neck was standing up, and I lost my
curiosity. I have not capsized the boat to see what would happen (next summer - when the
water is warm).
It is not always a dry boat: a small wave
will occasionally slap the side near the bow, jump vertically up the side and blow into
the cockpit. The high-back seating is great - if I'm not wearing a PFD, I put one
behind me as padding. A short hiking stick (or slightly longer arms) would make it even
more comfortable. It truly is the cockpit out of a 30 footer without the rest of the
boat, and has all the good and bad aspects associated with that.
Recommended Changes:
- Don't make the hole in the bow transom
any higher than necessary to pass the anchor chain shackle -- too much water comes in.
- The tiller could be a bit longer --
4" to 6" to make it easier to keep one hand on it while messing with things
forward.
- If the lower portion of the mizzen mast
were round instead of square, so the mizzen mast were free to rotate, the sail would set
better. (Same for the main, but this gets more complicated - I haven't thought it clear
through yet).
- The aft end of the boomkin is too low and
too far forward. The result is that tightening the mizzen sheet compresses the sprit and
loosens the foot of the sail. Moving the snotter down the mast helps, but making the
boomkin about 7-1/2' long and angling it sharply upwards would be better. This is a
modification I plan to make.
- Add an asymmetrical spinnaker/reacher on
a pole for light air off-wind sailing.
- The resulting paint job looks great, but
I do not recommend it, too much work - especially the 404/414 primer which is the nastiest
paint I have ever encountered. On a previous project I used the System 3 water base
urethane and found it much easier (and actually cheaper) than the Interlux system used
here.
- I believe that sailing performance could
be improved with leeboards or an offset centerboard built into a centerboard trunk that
was part of one of the cockpit footwell sides. Whether or not it is worth the trouble may
vary with the user. I will probably leave mine just the way it is ("Gentlemen don't
sail upwind").
Summary:
This boat is the most fun for the time
and money than any I have ever had. For a 12 foot boat, it is neither cheap nor
simple, but for what it does, it is a good deal. Like any boat, it is a combination of
compromises, but it is well suited to what I want to do and a good fit with the
circumstances under which I use it. Oldshoe is an unusual boat, but in a funky sort of a
way. It draws plenty of comment -- mine is named FAR OUT.
....Bill |

| "The Second Season Report on
Sailing an Oldshoe" -- Bill Nicolay 11/16/00  Cold
weather and lack of sunlight ended my second season of sailing my Bolger Oldshoe "FAR
OUT". The boat is back on its trailer and covered in anticipation of snow.
Compared with the summer of 1999, this year was plagued with rain and light air,
but I still enjoyed the boat very much. I tried a few new things and learned a bit
in the process: Cold
weather and lack of sunlight ended my second season of sailing my Bolger Oldshoe "FAR
OUT". The boat is back on its trailer and covered in anticipation of snow.
Compared with the summer of 1999, this year was plagued with rain and light air,
but I still enjoyed the boat very much. I tried a few new things and learned a bit
in the process:
|
| 1) I didn't use the lights very often and don't have much
quantitative info, but the DieHard deep cycle wheelchair battery powers AquaSignal 5W
navigation lights nicely. A 6 ampere Guest multicycle charger keeps the battery
charged. 2) I was always a bit disappointed in the boat's pointing
ability, and in the first report had suggested the addition of an offset centerboard.
That's still valid, but I made a big improvement by getting the mainsail set
properly. I had sheeted the main to the center of the transom arch (a modification
described in the original report). The result was too much force moving the boom to
towards the centerline compared to pulling it straight down. The resulting twist in
the mainsail was costing me at least 5 degrees in pointing ability, maybe 10. I jury
rigged a fix, and next summer will have some sort of traveler - probably a pole between
the gunwales above the after bulkhead with the sheet going from the end of the boom to a
slider on the pole. In retrospect, I had noticed the effect early on, but am at a
loss to understand why it took so long to sink in. I hope this was not the sign of
an impending "senior moment".
3) You learn something every day: I tried powering right onto a soft
muddy river bank -- worked great -- sort of. We sat there having lunch but
eventually noticed the river current was working the boat loose. I wanted to stay
awhile and decided to take a line ashore to a tree. When I hopped over the side, I
went clear to my knees in soft mud and became very well anchored. I did not wait to
see if the river current would work me loose.
4) I completed an acrylic boom-tent style of cover for use when I am not
aboard. When in place, the boom is horizontal about 6" above the main mast
partner. The boom is suspended by the snotter at its forward end and its aft end
rests in a block sitting on my transom arch. The cover is open at the ends, but any
rain that gets in goes in the free flooding wells. The cover is held in place by
five "lift-the -dot" type of fasteners spaced evenly down both sides halfway
between the sheer rail and the rub strake.
5) The Pettit AquaClear bottom paint does not do a particularly great job of
keeping the green slime off areas exposed to a lot of sunlight, but I will keep on using
it, because it is so easy to maintain.
6) Favorable comments continue. It's surprising how many strangers start
a conversation with something like, "is that a Bolger design?" One
beautiful evening I sailed across Burlington harbor in company with a 20' wooden New
Haven sharpie: a yawl and a ketch, both with sprit booms and free standing masts.
Quite a sight.
...Bill |
|
