
 Custom Search
|
| boat plans |
| canoe/kayak |
| electrical |
| epoxy/supplies |
| fasteners |
| gear |
| gift certificates |
| hardware |
| hatches/deckplates |
| media |
| paint/varnish |
| rope/line |
| rowing/sculling |
| sailmaking |
| sails |
| tools |

| join |
| home |
| indexes |
| classifieds |
| calendar |
| archives |
| about |
| links |
| Join Duckworks Get free newsletter CLICK HERE |
|
|
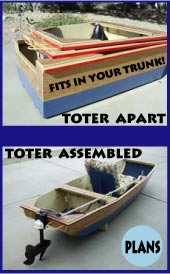
| A Home Depot Sailboat for the Sea Cadets - 4 |
by Richard Ilfeld - Apollo Beach, Florida -USA |
Part one - Part Two - Part Three - Part FourMotor Mount options? An offset board above the transom? An offset box off the rear? An opening in the afterdeck? How often will you use a motor? Can't use the violent drop launch if you open the afterdeck! I like on a trolling motor & solar panel - not in the base cost, of course. This works fine with a small tab on the rear corner of the transom. Rudder & Leeboard Options? I used eyebolts, and did not build as a kickup initially. I do plan to convert. The New Instant Boats books talks about options, as do numerous Duckworks articles. One think to think about - lanyards for all the pieces that might depart the boat at inopportune times. One way to taper the mast: Set up on a flat surface & make bench marks at the four ft start point and 2 ft increments. Start at the 4ft point and walk the pad sander to the tip. Repeat from each benchmark, 6, 8, 10 and so on. Turn 90 degrees and repeat. Continue until tip is a fat ¾ by ¾ . One full pass on each side, and radius the four corners. One layer fiberglass (or just coat with epoxy, if it seems strong enough). Not sure we'll try to sail through a gale in this boat. Base & partner per drawings/pictures. What's the hardest thing to deal with? Sanding, sanding, sanding, sanding, sanding. (Whining) "Are we going to have to sand forever"? " Sanding is boring"! "It's smooth enough"! "This dust mask is awful"! The second hardest thing is giving instructions to someone who won't take off their ear buds or get off their phone. I assume, as a prehistoric, that these are generational issues. Boatbuilding: there isn't an app for that! Bonus thought! An adult with a belt sander is a very positive plus on this project. A dremel sander is pretty handy. A 5" disk for the ¼" drill is too - it was great for the oars. Important finishing step!: when the boat is done, or, at least, when the hull is done, it needs a final coat of epoxy inside and out. This should be just thick enough to fill the weave. Force the resin in to any observable cracks and corners. If you omit this step, your boat will have some pinprick leaks, as it is difficult to have this many imprecise joints without them. While a good, high quality acrylic paint will serve the same function, the resin will bond better. I have built using 2 layers of 3.2 Oz cloth & filled outside only, which also works, but take longer and costs a little more. Surprisingly, doing a bead and cove on the strips does not eliminate the problem. Set the boat upside down in the sun and sit under it before this step and you'll see the filled pinholes and tiny cracks. You wouldn't see them in the plywood original, until the ply layers delaminated (unsolicited personal opinion). While there are a lot of pieces - screwing small pieces to a frame goes quickly. Based on what I've seen of the fiddle factor with plywood, and about the same number of epoxy curing cycles, the build is acceptably fast compared with Payson's Instant Boats. The details are the same pain in the posterior they are in any small boat: 10% of the stuff seems to take 90% of the time. Making the basic boat & glassing it was 30 - 40 hours working alone, and I had to stop and think through some stuff and correct some brain cramps. BTW, the boat is easy to paddle, especially two up, so the oars and fittings can be one of the things left for later if you run short on time. As can paint - brief use is fine - it's long term solar that is a problem. Almost everything did come from Home Depot. (Or, for equal time, Lowes, or Menards). That was my rule. There was one exception: I choose to order epoxy and fiberglass from Raka.com. And one must mention you can order stuff from duckworksbbs.com for wooden boat building needs. Once we have a basic hull that floats, seats 1-4, and rows/paddles OK everybody can do their own thing. The nose ring and port and starboard stern rings are useful for cartopping or gang towing. I used the bolt eye and pin design for the rudder. Need a pin or two for the leeboard. Check the photos for my details, but yours can and should vary. "real" sailors tell me there a number of possible rigs for the boat and Payson says so too, as long as you stay under 60 SF. Great reference on cheap oarlocks from Duckworks by Rob Rohde-Szudy. I used (stole) this design. Actually great references on Duckworks for about anything for this kind of project, and parts if you want to buy them. Several good rudder designs. Special thanx to David Lucas down the road for his irreverent attitude toward materials in several articles. Have to meet him someday. I'm not much of a sailor - so I built the rig per June Bug plans using a poly tarp sail and turned it over to the folks who knew what they were doing. And now I'm turning it over to you.
So we are better off talking about a $300 boat, still not awful. The $200 boat, like the nickel Coke, is a case of reliving one's childhood. Yes, people, there was a time, remembered by some still alive, when a Coke, a Candy bar, and a phone call all cost a nickel, though the Coke required a bottle deposit. I also recall Popular Mechanics plans for an orange crate canoe, where the materials were free. Sigh! Maybe your organization has good scroungers or kindly donors, and can do a bit better! Detail notes & stick dimensions: no drawings here, as the June Bug is a commercial design; lets honor the copyright. You can buy plans from Payson or Bolger, or take New Instant Boats or 30 Odd Boats out of the library and work from the cartoons. This cut list is approximate.
Good Luck! |
To comment on Duckworks articles, please visit one of the following:
|


 |