
 Custom Search
|
| boat plans |
| canoe/kayak |
| electrical |
| epoxy/supplies |
| fasteners |
| gear |
| gift certificates |
| hardware |
| hatches/deckplates |
| media |
| paint/varnish |
| rope/line |
| rowing/sculling |
| sailmaking |
| sails |
| tools |


| join |
| home |
| indexes |
| classifieds |
| calendar |
| archives |
| about |
| links |
| Join Duckworks Get free newsletter CLICK HERE |
|
|
| Surgery |
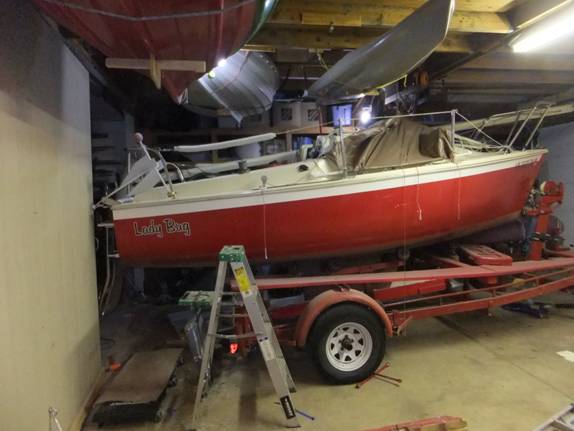
by Dan Rogers - Diamond Lake, Washington - USA |
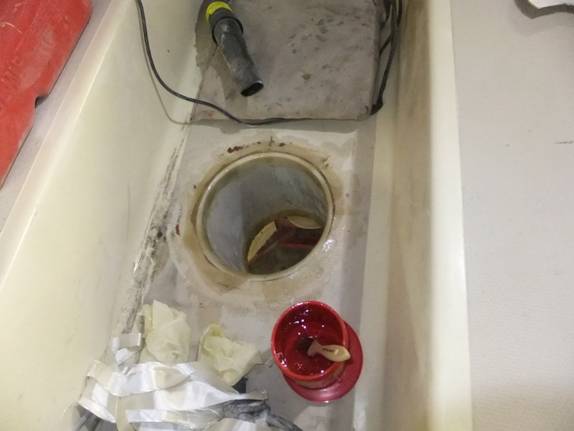
OK. I admit it. It’s a damn fool stunt that I’ve gotten myself wrapped up in. A hairball idea, running straight down hill on rails. This is a pet project that I’ve been hankering to get on with for nearly ten years, now. I keep putting it on the punch list, and then shying away. I have visualized each and every step for years. I’ve been through this evolution in my pointy head over and over again. Anticipating each and every problem. So, when I just decided to jump in and get to getting, I didn’t expect for things to go sideways sooooo soon. Really, didn’t. Little Lady Bug and I have been mates for almost a decade. I’ve subjected her to myriad insults and improvements in that time. In fact, just about everything about that sure-footed little packet has morphed and evolved to the point that her designer and builders would probably never recognize her now. But, there’s one thing that I’ve always been “going to do.” Every time I reach back through the pushpit to raise and lower the outboard motor and get it started, and then get it shifted and throttled, etc., I think about adding a motor well in the cockpit. Yep. Damn near every time. Sometimes it’s a square hole in the port seat. Sometimes, it’s a round hole in the footwell. Sometimes, it’s even a small inboard engine coupled to an outboard’s lower unit in a homebrew version of the commercially available Saildrive. But, no matter what iteration, the prospects of getting that weighty and inefficient contraption off the transom have been quite compelling. Until yesterday morning. I’ve been thinking that I’d take Lady Bug over to Port Townsend for the Pocket Yacht Palooza, in about a month. There’s a follow-on cruise around Marrowstone Island, that I sort of want to attend as well. Anyhow, that was the excuse for this particular leap of faith, and certainly chutzpah. A couple years ago, I dragged home a 10 foot section of heavy-wall direct burial PVC pipe. Most of it I turned into a culvert, but saved about 3 feet just for this particular project. That chunk of 10-1/2” pipe has been taking up space ever since. And, I guess if you live with a “plan” long enough, it becomes almost a fait accompli. Well, almost. So, there I was just sort of measuring and marking and studying on things. Kate came out to the shop to see what I was up to. I told her that I was fixin’ to cut a huge hole into Lady Bug’s bottom. Of course, she said in horror, “Don’t do it! Or, at least wait for winter…” And normally, that would be good enough. Somehow, this project had finally gotten legs and was already running out of control. To be honest, I did dither on the idea some more. When I finally dived in head first, it was getting late in the day. The hardware store was closed. And, this matters quite a bit, as it turns out. And, right out of the box, I made a significant change to the plan that added a whole level of complexity and nearly led to complete disaster. Such is the nature of these things. There I stood. Roto-zip in hand. A circle drawn on the cockpit floor. The basic plan of attack was quite straightforward. (a). Cut circle in floor. (b). Drop pipe through the (perfectly round, perfectly perpendicular, perfectly fitting) hole and scribe line around pipe for second hole, in inner liner. (c). Cut second hole (perfectly, of course). (d). Drill locating hole through hull, and repeat. Could it be simpler? Right out of the gate, I broke the Roto-zip bit and didn’t seem to have a replacement. Wait for the store to open in the morning, and loose all this wonderful “momentum”? Most certainly not. This is half way through the first hole. The edges are anything but round, or well-fit, or perfect. I found one of my hand routers with a sort of 3/8” cutting bit in it. Presto! We’re back in business. The rest of the first hole appeared—ragged, elliptical, and a bit off-center. But, once begun, one must ride this sort of horse all the way to the barn. Second hole. Oops. There was a molded stiffener athwartships right where my second hole was supposed to land. Oh well. I’ll just angle the pipe forward a bit. Should be about a 20 degree declination anyway, for the standard outboard transom mount. This is of course under the footwell on a SIXTEEN FOOT sailboat. Room for snakes and kittens, perhaps. I’m wriggled in there with a router, a respirator mask, ear muffs, goggles, and my 68-year old torso. Feet stuck up under something in the cabin. Even so, it all still seemed doable. Said the spider to the fly… Laying flat on your face, peering out of the corner of a dirty set of shop glasses, under a fogged up set of goggles with a router held at arms’ length, is decidedly NOT the way to cut a “perfect hole.” In fact, I couldn’t quite even see where the router was actually headed, until it had already run for an inch or so in what ever direction it was already headed in. Even so, I could in fact tell something had changed by the sound of the thing. You see, this second hole was only supposed to be in the fiberglass liner. Sooooo, when the bit slipped in the collet and drove on down through the hull; I think I was fully involved I that phenomenon Clausewitz called “the fog of war.” Do all the planning you care to. But, when it gets down to the actual “combat,” better be prepared for absolutely nothing to go according to the carefully debated plan. Seems the second hole was sort of almost cut fully around, by then. The third hole was supposed to be (revised version) held in abeyance until the first two were trued up, and all that. Here’s the deal. If you run a tube through succeeding levels of succeedingly curved and angled planes, that tube will actually require an ellipse where it penetrates a flat plane, and something even more grotesque when it encounters a complex curve. At this point it was too late to call the whole thing off. And, then, I broke my second and final cutter bit. Sawzall time. All hope of simple, or well-fitting, or even, even cuts was out the window. As they say, “press on, regardless.” Where the unintended hull penetration happened, the actual in-tube distance from cockpit floor to hull curvature was inching dangerously close to longer than the shaft of the motor intended for this job. Several years ago, I bought a pretty nice air cooled 5hp Mariner short shaft just for this job. The big idea was to run it down through a well of some sort, and then make these perfectly fitting plugs that would seal off the tube from exhaust smoke, etc. The air cooled power head wouldn’t need to have water splashing and squirting around in that tube. But the vertical distance from transom clamp to cavitation plate wasn’t more than a pencil mark over 17 inches. This angled thing that I had embarked upon pretty much on the fly was looking a lot more like 18 inches, or even more, would be required. But, like I was saying, “press on regardless.” At this point, hole three was going to be cut laying on my back under the trailer, working with first the Sawzall and then a series of grinder and sander pads to make the damn tube fit. To falter now, might be to give up. That would be a failure, and I wasn’t near licked. Not yet. Once this mine shaft with no gold mine was cut all the way through, I used the heavy pvc tube as a try-fer fit mandrel. Once it was sliding all the way through three layers of boat, I was breathing a whole lot easier. First job after the tube was cut to length, was to glass it in place.
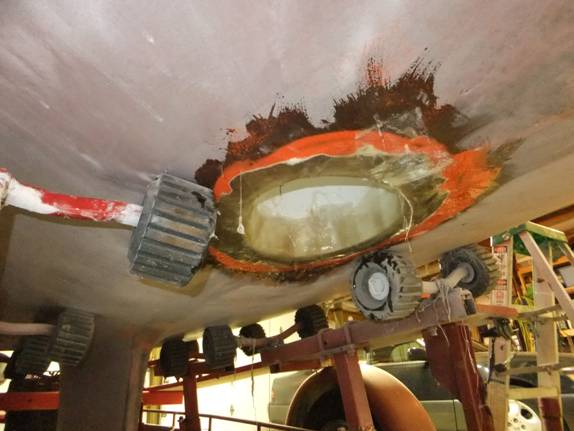
Not too bad from the up-side. Less fun to work in the drips, on the down-side.
It was about then, that impatience and returning enthusiasm conspired to almost wreck the project. Again. I had the lower end of the “tunnel” just tabbed in place with short pieces of cloth and ‘pox. It was about then that I figured if one layer of glass tabs was good. Two layers would be great. Big oops. The added weight in well–saturated glass that was supposed to bond up into the plastic tube and around the corner to the ground-off hull surface started causing a bit of a chain reaction. I’d get it all pushed into place, and leave the room for a while. I’d come back to find it hanging in tatters. ‘Pox dripping all over the floor. Quite a mess. So, for several hours, I uncharacteristically patiently knelt and craned my neck back while I continued to push the gooey stuff back into place. Until it started to kick. Finally. Next disaster. To try and make things flow in the right direction, I had to jack lady Bug and give her a flat surface for the ‘pox to pool in. These spur of the moment things take on a getter-dunn attitude that allows me to make even a greater mess.
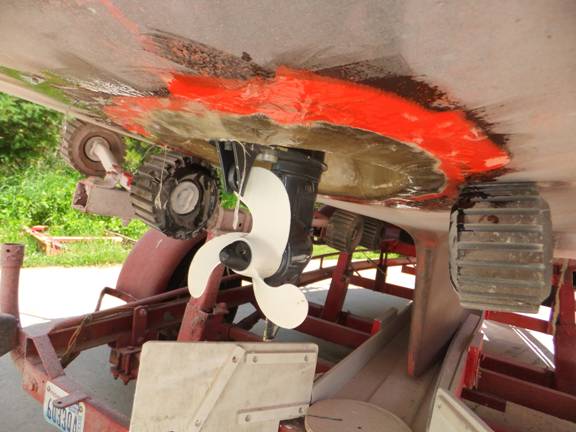
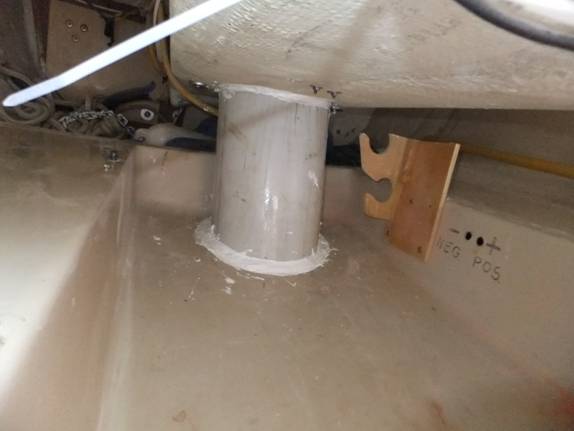
Not one to simply rest on past achievements. I came out after about two hours of waiting for the ‘pox to cure a bit, and moved on the next on-the-fly piece of this woebegone project. I worked liquid ‘pox into the join of tube to two layers of hull and liner from under the cockpit floor. Talk about fun, trying mostly-successfully to wriggle in there with a pot of ‘pox, sticky rubber gloves, a brush, and get with it. And I did in fact get with it. After pouring a couple batches of the stuff into the void around the tube and above the glass tabbing that spanned the gap from below, things were moving along swimmingly. Until. Until, the whole thing slipped loose and dumped a fair amount of the goo directly down on me and the floor. Not a particularly good time to be taking pictures. So, this one is a bit later, after the hull was sealed. Motor is in place, but not mounted. The stalactites of resin are in full view.
Then, in the truest belt-and-suspenders tradition, I ran a healthy bead of 3-M 5200 around the tube. Yep, another trip under the footwell.
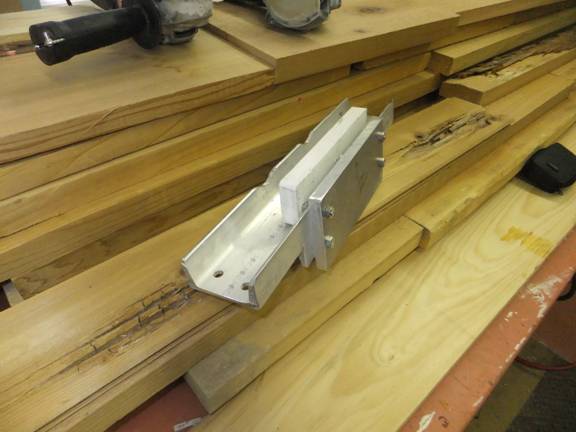
Then it was time to invent ways to make a 17” motor reach close to 20”. This took some jury rigging of the first magnitude. To make it fit, and not put the prop up the inside of the tube, the motor needed to mounted backwards and dipped down inside the well a bit, as well. This is what the main apparatus looked like before it went on.
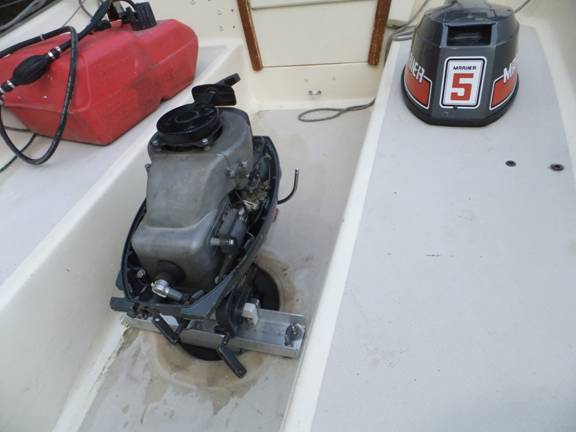
And, here. Motor propped up rather precariously.
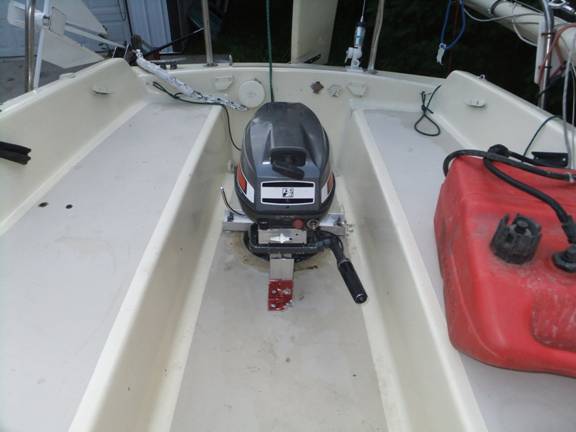
And, then finally, looking more like that fevered gleam in my manic eyes the day prior.
So ended the first working day. Today we did sea trials. She backs up straight. She runs forward without hindrance. Much cosmetic work yet to go. But, so far, it does look promising. |
To comment on Duckworks articles, please visit one of the following:
|


 |