WHY DIDN'T I THINK OF THAT?
By Steve Bosquette
Mt Laurel, NJ
|
I
have been a long time contributor and reader of Duckworks. Over
the years it has been almost a daily ritual to open the site and
see what's new.
Now
that some years have passed I thought it might be a good idea to
revisit some of the original ideas that folks have contributed.
There is a treasure trove of useful “how to's” and
gadgets to put to good use contained in the archives. I ran the
idea by Chuck and he thought it worthy of publishing. Periodically
I will pick out some of the GEMS and share them here. |
#1 |
One of the more prolific contributors is Rob Rohde-Szudy. Here is his take on boarding ladders. |
|
REBOARDING LADDER
By Rob Rohde-Szudy |
More than just an easy way to go swimming, a reboarding ladder is essential safety equipment. Even fairly warm water will kill you through hypothermia if you can't get out of it. And it saps the strength you need to be able to get out of it. And I'm a lousy swimmer, so I take this piece of gear seriously.
There are good and bad ways to do this. Here's a bad way.
 |
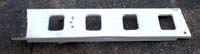 |
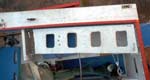
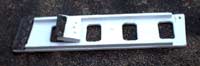
| Back |
Front |
I thought this would be an improvement over the Reed Smith type plywood ladder. Being bolted in place when in use keeps it from moving around, so it's nice and quiet. The "ribs" make it very stiff and make a nice handhold on the sides. The hinged transom standoff works brilliantly, and you can really put an awful lot of weight on it. So it works perfectly well to get you on the boat … once it's set up. The trouble is that you can't get it unfastened from the chocks when you're in the water! I think it was Max Wawrzyniak who noticed this at Rend Lake. I tested it later and he was right. I was thinking of a way to improve this by holding it down with lines and cleats. But then I found a better way. |
CLICK
FOR FULL ARTICLE |
+++++++++++++++++++ |
#2 |
Ever been intrigued with the birdsmouth mast. Dave Burdecki seems to make it an easy process. |
A Birdsmouth Mast for Skat
by Dave Burdecki (Bink)
Greetings: Well...I heard there was some sort of end-of-season football game yesterday...but I had real work to do. John O'Neil and I (ok, mostly John) made a beautiful octagonal 14 foot bird's mouth mast for the Skat. John wrote a couple of articles about the
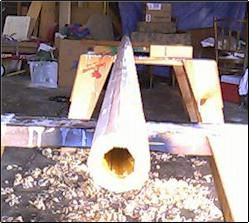
technique in Boatbuilding and since he lives nearby I begged and whined until he agreed to show me how its done. |
CLICK
FOR FULL ARTICLE |
+++++++++++++++++++ |
#3 |
There is not a more nautical item on a traditional sailboat than a nicely executed wooden block. Derek Waters is a master. |
Rope Stropped Blocks
by
Derek Waters
Building a small gaff-rigged yawl, we needed lots of blocks. I was able to find good ones, or cheap ones. Cost was an incentive, but the 'plasticy' look of the commercial products was as big a factor for me. Having built the boat, made the spars and sewn the sails, buying rigging didn't feel right. Fortunately I'm not yet crazy enough to make my own rope.
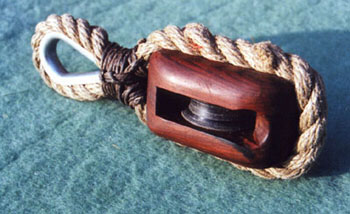
Rope stropped blocks have very few metal parts; they can be made and repaired with hand tools. They work, and for me, they just look right.
Four components make up the basic block; a pulley or 'sheave' for the rope to run over, an axle or 'pin' for the sheave to turn on, a wooden body or 'shell', and a 'strop' - generally a grommet - an (almost) endless rope loop to wrap around the whole, providing an attachment point. The wooden shell can be carved out of a solid lump of wood (a 'mortised' block) or assembled from smaller bits of timber (a 'made' block). These are made blocks. Traditionally, made blocks have the parts of their shells both glued and riveted together. With modern adhesives, a made block should be as strong as a mortised block. Rivets optional.... |
CLICK
TO SEE FULL ARTICLE |
+++++++++++++++++++ |
#4 |
Dog Bone Scarfs
by George Wright |
Problem;
The plans for the boat I was building called for sides of 16 feet length so I needed to scarf together plywood. I was ready for this but -- even with metric plywood two sheets scarfed together will be shorter than 16 feet. It seemed goofy to have another scarf to pick up a couple of inches in length.
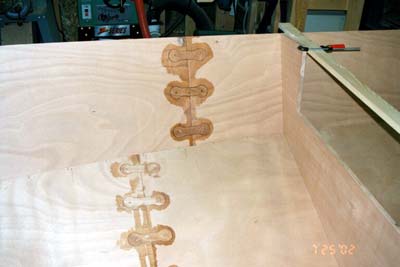
Solution;
I came up with this method to scarf plywood together using a router and inlay techniques which did not shorten the plywood. I call it a dog bone scarf which comes from the appearance. [Figure 1] Normal plywood scarfs reduce the overall length of the plywood for the overlapping of the scarf. The dog bone scarf butts the two plywood pieces together and then adds interconnecting dog bones to strengthen the joint and allow the joint to flex the same as a normal sheet of plywood. |
CLICK
TO SEE FULL ARTICLE |
|
STAY
TUNED FOR THE NEXT INSTALLMENT COMING TO A DUCKWORKS PAGE NEAR
YOU! |
|
To comment on Duckworks articles, please visit one of the following:
|