|
By now I had been thinking incessantly about the finish I wanted in the boat, but at what point do I put it into action? This is the critical question. Too late and it becomes hard to clean up and prepare, to get a good finish, because glue has been spilt on the surface and it is difficult to gain access for sanding. Too early and you find that some of the work will need to be undone by, and for subsequent work. I found this out when I proudly stepped back and admired my painted engine beds, only to find that most of the paint will needed to be scrapped off later to glue boxing to the sides and bottom surfaces. I finally decided the best time to prepare will depend on the situation, this leaves plenty of scope for errors, so best be ready and willing to redo some of it.
With the interior woodwork I had decided that a retro look would be most pleasing, matt oak floor and framing, white roof, cream walls with varnished red wood cladding. When I say ‘red wood’ I don’t mean Sequoioideae, I mean red coloured wood as in mahogany but cheaper, My wood yard sent me samples of their Utile, on which I tried a variety of finishes, the gloss varnish came out best – so that was one decision out of the way.
 |
The look I was aiming for, definitely minimalist and not like the modern glass fibre yachts, with splashes of colour to be used sparingly and to good effect. |
Now what about this oak? I definitely don’t want it to be natural colour as it is way too light, I chose it initially because the plans specified it, they were American plans, British plans may have specified a different wood. At the time when I was building the hull white oak was cheaper so I went with that. European oak has a nicer colour, more of a golden brown that I liked, but at about 50% more cost I decided to spend that money elsewhere – as you know there is always something to buy when you have a boat. One option was to try fuming the wood with ammonia, which reacts with the tannin (white oak is particularly high in tannin) to darken the wood.
After a bit of research on the internet I found that ammonia comes in two types, anhydrous and aqueous, the anhydrous is without water and is much more concentrated and very dangerous to handle, so that option was out. What I bought was a 5% aqueous solution, which still smelt pretty strong and did the job just fine.
My first attempt yielded a dark brown result, more like walnut and not the result I was looking for even though the wood was only left in the box for about 3 hours. It must be said that that the box was small and the sample close to the ammonia so with a larger fume cabinet, aka a polythene sheet over a wooden frame I suspect the exposure times will be longer and easier to control.
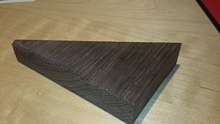 |
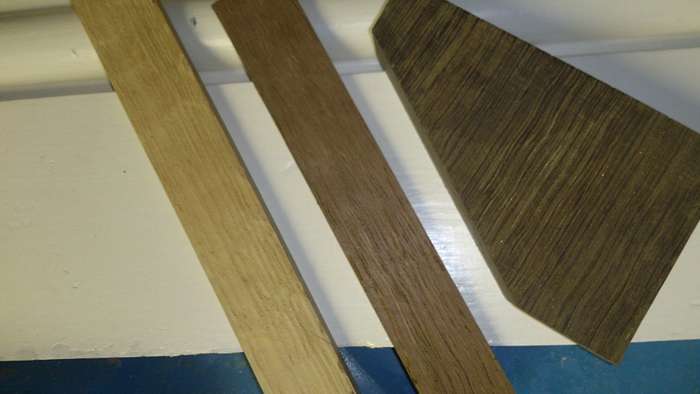
The first sample, a good colour, if that is what you are wanting. It wasn’t what I wanted!!! |
 |
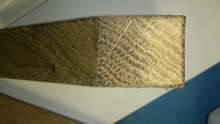
Second sample (in the middle), still the wrong colour. The piece on the left is natural colour for comparison. |
My second trial piece was left for just under an hour, this time the colour was noticeably lighter by several shades, but still had a dark brown tones rather than the golden honey/red/brown I was looking for. In short a nice idea, simple to do, and a good even colour, if that was what you wanted. After seeing the results I think I will try staining some samples, it is a very light colour so it should take the stain easily and still leave the grain evident or I may just paint the deck beams the same colour as the roof. And us a bit of the Utile down the centre, covering the cables and lights, to provide a splash of colour.
 |
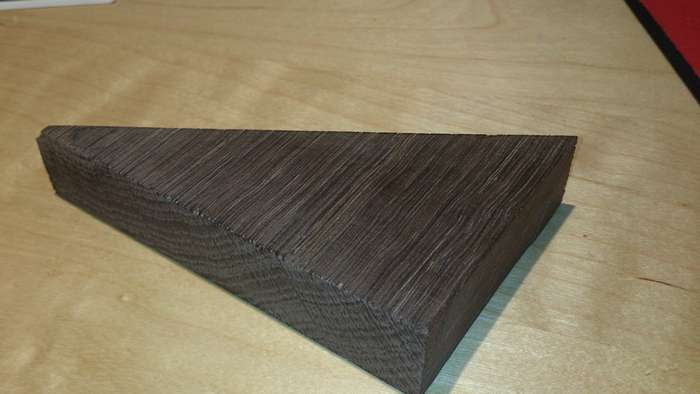
Just to check on the penetration I cut a corner off the first sample. The side grain shown on the right has a penetration of about 1mm. On the left where there was exposed end grain, the penetration was up to about ½ inch. |
NOTE: Should you decide to try this yourself be prepared to juggle around a bit with the timing, as not all the wood will have the same amount of tannin and hence may not darken to the same colour in the same time. The problem occurs where you have laminated a component like a deck beam and some strips turn out lighter, these may need adjusting a little with some stain.
*****
Click HERE for a list of articles by Mike Machnicki
|