
 Custom Search
|
| sails |
| plans |
| epoxy |
| rope/line |
| hardware |
| canoe/kayak |
| sailmaking |
| materials |
| models |
| media |
| tools |
| gear |


| join |
| home |
| indexes |
| classifieds |
| calendar |
| archives |
| about |
| links |
| Join Duckworks Get free newsletter CLICK HERE |
|
|
| Out There |
by Paul Austin - Dallas, Texas - USA Lofting Today - Part Six |
 |
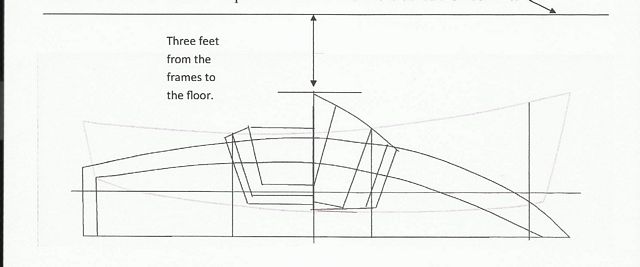
| Part One- Part Two - Part Three - Part Four - Part Five Picking Up Forms, Plank Thickness, BevelsNow let's go ahead to build our 10 foot skiff upside down. Our first item of business is to draw a line above the three views, straight across parallel to the baseline. This will enable us to know how far off the floor to put each frame. This line is called the floor line.
This is what we'll see on the loft floor, the lines right side up. When we measure from the sheer of each frame to the floor line, that measurement becomes the length of the frame support that we build below:
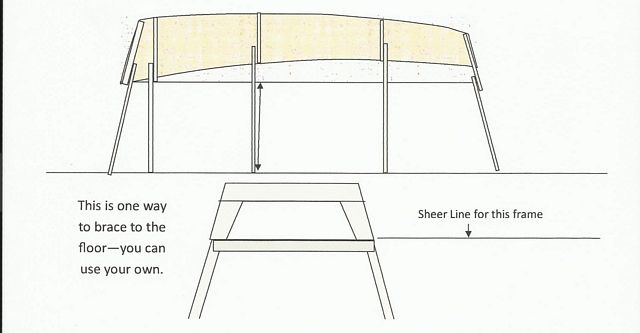
In the previous drawings I did not put in any bracing. With stands 3 feet tall under the actual frames bracing is needed. If you'd like to do away with bracing, you can build a ladder upon saw horses like this:
The frames have to be cut with the thickness of the planks-side and bottom-in mind. As ships get larger this becomes more and more critical. We can determine how to cut the frames for plank thickness from our drawings. It's just drawing an accurate line and measuring that line at the frames and transom and stem. The measurement must be at right angles to the face of the edge. As the plywood plank is bent around frames, a bit more of the frame will have to be reduced for that bevel. However, on such a small boat that bevel can be done by eye and hand. It really isn't much. On some boats stringers will lie in or on top of the frame. Their thickness will have to be taken into account. If the stringer lies in the frame, you'll have to check on every frame that it doesn't exceed its' position. In the old days when boats were planked with 5/8 pine, a mistake below the plank could be faired with still enough plank to be strong. With plywood the margin for error is not so great unless you're dealing with 1/2" plywood. By now you should realize with lofting you really get to know your boat before it's even finished.
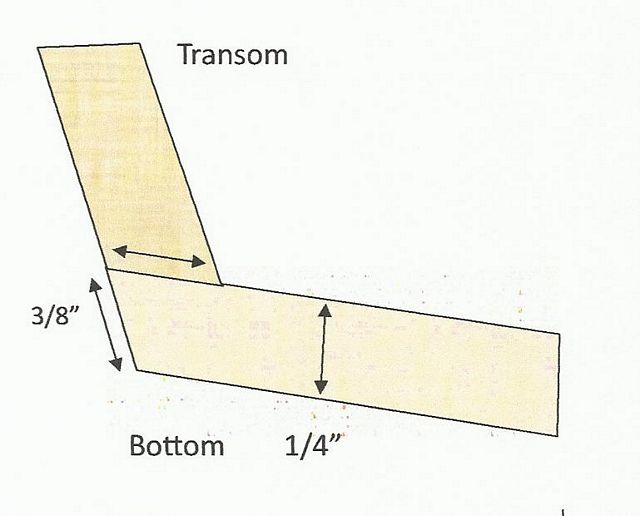
The transom and the bow have their own techniques for taking off plank thickness. Now about the transom, we have a little more work to do. You can see the cut along the bottom and the transom is longer than the thickness of the plank. If you need to enlarge this scale on the loft floor to get a more accurate measurement, go ahead. It's been done before. The situation will be the same where the planks come in to the transom sides. But there we will bevel instead. After all, this is a very small measurement and plywood edges can flake off, anyway.
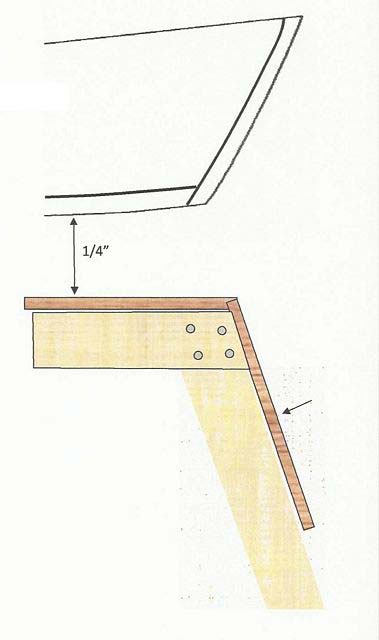
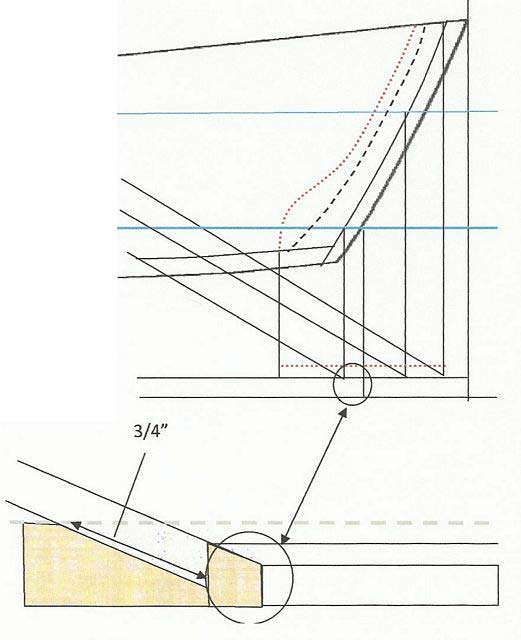
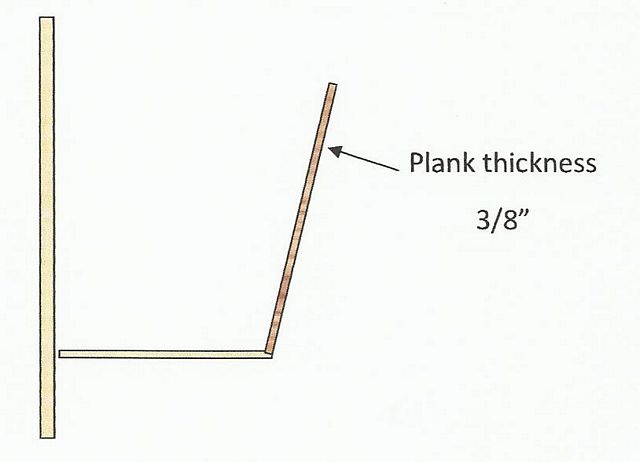
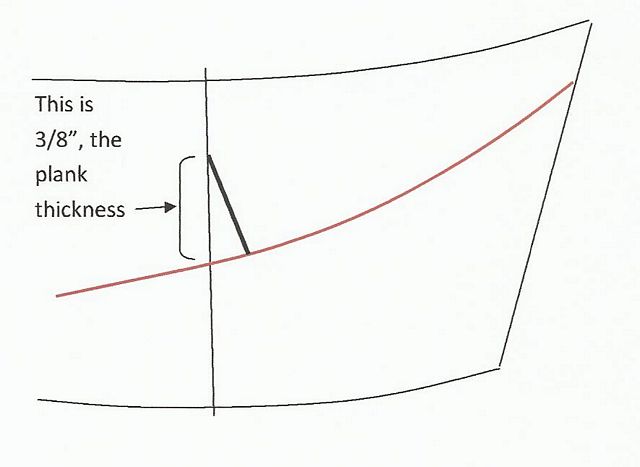
When we come to the bow, the procedure is a little more involved. A great deal depends on the style of stem A few small boats will have a rabbet specified but that will have to wait for later. In these small skiffs, the situation is simpler. We know the thickness of the plywood and the manner in which it will be fastened to the stem, in a previous drawing. What I did not show in the previous drawing is the slight taper from the front of the keel piece back to where it meets the plywood planking. I've enlarged the drawing at the bottom of this page to show that taper.
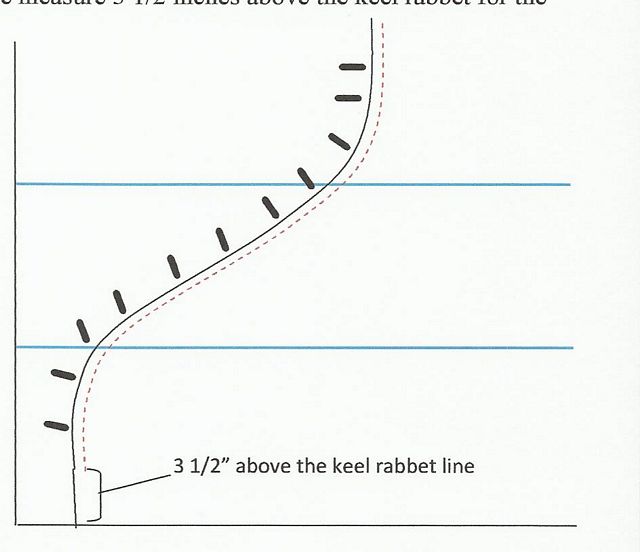
Now the real stem is in red, in the small dots on the profile view. With the planking at 1/4", the bevel-shown by the double arrows-will have to be measured with the full sized lofting and then drawn back in as the dashed line on the profile view. After looking at several plans, it seems this cut is 3 times the thickness of the planking, nearly all the time. In truth, with small boats these dimensions are so small, most builders might just want to judge the beveling by eye and hand. But with bigger boats, these small distances become vital to keeping the boat watertight. Glue is like love, it covers discrepancies. By now you have probably guessed that making the forms for round hulls is not so simple as our little skiff. The issue with round frames is that they will curve in two directions, and they will have a bevel on the outside of the frame, at least most of them. Our frame lines will have to be precise and we will have to pick up those curved lines onto a heavy piece of wood to cut an accurate curve. We have a method. Usually builders use white pine. It can take a nail or two and it's cheap. Straight pine boards will become the cross spalls, providing they are 4" thick. One builder says he uses so much of this white pine, he has no idea how much he orders when the job's all done. Must be nice. We will need nails, a straight edge, a good hammer and a cross-cut saw. First, we subtract on the loft floor lines for the thickness of the planks. I've put that in as the dotted line outside our solid line. Then we measure 3 1/2 inches above the keel rabbet for the bottom of the frame.
Now we tap the heads of our nails right into the curved line, with the nails on the inside of the curve. Then we take one of our pine boards-and it will cover more of the frame curve if the pine isn't as perfectly straight as I have drawn it-and then mash it down. If you want to do the funky chicken on it, go ahead. When you pick the pine board up, the nails are in it. You simply put your batten around them, draw and then cut. You might have to wrap the batten twice, once for one curve out from the centerline and once for the lower curve in toward the keel.
As you can see, it might take more than one pine board. Ordinarily the two are butted and then a shorter length of board connects the two. I'm not sure I'd try cheap plywood on this. These create the fair curves for your hull; I don't think I'd go low class too much.
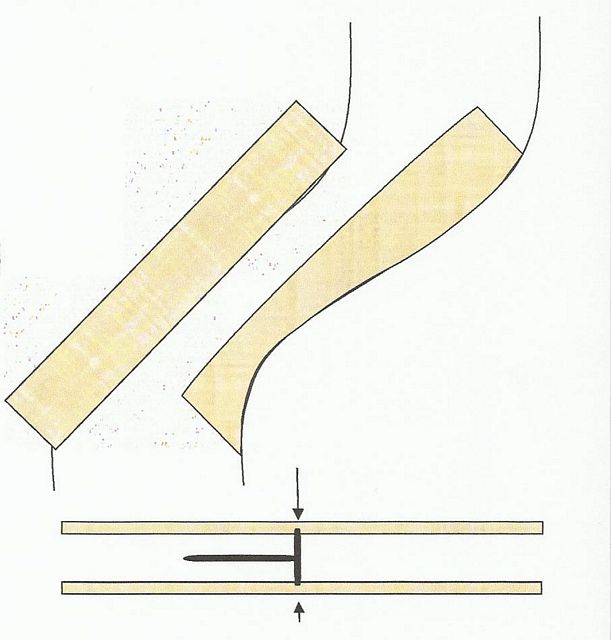
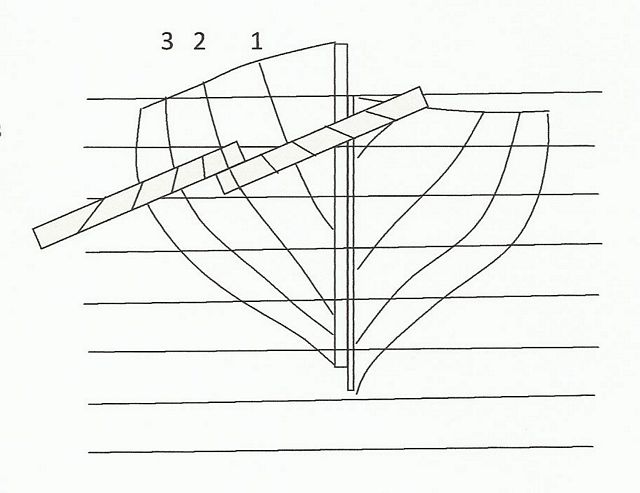
With a round hulled boat, subtracting plank thickness has a bit more to it than with the skiff. The lines on plans sheets which seemed thick on a small boat will not be here. The issue with larger craft is their hull planks curve more around frames than with skiffs, especially at the bow. The planking is much thicker, also. There's just more to take off. If you cut off the correct amount of plank thickness at each frame, it's like doing the fairing beforehand. Just don't take too much off! That's like getting a haircut-if your barber takes off too much, it's hard to put hair back on without injury. You don't want to put a plank on your pride and joy that has a hollow in it so bad it looks like a belly button. Then you get questions from passers-by. Thin lines on a 11x14 sheet become thick planks when they're drawn full size. Here below you can see the difference in angles of two frames.
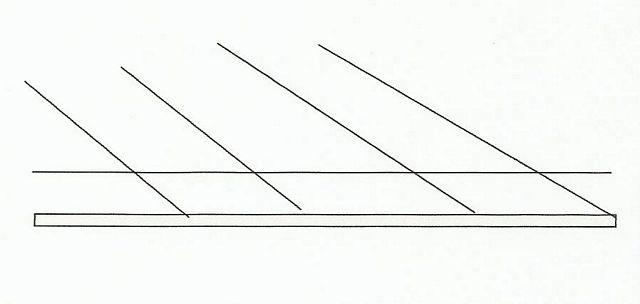
This means we will need to get the angle of the frame and plank to find out how much of the frame needs to be reduced. One way is to make a bevel board. Not every builder used one, but the bevel board has plenty of uses. The board is plywood at least 1/4" thick and square as long and wide as the greatest distance between frames. Most bevel boards have been made 3 feet square. Using the bar compass, draw an arc around 90 degrees, the biggest radius you can. Then divide that arc into 90 units Make these 90 units as clear and accurate as you can. Now you'll need to make a perfectly straight stick longer than the arc so it will reach across and then some. Label the degree lines at least every 5 degrees. Then we will mark off along the bottom border the station line distances, with a perpendicular for each one. Every line here really has to be thin but permanent. Now we need to make a straight stick the same thickness as the planks which go on the boat.
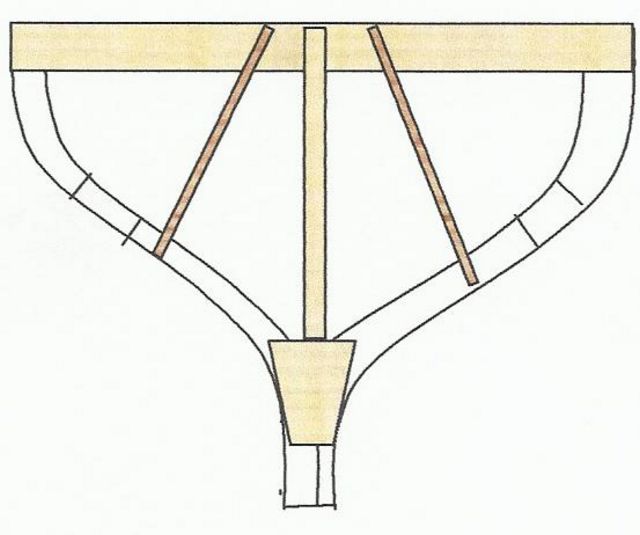
Here we have vertical stick A laying on the station line. This stick is the same thickness as the planking. We will now draw our compass lines upon that stick, at their angle. So we take that stick to the body plan, which I have simplified. We want to subtract the plank thickness at Frame 2. We will lay the vertical stick across Frame 2 so that its' base touches the frame at right angles to the frame. Then read the angle closest to Frame 3, say it is 20 degrees. Now reverse the stick so it lays across Frame 1, reading the angle there as 15 degrees. Frame 4 is the average of the two, 17 degrees plus a touch more. So we take the 17 degree line, lay it perpendicular to the frame on Frame 4 and measure across the stick.
That is our plank thickness reduction at that point.
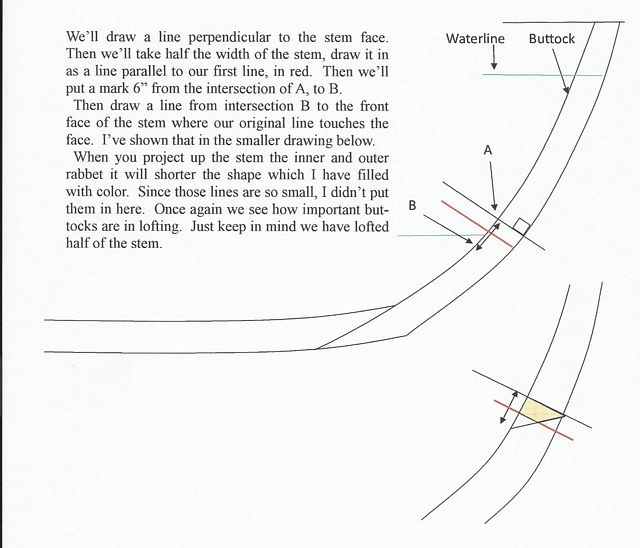
The thickness of plank reduction at the frames is simple, depending on the accuracy of the lines we put across the vertical stick. But now we come to the stem, where we'll have to do a few more steps. First, we draw a buttock on the half breadth plan with the waterlines drawn in, 6" away from the stem.
Now we'll project the buttock to the profile view.
The second way to get plank thickness is well suited for small boats, as it is not quite so precise but easier to do. We begin with the body plan where we measure the thickness of the plank. If the thickness is already given, so much the better. In bigger boats plank thickness varies so the compass method I've already shown you has to be used. In small boats, the plank thickness doesn't vary much if at all, so we can do something simpler.
Here we go to the half breadth plan, at station 1 where this frame is located. With the buttock drawn in, measure up from it along the frame to a point which is the plank thickness above the buttock. At that point, swing a line perpendicular to the buttock. The length of that line will be the plank thickness to subtract.
Paul https://crossingthoughts-paul.blogspot.com.au P.S I am now writing with Mike John on: And, I am now offering books on Amazon. *****
|


|