Dry rot is like cancer for boats. As with that pernicious disease, the longer you let it go the worse it gets until eventually nothing can be done.
Here's one solution when you find dry rot is seeking a toehold in your boat. Sort of a chemotherapy for wood. It's suitable when you find a soft spot in the rubrail or a few square inches of punky plywood in a non-critical area. A square foot of damaged wood on the bottom would require a more radical treatment.
| Jim Michalak's Piccup, 11 feet of stubby charm. |
The "patient" in this case is a Jim Michalak Piccup Pram; 11 feet of stubby charm that I built 17 or 18 years ago from ubiquitous BC pine plywood with (mostly) cypress framing. The hull was badly in need of repainting and there was a small soft spot in the cypress rubrail.
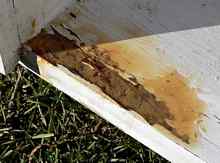
Sanding the hull revealed a small area of the upper hull also had been infected, as had another spot nearby on the stern deck.
| The plywood looks almost normal under the paint, but rot is lurking. |
The pictures tell how the repair was accomplished on a section of the hull. First, the hull was propped on its side and the affected area was made as level as possible. You don't have to use a spirit level, but get it eyeball close.
Next, I use a drill to punch a series of closely spaced holes on the affected area. You should be able to feel the damaged wood. I try to drill holes right to the border of the infected area and a little over into good wood. Try not go drill through the wood, which can be a little tricky when, like the Piccup, the hull is made from ¼-inch ply. In this case, the affected area is backed by the rubrail, so there's little worry about going too deep. If you do go through an unbacked area, cover the bottom side with tape so the eventually applied epoxy won't drip through. As the picture shows, much of the top layer of the ply will simply flake off. Don't worry about that.
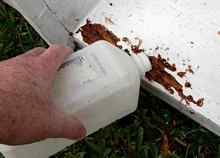
The second step should not be overlooked, even if the rotted area already is dry. And that is to saturate the wood with rubbing alcohol; I imagine denatured alcohol would work as well. There are two reasons for the soaking. One is being lighter than water, the alcohol displaces it and drives it out of the wood fibers. The second is any remaining rot spores will be killed.
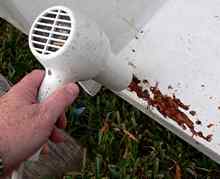
If you're in a hurry, use a hand hair blow dryer to dry the wood. This actually goes pretty quickly. The alcohol should have driven most of the water out of the wood, and the alcohol itself evaporates fairly quickly. I'd be careful about using a heat gun. Denatured alcohol can be ignited, given sufficient temperature provocation, and I'd assume that rubbing alcohol would do the same.
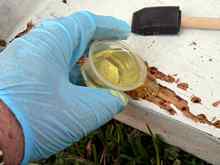
Next comes the epoxy. The goal is to saturate all of the affected wood right up to the good wood, which is why holes are drilled right up to and a little over the boundaries of the rotted areas. The epoxy is poured into the affected area, and a small brush spreads it and pushes it into any nooks and crannies. On the rubrail, some of the drilled holes were pretty deep, up to an inch or so. For those, a small syringe was used to inject epoxy into the affected areas. The rotted wood will soak up a lot of epoxy - a good thing. Several "injections" were needed on the rubrail. It is not necessary at this point to fill the affected areas with epoxy, but also don't scrimp. The goal is to saturate all the wood fibers in the affected area, from top to bottom, with resin.
When the epoxy has set, go back and check for any remaining soft spots, especially around the edges. If needed, drill more holes and apply more resin.
The rest is more or less just finishing work. Once the epoxy has cured, give the affected areas a quick sanding to eliminate any (now encapsulated) wood fibers that might be sticking up. Then with thickened epoxy and a putty knife, finish filling any of the holes, smooth any rough areas on the rub rails, and fill any depressions in the plywood areas and bring those up level with the surrounding sound areas of the hull. If you want some additional strength and reassurance, apply a couple layers of fiberglass tape over the repaired area, and fair that into the hull.
| Thickened epoxy applied over the repaired area; a little more smoothing is needed. |
This technique will take a little patience, but it's much simpler and quicker than the traditional remedies, such as scarfing in a new section for the rubrail, or cutting out and replacing the bad section of the ply hull, backing the new wood with a ply backing plate (which might be inconvenient in some places) or a few layers of fiberglass.
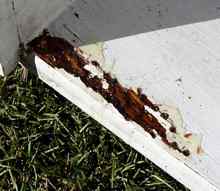
While I consider it a suitable long term fix for small areas, it can also be used as an emergency repair in other applications. Just before the Piccup was moved off the trailer for repairs/sanding/painting, I discovered some serious rot in the rudder just below where the tiller is attached. It's not an exaggeration to say I probably could have twisted the top of the ¾-inch thick rudder off the bottom with my bare hands. A replacement was immediately started, but it would still take a couple weeks or so to cut, laminate, seal, and fiberglass the new rudder, and I didn't want to miss some good sailing weather. So the "drill and fill" procedure was used over two evenings and the boat was ready for more sailing. The quickie repair doesn't seem quite as strong as the ply original but was more than adequate for daysailing. (Note: Although the temporary fix was successful, I didn't go anywhere I couldn't row back from.)
| A quick and ugly repair of a rotted area on the rudder, but surprisingly strong. It kept the boat usable while a new rudder was made. |
|


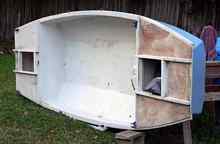 Jim Michalak's Piccup, 11 feet of stubby charm.
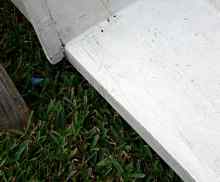 The plywood looks almost normal under the paint, but rot is lurking.
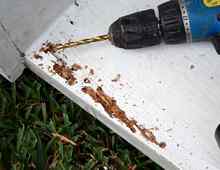
 Thickened epoxy applied over the repaired area; a little more smoothing is needed.
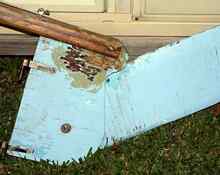 A quick and ugly repair of a rotted area on the rudder, but surprisingly strong. It kept the boat usable while a new rudder was made.