| To Part One
To Part Two
In the cockpit area the glass ribs are too sharp, so I did this arrangement:
Cut in half are flimsy plastic pipe drain. Two layers of simple mat. I could have used cardboard tubes as well. The seat was a much later addition. Boat #2 I glassed in the seats, and walla, the fiberglass sides do not can (flex) very easily at all. Boat number one only needed bracing in the cockpit area on one side, the other side has been stiff enough to not need a rib. Guess I used a little more resin?
Connecting beams - connect beams to bulkheads, set bulkheads in boat, make sure of alignment, then glass in place. If you glass bulkheads first - the beams probably won't fit, or the boat will want to go sideways through the water. Clamp EVERYTHING until you are sure you want to drill holes, bolt together glass in place. I would glass in place, then bolt, then remove clamps.
Piece not wide enough, or long enough - sand for a good bond, and glass in an extension!
Some ideas that will save you money: While I throw rollers away, I wash brushes, and my hands with laundry soap. I bought acetone for cleaning, but still have ½ a pint after finishing building. Detergent gets kinda gunky, but it will clean off liquid resin. If the brush hardens up completely, get another one. We have open drains here in the West Indies - not sure I would want the gunk to go down a regular drain. Maybe wash brush and hands over a bucket and dispose of gunk later.
Building in this manner leaves very little waste. You never have to buy another piece of ply, you buy the cloth by the yard, and the resin by pint, quart and gallon, etc. I used about 7 gallons of resin.
From under the mango tree; covered with leaves and dirt, and termites eating the wood in the same scrap pile, I have taken some small pieces fiberglass. After some cleaning and then some sanding, fitted them together, kinda, and added a new layer of glass on the top, and they all take on the qualities of one uniform piece.
Salt your decks. That is right. Heavily salt your decks. When you go to paint the last coat of paint, sprinkle heavily on the wet paint, table salt. When everything dries, if there is salt left, it will rinse off, or just set it out in the rain, it will go away. The pitted paint then makes good anti-skid.
The salt and the soap should be enough savings to make it worth reading this article.
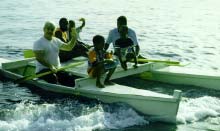
Final: boat number one is almost 16 years old. It cruises with two at around 5 knots with a 2.5 hp engine, consuming less than ½ gallon of gas per hour. The original wide deck version was great for four people and stuff. The narrow version is faster, and there isn't much room for people or stuff. It does row. The wider version had to be paddled. While I like the calm waters, the newest version has been out in 2-3 foot waves. Gets kinda wet, but gets you home. I seal under the decks so under deck splashes can't reach the cockpit area.
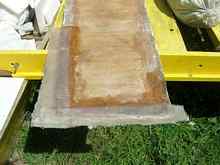
FIXING IT: Had a hole in the bottom of boat one. Evidently some rocks under the keel, hidden by sand; too many kids jumping on it, over too long a period of time. Cut out the bottom where it had the holes - see cutter above. Sanded both sides extensively - see same tool above.
Looks pretty bad. But sanded inside and outside around the area. Took the cut out bottom piece and sanded til the gel coat was gone, then sanded the inside. Fiberglass seems to be a physical bonding, not chemical like epoxy.
Wrapped string around the boat, so the bottom piece, now smaller than the hole, wouldn't fall through.
I laid in the old bottom, on the string. Glassed in one layer of matt, one layer of 22oz biaxial on the inside, completely covering the old piece. Flipped the boat over, and sanded out the runs and whatever poked above the rest, and gave the same fiberglass treatment on the outside, with an additional layer of matt on the top, so I could sand the matt for smoothing, without destroying the strength of the biaxial. Since the original had only one layer of cloth, the new bottom in that area has two new layers, and some of the old - therefore is thicker and stronger.
Not shown: where the keel line on boat #2 wasn't a smooth curve. Cut the bottom loose, and sanded all around. Knowing the build up of fiberglass in the area would be more, sanded the old fiberglass almost totally away. I made it follow the curve with pieces of wood wedges. Then I glassed in small section, and when hard, removed the wood wedges. Then basically glassed the inside and the outside as per the repair above.
If something isn't long enough, just sand and add the extra needed. Not aligned right, cut it out and reglass. I watched a workman descend into the bowels of a 60 foot catamaran and cut out a misaligned centerboard case, sand, re-align and glass it in proper. While covered from head to toe in fiberglass dust, the job was done. He was wearing a full body suit, eye protection goggles, heavy duty dust mask. It is amazing what you can fix with this fiberglass stuff.
Oh, after all that sanding, and filling, when it is painted, it is strong underneath, and no one will know the work involved.
Enjoy.
Materials List: I might add that living in two foreign countries, getting anything other than pine wood, is hard to get. I have bought wood with some kind of stuff already growing on it! However, because cars are prevalent, buying fiberglass, is not hard. Sometimes the cloth is not the right kind/weight, or the resin is sold in pints, but it is available.
I used about 7 gallon of fiberglass resin. Cloth 22.5oz biaxial, and 1.2oz matt - long enough to cover the table at least three times, plus almost ½ again for glassing pieces together. 52" wide, about 20 yards long for starters.
Maybe in your country you can buy precut fiberglass tape and you won't have to cut it yourself. That would be great for attaching the sides to the bottom.
At least 200 stainless steel screws - for attaching the wood to the gunwale, and the deck to the same piece of wood. (About ¾" long, so the screws do not protrude beyond the wood.)
1 gallon of gel coat - diluted some with resin to stretch it. Probably should use gallon and ½. Two 3/8" ply for building table, later for temp bulkheads, maybe permanent ones, seats, deck, etc. Three 1"x3"x16' to keep table from sagging. Later cut and used as part of the gunwale Modeling clay used to fill gaps, cover screws. Three saw horses, which I already had. Couple of disposable brushes (one just came apart), still have #2 Disposable roller covers, used for medium density walls
Sanding sealer (2 coats) Sanding 120 in between, coats 220 for final.
Mould release wax - follow directions, and maybe one more coat.
Cutter and sander as illustrated. Something to cut wood with - hand saw, power saw Something to drill with.
DESIGN: The bow and stern are 6" less in height than the mid-ship section. The rake of the bow and stern are up to you. I picked the same rake for both. I did not hang a rudder off the stern, so if you are going to I recommend a vertical stern. The first side you cut, becomes a pattern for all the others. Bow "gap" is about 1", the stern I made 5" wide. Mid ship section is 8" wide on the floor, 2 ½ feet wide at the gunwale. Floor tapers to bow and stern.
Beam connects at 6' from bow and 4' 8" from stern Deck width is 4' across the beam, front to rear is 5' 2". Eventually, I cut deck size to about 12". Boat is lighter, and faster with engine.
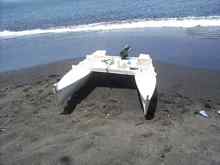
Worried about final results? Mine works. If you study boat #1 it has two different hulls, three different sized decks. One hull is almost 2' shorter than the other, and has a wider keel. It tracks straight. It has been abused and used - and it still floats great. I believe there are many applications of this way of building that would get you in the water.
Previous builds that got me to believe that a dory shaped hull would work:
https://www.motherearthnews.com
https://www.duckworksmagazine.com/09/projects/kejak/index.htm
Flat top “molding” with fiberglass are not my own idea: Derek Kelsall https://www.kelsall.com, Richard Woods, Vance Buhler and others.
But I wanted to show how easy it is. I used a 14 and 15 year old to help mr build boat #2. They didn’t see anything really difficult to do. The pictures tell the story.
Want more details, pictures, questions, email me. micro@vincysurf.com
Visit our website: https://www.wix.com/alanberry/alan-and-beverly-berry
If you actually build one from this idea, I would like to hear about it.
Remember this is a flat water boat, that really is a lot of fun.
 |