I decided to build a boat this winter in my basement. The stairway to the basement is in the garage and it has a right angle turn and solid walls. Whatever I built would have to fit out of one of the 12"x30" casement windows. This limited my decision to a kayak so I decided on a Skin On Frame Greenland style using the traditional methods of mortise and tenon, pegged and lashed construction. I was able to purchase Eastern White Cedar from a local mill. I bought it rough cut and re-sawed it to the required dimensions.
With that decision made my next concern was bending the ribs and coaming which is normally done with a Steam Box and all the paraphernalia that goes with it. I was web surfing and found the arctickayaks.com site and saw a reprint of a SOF Greenland kayak construction from Sea Kayaker Magazine. I printed it out and liked the method used to bend the ribs and coaming. They sawed kerfs partially through the piece being bent and steamed them with traditional methods. The article explains everything in detail. I also have three kayak construction books that I found very useful.
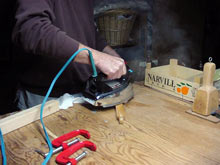
I had a "Eureka" moment and thought of using an electric iron pressed on a wet cloth to steam the wood just like I pressed my uniforms when I was in the US Navy 60 years ago. Luckily my wife had an old electric iron that she let me use after I explained what I was up to. We took some photos of the process and am very happy to say that I was very pleased with the results.
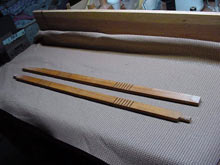
Two ribs 32" long. Stock size is 1/2x1". Grain direction doesn’t matter.
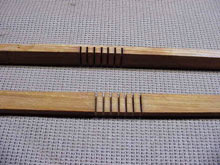
Close up of the saw kerfs which are 3/8" deep.
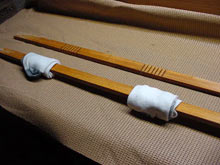
Thick wet cotton socks wrapped around the kerfs after soaking overnight.
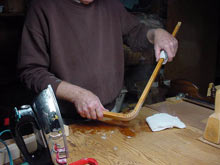
Steaming with the iron set on high with the iron steaming also. The more steam the better. Time about 30 seconds, you only have to steam the back side of the rib not the kerf side. Keep the iron moving. The iron forces the steam into the wood. It’s almost like a pressure cooker.
Bends nice and easy with a smooth radius. Careful, it’s hot.
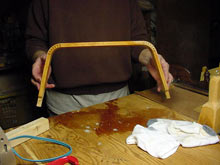
Bending the other curve.
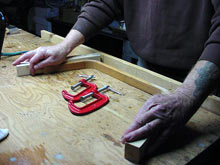
Setting the rib in the jig.
Clamping one end of the rib in the jig.
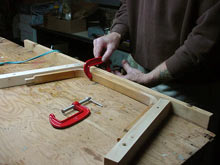
Clamping the other end in the jig.
View showing the jig. The clamping board is a 1x4 screwed to the edge of the bench sticking up 1 ½". The jig sides are 2"x2" stock screwed at a 17 deg. angle. The left side is permanent and the right side is the one I adjust for each rib. I let the ribs stay for a few minutes in the jig and tie a cord across the tips to hold the shape until they are dry. I leave them a little long for final trimming and cut the ½" dia. x 1" long tenon on the ends.
Three bent ribs, the small one is oak.
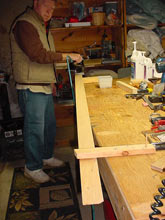
I noticed that some of the stock that I re-sawed for the gunnels was drying with a bow to it. Two of the four pieces (I’m splicing them in the middle) were OK and the other two bowed in the wrong direction. We decided to try the wet sock and iron method to straighten them out. I prestressed them with a crude set-up as shown in the photos Truing Gunnels 1-4. One end is slipped under a shelf, the center is bowed up with a 2x4 and the other end is held under a 1x2 screwed to the bench. You can adjust the stress by increasing the size and location of the 2x4.
Long shot of the setup.
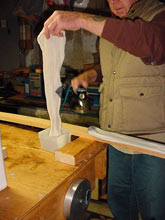
Sopping wet cotton socks. You can cut up old terry cloth towel.
Steaming for about 60 seconds or until the steam slows down.
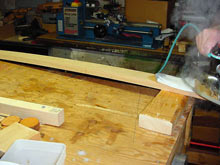
You can see the steam in this shot. I let it dry in this setup at least 8 hours. It’s winter and the humidity is low.