Sometimes you need to reach a knife with your off hand. Let’s face it, your dominant hand is more likely to get tangled in something because it’s probably the one you’ll be using.
This is a taller order than it seems, actually. Clip-on folding knives with opening lugs are pretty good in the dominant hand, but for a lot of people they fall short in the off hand. Can you open the knife under stress? A sheath knife is more reliable, and it is certainly a possibility to wear one near your off hand, and a folder near your dominant hand. But now we’re starting to hang a lot of weight on what is quite possible the elastic waistband of swimming trunks. You can see where that would lead. Worse, women’s swing suits seldom even have waistbands to hang anything from.
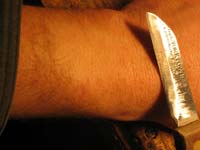
Let’s take a tip from the guys who spend all their free time in olive drab with assault rifles. They spend a lot of time thinking about knives and sheaths. Their concept of the neck sheath helps us out here. It stays where both hands can reach it and there is no folding action to fuss with.
But first a knife.
Cheap boat knives
Have you noticed how the price of a knife goes up quite a bit as soon as someone grinds a sheepsfoot tip on it and calls it a “sailing knife”? I suppose there may be reasons for this relating to economy of scale, but there’s no reason we can’t do as well for much less money.
My approach is to recycle old steak knives or paring knives with broken-off tips. When possible, try to find brand names. I made my favorite knife from a broken Chicago Cutlery steak knife, but my love for it has more to do with the metal bolster and wood handle than the quality of the steel. Many cheap knives have pretty decent steel. Look around at yard sales and thrift stores and something will suggest itself.
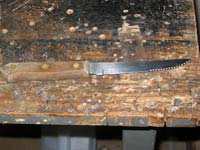
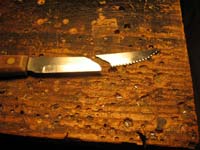
Here’s our victim – a no-name steak knife.
First we mark the new shape.
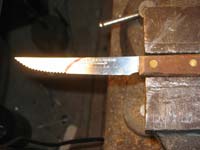
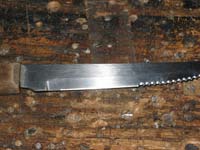
I cut and ground to the line with a Dremel, then cleaned it up on a grindstone. Obviously use common sense about securing the knife in a vice and wearing protective gear. You cannot do this with a hacksaw because its blade is no harder than the knife’s blade.
Then we grind a new bevel. I am fortunate in that I have a wet grinding wheel, so I can grind hard and heavy without overheating the steel.
Most folks will have to grind a little at a time and cool the blade in water. If you let it get hot enough to start turning blue, that part of the steel must be ground away unless you want to learn about heat treating and hafting. (I think that is way more work than it’s worth.) The safest approach, albeit slow, is to do it completely by hand on coarse emery paper.
I ground a lot more relief into the blade than it had as a steak knife. (Actually I do this to my steak knifes too, as I like them to cut effortlessly.) This smaller cutting angle allows a sharper edge. It is much easier to chip this sharp edge, however, so leave it more blunt if you want to be able to abuse it. Fatter angles are for chopping, and finer angles are for fillet knives and razors.
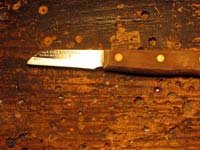
Here’s the relief as a steak knife.
And after making the relief angle more acute.
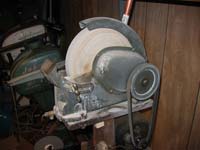
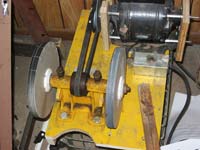
Finally we sharpen the blade on successively finer grits. Try to keep the angle as constant as you can. I do it with a paper wheel sharpening system (https://users.ameritech.net/knives/paper.htm) that I cannot praise highly enough. I could always get a blade shaving sharp eventually, but now I can do it in just a couple minutes. This has an immense impact on how willing one is to bother with edge tools! The system mounts on a common arbor grinder with no safety guards. This means a cheap yard sale model works fine.
This is a tremendous bargain when you figure in the time I’ve saved sharpening knives, plane irons and drill bits, in addition to the time saved by working with truly sharp tools. I’m not kidding about truly sharp. I can shave with this knife when it’s freshly honed.
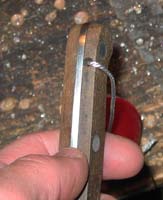
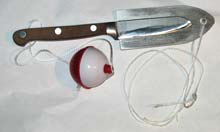
Finally we need a lanyard. I didn’t want to bother making a hole in hardened steel, so I drilled only the scale. I probably should have done it before sharpening. Then I ran some mason’s twine through it and added a couple fishing bobbers for when I drop it in the water. Make sure you use enough bobbers to actually float it.
That finishes the knife. Now let’s get to the sheath.
Magnetic Neck Sheath
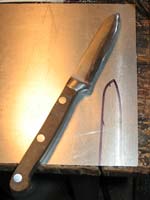
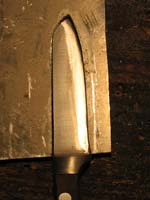
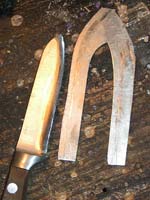
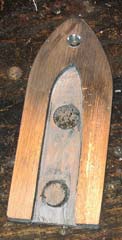
The neck sheath is easy to make. You could use scrap plywood or any sort of plastic sheeting that can be glued. I used 1/8” aluminum plate for the easy-to-clean deluxe version. First we trace the blade on the stock, then cut it out. A hacksaw makes short work of aluminum and with a bandsaw it’s downright easy. Finish to the line with files or sandpaper. (You will notice I switched knives on you. This one is one of my favorite knives, which is why it deserved to get the first sheath.)
Now we rough cut the final shape and trace the blade opening onto another layer of aluminum. This lets us drill holes for the magnets.
 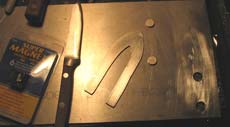
The magnets are small-but-powerful neodymium discs. In my area they are marketed as “Super Magnets” and a pack of six ½” discs cost around $4.50. I think this is a much better deal that attempting to salvage magnets for this purpose, since most salvageable magnets (e.g. microwave ovens, computer hard drives) are too big for this purpose.
Now we prepare for gluing. Sand all gluing surfaces and wipe down with acetone. A piece of tape on the back keeps the magnets from falling through. I used JBWeld to fasten the aluminum layers and magnets. Be sure to thoroughly clean up squeeze out in the blade slot, as it will be nearly impossible to get out later. I used toothpicks, cotton swaps and a bit of acetone.
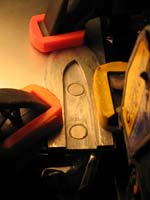
Once the glue cures we need only cut and sand the final outline, and bore and chamfer a hole for the lanyard.
It might be a good idea to paint or varnish the whole thing to protect the epoxy from UV rays. I didn’t, so I make sure to store it out of the sun.

Finally, we need a neck lanyard. Do not use anything strong enough to choke you if you get it hung up. Cotton string would be OK. Mason’s twine is stronger but the twisted stuff is usually rated at 10 lbs. I wouldn’t count on that, however, so consider adding a 5 lb fishing swivel in the line as an intentional weak link. Another common choice is keychain like the army uses for dog tags, since it is designed to break away. Good hardware stores have this stuff in bulk, but most folks will probably have to find it online. Search for “dog tag chain” or “ball chain” and you’ll find it.
There are a few caveats. While it is possible to re-sheath the blade with one hand, it takes two hands to avoid dragging the edge over the aluminum lip. A mildly annoying feature is that the the magnets will pick up iron-bearing dirt if you set it down on any. This could possibly be mitigated by gluing a layer of plastic or wood to the top and back. Wood would actually look quite nice if it matched the knife’s grip, but I left it off to keep it light and easy to clean. Similarly, another layer of aluminum or plastic can make the sheath more secure, but again I wanted it light. And finally, keep this sheath away from your computer or any magnetic storage media, and don’t trust a compass anywhere near it.
In spite of the slight drawbacks, the final product is secure, easily washable, and draws easily with either hand. And of course it’s cheap, too.
Rob Rohde-Szudy
Madison, Wisconsin, USA
robrohdeszudy@yahoo.com
|