The biggest electric system trick of all is to have as little system as you can get away with. Electrical systems are easy to install, which invites overkill. You’ll regret it later, though, because problems are more likely to arise and harder to diagnose in a complicated system. If I were doing all this over, I would simply buy portable LED bicolor and stern navigation lights and have it done with. These are simple, inexpensive, efficient, and they will fit all of your boats! Take careful note of this last point.
In fact, if you’re smart, you’ll skip the rest of the article and buy a set. Trust me, it will save you a lot of work.
Still reading, eh? Well, I guess you’re one of the dumb ones. Welcome to the club.
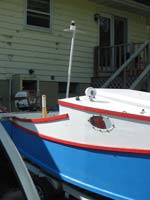
My starting point for this system should have been a clue to me that I should get portable lights. I had a bow light installed pretty well on the schooner, but the 360 degree light was screwed to a makeshift mast made from a scrap 2x2. There was no good way to hold it vertical. I had a pair of 6v lantern batteries clunking around unfastened in a compartment. I swear to you that this project was on the list, but a stern rebuke from the local water cops made it a higher priority.
At this point, the choice was to get a simple system or further complicate the one I had. Naturally, I complicated.
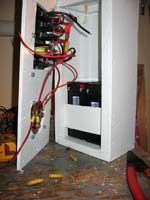
Battery Box
I probably shouldn’t even tell you this part of the story, since I think it’s a bad idea. But I suppose some of you will insist on a more elaborate electrical system, so let’s look at some things I did wrong.
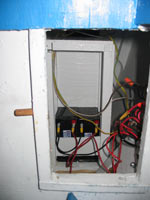
Legally, the battery needs to be fastened to the hull, and the terminals need to be covered. I built a box to house the batteries and switches, and mounted it inside a compartment. This meant it had to be cleverly designed to fit through the hatch and still be able to mount solidly to the hull and be handy to use. I don’t think I really achieved the latter, since I had to reach into the compartment to operate switches or charge the batteries. Worse, if I capsized the entire system would be very difficult to open up to dry it out. This would be an even bigger deal for folks on saltwater.
 |
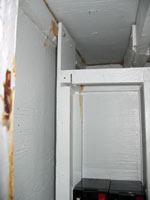 |
Click images for larger views |
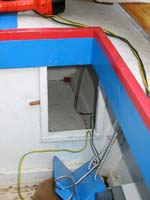
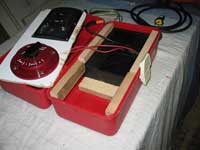
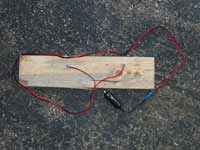
I finally realized that my mistake was in making it permanently attached. Keeping it all in one box was actually sort of smart. But if the whole assembly could be unclamped, it would be easier to charge and work on inside the shop, I wouldn’t need to carry it at all for daysailing, and I could also use it on other boats! This should have been obvious, since these points are make outboard motors so attractive.
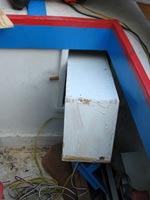
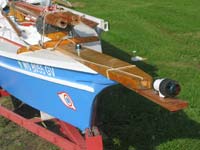
Here’s the new removable box. It can strap down under the thwart in the rear cockpit when needed. This allows the switches to be under cover too.
Here’s an unforeseen advantage: the box also serves as a remote auxiliary power supply! It supplies power to three circuits with a 4-pin flat trailer connector, but most of the time I’m using the accessory jack. It is a very handy place to plug in a 12v air mattress pump! This allows a midnight top-up when you have that elusive leak, but without operating a manual pump or dragging the bed to the truck.
It can also run a CB radio or other accessories without running down the truck’s starting battery. Or when the tow vehicle has a wiring failure and I’m too tired to fix it, I can at least get the trailer lit up without too much fuss. Maybe I should add an auto flasher relay for one of the outputs to make hazard lights easy too.
I guess the most important message here is that I find this box useful, but mostly for non-boat jobs. Let’s look at some details.
Charging the Batteries
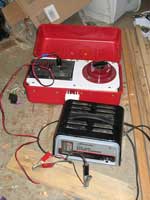
The easiest way to charge the batteries is to make a cable with two cigarette lighter plugs. I guess now they call them 12v accessory plugs. Connecting the car’s jack to the box’s jack while driving will charge the batteries. Make sure the battery switch is set to “both”, so both batteries get charged. Unless, of course, you know one battery is already fully charged. Make absolutely sure you have tip connected to tip, and ring to ring!!! And be sure the accessory circuit has a fuse in case you screw up.
Of course many trips aren’t long, and charging SLA batteries takes time. You’ll want a way to charge them without running the tow vehicle in the driveway for hours on end. This is easy. Connect the same accessory plug to a pair of screws through a scrap of plywood.
And in use…
Bear in mind that you can’t get a good test of a battery’s state of charge until you let it sit for three hours or so, or power something for a few minutes to drain off the “surface charge.” Find way more than you ever wanted to know at www.batteryfaq.org/ and www.batteryuniversity.com.
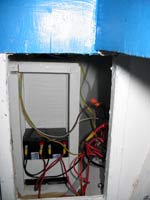
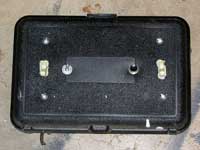
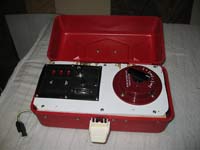
Let’s look at what’s inside the power box.
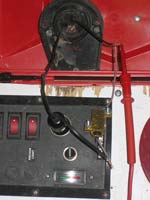
Fuse panels
I really tried to find an ultra-cheap approach to a fuse panel and switches. I actually did build something from parts taken from a conversion van in the junkyard. But it was so bulky and ugly I took it apart even before I photographed it. For the price, I couldn’t beat the metered fuse panel Duckworks sells. I bet you know how painful it is for me to admit that kind of defeat.
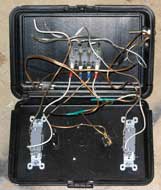
But Chuck knows I’m an electrical gear junkie and cheered me up by adding a cool Bakelite dual battery switch to his lineup. I had been planning to simply disconnect spade terminals on the batteries, but the switch is much more convenient. Battery switches really clean up a rat’s nest of wire. Now the wires don’t move and the switches are easy to find by feel.
Where I failed, Eric Larson succeeded. He came up with a pretty good el-cheapo switch box. This is a small discount store utility box and common household light switches. He even stuck in a little accessory fuse block. Here it is removed while I was remodeling the hull.
Eric included switches for bow and stern light, as well as a built-in searchlight. I think I would always prefer a powerful flashlight for that function, as I could use it elsewhere. The pushbutton switch is for the built-in horn.
All in all it’s not a bad setup, and better if mounted to a portable battery. One could do the battery switching with two common light switches as well.
On the other hand, I think it would cost $15-20 for the parts if you didn’t have them laying around. For an extra $5-10 the ready-made gets you an accessory jack and two-battery switchable charge meter. That charge meter is terribly convenient and saves me bringing my nice multimeter in the boat. I guess I would base this decision on the contents of your junk box.
Battery Box Bottom Line
I think I’ve reduced the inconvenience to the practical minimum in this battery box system. But I hope I have illustrated how easy it is to overcomplicate electrical systems. Resist the temptation! Get the minimum necessary and keep it interchangeable among boats.
That brings us to the lights themselves.
Light Testing
Of course I had the cheapest lights available. Chinese industry isn’t exactly known for looking out for the safety of Americans, so I decided I’d better test whether I was actually legal.
On vessels under 12 meters (pretty much all of us), the sidelights have to be visible a mile distant, the all-around light 2 miles. As I mentioned above, unpowered vessels under 7 meters can opt out and display a flashlight “in time to prevent a collision”. But notice that this places the burden of proof on the person with the flashlight. The lawyer for the inattentive clod in the big powerboat will say it wasn’t “in time” if there was a collision. And obviously boats like ours are going to fare badly in any collision, so we want to be highly visible.
For this sort of testing you need two people and cell phones or two-way radios. You could get away with two big flashlights and a code system, if you need to. You also need GPS or a map to tell you how to come up with locations that are one and two miles distant. One location could be on shore, but I suspect it is important that the lights are viewed over water. We see differently when reflections are involved.
This process is much easier when the lights are off the boat. Look at scaled map of your local water and figure out shore access points that are one and two miles away across the water. This lets you do this kind of thing when it is too cold for boating to be much fun at night. It also doesn’t take nearly as long. Even if you’re doing this in a boat, choosing spots along shore can help you figure out your distances without GPS.
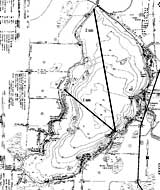
If you live in Wisconsin, you’re in luck. The Department of Natural Resources provides free scaled hydrographic maps for most lakes on their website.
On the water
My local outboard motor contact and I made an outing of this event, since he wanted to test his lights too. It was a perfect night for it, too – 55 degrees (warm for October), almost no wind and a clear sky with first quarter moon. We all got in my boat and headed across the lake to land them at the park where they would be watching from shore. Then I headed out to a position one mile away with no backlighting. My incandescent bicolor light, and Dale’s incandescent portable were visible to both Dale and his friend. My LED portable was visible only to his friend.
Then I proceeded to the two-mile position. All of the white lights were visible to both sets of eyes, including the LED light. Only my incandescent was dim but visible, but it came back strong when I switched to a fresh battery.
I was worried that the bicolor LED light might have had low batteries to account for its less-impressive performance. But no, all its batteries read 1.462 volts. On the other hand, I must have put mismatched, half-used batteries in the white LED light, because they read 1.253, 1.266, 1.466 and 1.252! Yet this light was quite bright! I guess the lesson here is that the white light makes better use of fading batteries, probably because there are no filtering losses. The other lesson is that the LED bicolor is legal, if just barely.
The interesting point was that running the incandescent bicolor for only a short time depleted the battery to where it was very noticeable on the test of the white light a short time later. The difference I measured after the fact was 12.08 and 12.47 volts. This was another clue that I my initial approach was wrong. I had started out with fresh batteries, and they were draining fast!
Incandescent Bulb Challenges
This precipitous drop in battery voltage would have been predictable if I’d done a small amount of math beforehand. Here’s an example.
My bow light had an unmarked festoon bulb with a resistance of 2 ohms. Divide the battery’s 12 volts by this resistance and we get its current draw – 6 amps. Multiply this by the voltage and we get its power rating – 72 watts. This same trick works for any incandescent bulb you can measure the resistance of, since they should have similar efficiency characteristics. The white incandescent light is 1.0 ohm, 12 amps and 144 watts.
With incandescent lights we can expect to draw around 18 amps underway, 12 amps at anchor. Remember those amperages as we discuss…
Rechargeable Batteries
Battery capacity is rated in Amp-hours (Ah), which is a measurement of how many hours a battery can provide 1 amp. Unfortunately this is not linear. A battery rated for 5 Ah will probably last much less than an hour at a 5 amp discharge rate. (It might also get ruined!) It might also last longer than 10 hours at ½ amp. So ideally we also want to see the battery’s specs to glean the recommended discharge rate. It is only at this rate that the specified amp hour figure applies.
Since we’re talking about discharge characteristics, we’d better look at battery types. I am focusing on rechargeable batteries, because 18 amps of disposable battery power cannot ever be remotely cost-effective.
Auto Batteries
The first rechargeable battery we’re all going to think of is one of the old automotive batteries we have sitting around in the garage. Unfortunately, these are terrible for our needs. First, auto batteries are designed for producing large jolts of current for a short time to turn a starter motor, then being immediately recharged. Deep discharge physically damages the paper-thin lead matrix needed to produce that big jolt. Second, they are much heavier than they need to be. And third, they can leak. I don’t really want sulfuric acid leaking into the bottom of my boat, do you? What would I do? Pump water in to dilute it, then pump it back overboard, all while clinging to a mast and hoping nothing important dissolves? That doesn’t sound fun.
NiCd Cordless Tool Batteries
Most of us have one of these somewhere, which makes us think it might be good to use it. The good news is they are designed to tolerate a deep discharge pretty well, and recharge fast. But most of these units are 1.2 Ah. Some nicer ones are 1.8 Ah. Remember those amperages above? We’re looking at 18 amps to light our two lights, so you’d need 10 tool battery packs to last an hour. I know I don’t have that many.
NiMH Batteries
Nickel Metal Hydride batteries are great in a walkman, but we again run into trouble with our current and voltage needs. HERE is the spec sheet we mentioned above.
The recommended discharge is .9-2.7 amps, which presents a problem. Remember that 18 amp demand? We’d need 7 banks of batteries in parallel. Worse, we need 12 volts and these are 1.5, so we have to stack 8 of them in series. That’s 56 expensive batteries. How would you charge them all? You’d have a box of batteries waiting in line for the charger at home. Also, there is no good way to charge them when you’re camping, since NiMH batteries need special charging circuitry to charge correctly.
Sealed Lead Acid (SLA)
Sealed lead acid (SLA) batteries are a different story. These are just as easy to use as any other lead-acid battery, but can’t spill. They also have a very low self-discharge rate, which equates to a good shelf life in your boat. This lets you forget about them all winter. HAM Radio folks are serious about batteries, so you can find a lot of information at www.hamuniverse.com/batteries.html.
I found on www.batterymart.com a 12v, 7 Ah battery for $10. That beats every other option I’ve found including trailer breakaway batteries, electric fence batteries, and rechargeable lantern flashlight batteries. There are larger Ah capacity batteries, but you don’t necessarily get more Ah per dollar. For example, the 35 Ah version costs $40, which is $5 more than 5 of the 7 Ah version. But wherever you order them, be sure to check the shipping cost before clicking “buy”! Lead acid batteries are heavy!
But still we have trouble. SLA batteries are generally rated for a 20 hour discharge cycle. So that 7 Ah battery is really meant to provide .35 amps over 20 hours, and a faster rate of discharge will shorten battery life. This is a good length of time for nav lights, but it also means we should have 57 batteries in parallel for 18 amps!
Incandescent lights sure soak up a lot of power, don’t they? I guess we’d better look at alternatives.
LEDs
Everyone has heard about how efficient LEDs are. But I’ve seen some claims that make no sense at all. For example when they tell you how many watts a light assembly soaks up, some of that power is heating up a resistor instead of making light. Worse, it’s not predictable. How much power goes to the resistor depends on the relationship between the system voltage and the voltage the LED wants, as well as how many LEDs you run in series. So you can’t translate watts to lumens in a predictable way. You have to know some electronics and do some math to make a reasonable guess as to power consumption vs. light output. For most of us, I think we are better off to rely on testing on the water as discussed above.
The other trouble with LEDs is that the powerful LEDs have narrow angles, so you need a lot of them or you need a fancy reflector. This makes it cost a bit to build a light. (Gary Blankenship tells you all about how to do it HERE. It might cost you $20-30 in parts, but as we saw above, the savings in batteries is tremendous. Let’s take a look at that.
First we should look at the requirements. COLREGS states that we need 0.9 candela (Cd) to be visible at one mile, and 4.3 Cd at 2 miles. (I’d like to thank the Coast Guard for doing that math for us!) They also caution us to avoid causing excessive glare with overpowered lights. But I cannot believe this would present a problem as long as we stay in the range of the next vessel size up. Vessels 12-20 meters are required to have side lights visible at 2 miles and stern and all-around lights visible at 3 miles (12 Cd). At worst we would be seen as a larger vessel, perhaps deserving of more respect.
It is handy that we know the requirements in Cd, since most LEDs are rated that way. As long as the LED meets the spec and is aimed directly at its target, the goal will be met.
If I were building an LED light from scratch, I’d use the direct method. For example, I might use a white LED capable of 8 Cd that needs 3.5 volts and draws 90 mA. It covers 45 degrees, so I’d need 8 of them. Three in series would need 10.5 volts, so I’d need a resistor to bring the voltage down to that. The remaining two would need the voltage taken down to 7 volts. There’s a calculator at www.superbrightleds.com to figure this out.
We end up with a light of 8 Cd that draws 2.7 amps. This is not a tiny draw, but it’s about 4.5x better than the 12 amps of its incandescent counterpart. This squares with the general notion that LEDs are approximately 5x more efficient than incandescent lamps – a good sanity check.
The savings are more pronounced with the bicolor light. An incandescent lamp loses around 70% of its power in filtering. LEDs start out making the right color. Even if you still put a filter in front of it, losses are minimal. My incandescent that tested correctly at one mile draws 6 amps. An LED bicolor at 8 Cd might use around 0.6 amps. So when filtering is involved, we can probably expect colored LEDs to be about 10x more efficient.
Our real world testing supports these numbers. Both LED lights are built exactly the same, only the bicolor has a colored diffuser. So the white light was plainly visible at two miles with weak batteries. The bicolor was barely visible at one mile with good batteries, so we know it lost more than 50% of its power in filtering. Perhaps close to that 70%.
Batteries requirements with LEDs
Now our current draw at 12 volts is 3.6 amps total. Looking at the battery capacities above, a couple NiCd tool batteries could do the job for a short outing, but we really ought to have 10 SLA batteries for long battery life. Unless of course you’ve gotten smart by now and gotten self-contained portable lights. It’s easy to recharge eight (or 16) NIMH AA batteries.
Is it starting to seem like I’m harping on this? Probably. So I guess I’d better talk about how I’m using those LED lights now.
Portable Nav Light Mountings
As is often the case, things aren’t as simple as they should be here, mostly because I have a bowsprit.
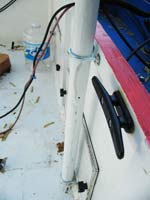
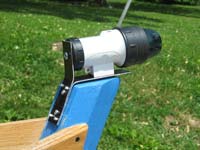
Bow Light Mounting
Here’s the new and the old on the schooner. The old one is just in front of the eye bolt.
The original installation looks very professional, but I am pretty sure the jib boom blocks the light to lee when heeled. With the LED light I don’t have to worry. A simple 1x3 spar gets the lamp well out in front of the bowsprit.
It is held on with the cleated line so it can be removed from inside the cockpit when approaching piers and other unyielding objects. Those of you who are smarter than me won’t have to worry about this, because you will have sensible lug rigs devoid of nonsense like jibs and bowsprits.
Mounting the same lamp on the AF4B looks like this. Yes, I have the fancy teardrop side lights, but I won’t be using them unless I both to rebuild them with LEDs. By the way, these portable lights mount with M6 1.00 screws, so go straight to metric section.
The mounting is obviously pretty simple – two pieces of aluminum strap pop riveted together. Two screws mount it to the stempost when needed. I leave the screws in the holes in the stem when not in use, so water doesn’t collect there. The only change I plan is switching to Phillips screws so I can mount and remove the bracket with a cordless drill.
One thing that worries me a little is that I’m pretty sure the bicolor can be seen aft of where it should be visible. But the pattern gets pretty spotty in that area, so I’m hoping the manufacturers know what they’re doing and are counting on the intensity being insufficient to cause any confusion.
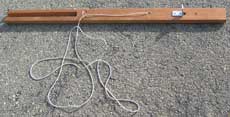
360 degree light
After fussing with that bowsprit mess, this mounting is quite easy. It is a piece of stair railing with a plywood baffle mounted on L brackets. The lamp screws to both plywood and railing, and the railing steps into a pair of U-bolts on the inside of the transom. I thought about using pole clips, but this member needed to be solid, as it also sometimes serves as a handhold when climbing aboard. Just don’t forget about it when going under a low bridge!
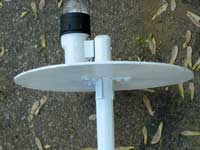
By the way, I made it that tall so the light can still be seen with the bimini up. This is handy when it rains and also seems better for maintaining night vision in the cockpit.
Stern Light
When sailing we need a different sort of light. The white light should be screened from the sectors covered by red and green. We do this by constructing a screen to block the light forward of 22.5 degrees aft of the beam. The interior needs to be flat black, and I didn’t both with anything beyond primer on the rest of it. Not shown is the lid, which is needed to reduce glare out the top.
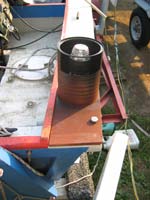
A coffee can does the job here, held accurately in place by being bolted against the coaming. It is easiest to get this right with a box jig similar to what we used to adjust the retro style side lights in a previous article.
Nice and simple. But if I start the motor, I have to unscrew the light and move it to the 360 degree mount.
I guess the bottom line of all this is to keep it simple, and seriously consider LEDs. I’m glad I built the battery box, but not because of boating. I think you will have all the light you need on a boat with a pair of LED nav lights, an LED head lamp, and a powerful lantern flashlight or similar self-contained spotlight.
Rob Rohde-Szudy
Madison, Wisconsin, USA
robrohdeszudy@yahoo.com
Addendum:
Electrical System Tricks – Error!!!
Welcome to the department of retractions, corrections and other screw-ups. I had a slightly uneasy feeling about the Electrical System Tricks Article, sort of like I had forgotten something. Well, it turns out I did, and Gaétan Jetté in Canada was kind enough to point out my error.
I’ll bet those amperage figures under “Incandescent Bulb Challenges” seemed really high to you. They did to me too and I should have known why. I was relying on cold filament resistances, but these increase quite a lot when heated to incandescence.
I really should have thought of this, since this is exactly why lamps are used to protect audio speakers in high power applications. A carefully chosen lamp in line with the speaker will normally act as a low value resistor and not do much at all. But when it gets enough current to light up, its resistance jumps much higher. This in turn reduces the current, providing a really cheap limiter. In fact my bass amplifier is so equipped! (I guess it’s been a while since I’ve had to play that loud…)
Let’s take a walk through what this means for our boatier purposes.
New Measurements
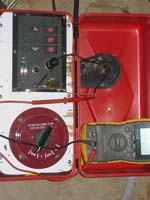
Measuring the hot resistance takes a little more doing than the cold resistance. One approach is to skip the resistance and measure the amperage directly. Most people don’t have a big enough ammeter to get a useful reading. I didn’t until I dug through a box of electrical parts I had forgotten I had. Lo and behold, I had the perfect meter on hand all along! So I wired it up in series with my battery box and a few lights.
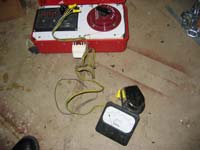 |
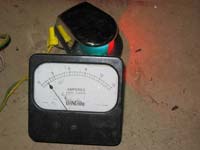 |
As it turns out, the bicolor light draws around one amp hot (not six) and the anchor light draws around 1.5 amps hot (not 18). (It looks like the meter is reading about 2.6 amps, but it was not at zero when unloaded.) Now we can run the math backwards and divide the battery’s 12.46 volts by the amperage to find that hot resistance. The bicolor is 12.46 ohms and the anchor light is around 8.3 ohms. So we have quite a range. The hot resistance is somewhere between about 4 and 6.25 times the cold resistance. Worse, Gaetan’s experiment on a bulb meant for mains voltage yielded a 10-fold difference.
Most of you won’t have a box of high current meter movements laying around. You can do the same thing with a regular voltmeter and a power resistor, which are only a couple bucks new and can be salvaged from most equipment with high voltage power supplies. It needs to be a small enough value that the lamp can still light up. If you’re buying one, I’d go for 8 ohms and 5 amps.
Here’s how it works. If you have two resistances in a circuit, the voltage drops across them will be proportional to the resistances. If one of those resistances is a normal carbon resistor, its resistance will not change much as it heats up, so it is easy to measure cold.
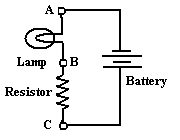
The voltage measurements are made from point A to B for the lamp (I’m calling this Vl – that’s a lower case “L” for “lamp”, not a one), and B to C (Vr). Since the voltages are proportional to the resistances:
Vr/Vl = Rr/Rl
Where
Rl = hot resistance of the lamp
Rr = resistance of resistor (measure it to get the exact value)
Also measure battery voltage under load while you’re at it, since you will use it when calculating current.
Here’s what the physical setup looked like. I used an 8-ohm resistor (tested at 8.2 ohms) that I use in place of a speaker for testing amplifiers.
Here are a representative set of my results on the bicolor lamp:
Vl = 7.82
Vr = 4.30
Rr = 8.2 ohms
So….
Rl = 15 ohms
We again divide the battery voltage by this resistance to get current in amps. It comes out to be 0.8 amps. This is somewhat less than the meter measurement, and likely more accurate. By the same method, the anchor light is 10.1 ohms and draws about 1.2 amps. Also notice that we ended up pretty close to Gaétan’s 10-fold difference in resistance, which could be handy for ballpark estimations based on cold resistance.
Amp Hours
Let’s look back at my sealed lead acid 7 Ah battery. Like I said, these are designed for a 20-hour discharge cycle at a maximum of .35 amps. To avoid damaging the battery, we would need four batteries in parallel to run the 1.2 amp anchor light and six to run both lights. This heavy and inconvenient to me.
And you really do need that many batteries. Further evidence of this came up in the above testing. Even with only the bicolor lamp, 0.8 amps from one battery was causing the voltage to drop fast enough that it was hard to do the test! I had to hook up the probes and switch the power on momentarily for each measurement. Otherwise each measurement would be taken at a radically different battery voltage. With both batteries in parallel the countdown slowed enough that I could get a decent measurement – the one found above.
Because of this I think we still end up looking at LED lamps.
More on LED Lamps
My idea for a white aimed-LED lamp actually uses more power than the incandescent version, so it is plainly not worth the effort. Granted, it will be brighter, but perhaps brighter than necessary at 8 Cd. The available LEDs don’t let us easily make a light in the 4.3 Cd range, so I think we still end up with a portable light for the white lamp – probably LED.
The bicolor, on the other hand, might be worth pursuing. Using single 120-degree LEDs we could use a power supply of three AA batteries for 4.5 volts. With the necessary resistors, the entire bicolor unit would dissipate 154mW. 91mW of that will be mostly light in the LEDs and 63mW will be heat made in the resistors. Discharge current would be 40mA, which is a pretty safe range for AA cells as far as I can tell.
Still, I only think I would bother with this approach if you really wanted to use nice-looking fixtures like the retro teardrop nav lights. The ready-made self-contained units are waterproof and easily interchange among boats, which has proven to be a real advantage.
So even though I think we end up in the same place, I am deeply grateful to Gaétan for pointing out my error. With any luck this won’t clue you all in to my nefarious plot to turn you into legion of proofreaders.
Rob Rohde-Szudy
Madison, Wisconsin, USA
robrohdeszudy@yahoo.com
|