|  The
Cape Dory 10’ is the boat that started the venerable
Cape Dory line back in 1963. Designed by Andrew C.
Vavolotis, it was the first of the many designs produced
during the company’s lifetime. Now only fifty-eight
10’s remain listed in the current Cape Dory
Sailboat Owners Association registry. Why. The
Cape Dory 10’ is the boat that started the venerable
Cape Dory line back in 1963. Designed by Andrew C.
Vavolotis, it was the first of the many designs produced
during the company’s lifetime. Now only fifty-eight
10’s remain listed in the current Cape Dory
Sailboat Owners Association registry. Why.
Perhaps one answer--off the wind, the boat is a shrew
becoming unsafe and unwieldy in even a moderate breeze.
Again, why?
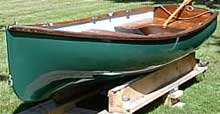
The boat is first and foremost a rowing craft. According
to the company’s 1970’s sales literature,
“a thoroughbred pulling boat” with lines
similar to many successful skiffs the CD10 is 10’6”
LOA with 49” beam, narrow bows, hourglass stern
and 150-pound displacement. She is only secondarily,
a sailing vessel, featuring cat style mast placement
and “modified” Gunter rig of 68 square
feet.
It is from this rig, or more correctly, because of
this rig, that the boat’s shrewish nature is
derived—despite Cape Dory’s claim that
the boats have “proven themselves very able
and lively performers” and despite the active
class racing organization mentioned in company brochures
of the time (now defunct), it is difficult to take
as serious any rig with no provision for reefing and
which places the mast step in an elevated position
in the bows only a matter of inches from the stem.
Perhaps it is this distinction of design which lead
to Cape Dory’s claim that, “the expert
sailor as well as the novice will find them challenging…”
In fact, I suggest that it is this characteristic
alone which has lead, apparently quite often, to the
parking of these boats in a field and there being
left to rot (refer to the Cape Dory Sailboat Owners
Association registry for some interesting narratives
on the “finding” of CD 10’s).
 |
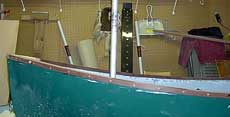
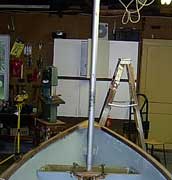
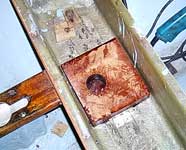
CD 10 “Sea
Minor”. Note the hollow bows—mast
step is located in the extreme forward end approximately
12” down from the rub rails. |
On a run, should the boom go forward of what would
generally be considered a broad reach position; immediate
broaching will ensue, with bows buried, stern up and
most likely the rudder out of the water. Secondly,
barring a broaching occurrence, another trick of this
rig is a tendency to self-tack when running. Here,
the very forward mast placement enables movement of
the center of effort forward and ACROSS the boat’s
centerline as the boom lifts and the sail billows.
If you are running say, on the starboard tack and
sitting warm and dry in the stern sheets on the high
side, the immediate impact of this action will be
a wet behind as you instantly find yourself tacked
and now on the low side.
All this wetting of body and loss of control may
not be an issue for bikini clad teen-somethings bouncing
around with the buoys but away from a closed-loop,
patrolled race path, loaded with camping gear, and
often in mixed company, control issues, pitch-poling
or settling by the stern are not the things of fond
memories. As I mentioned, this tender condition is
exhibited down wind. One might well be romping along
with a bone in the teeth to weather and fully enjoying
the sail without one hint of the rig being overpowered
only to find, upon falling off for the sleigh ride
home, an immediate issue and some very hair-raising
moments if in traffic.
Why then bother? Firstly, as claimed by Cape Dory,
the boat is, “a thoroughbred pulling boat”
and I happen to be as enamored of rowing boats as
I am of sailing ones. Secondly, the GRP hulls are
generally sound even if all those years in a field
have wrecked havoc upon the mahogany thwarts, gunwales
and fittings. Thirdly, I enjoy cruising on Narragansett
Bay and the boat was free. The question became, therefore,
and given that all wood required replacement, could
the more or less sound 30-year-old glass hull of a
finicky thoroughbred one-design be overhauled to become
a sane and safe workhorse cruiser?
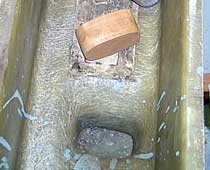
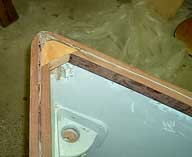 |
Original mast
step placement (shown during overhaul with original
mast partner removed and new gunwale rails in
progress) |
Mast placement and rig: Even the most modest of studies
of hull forms similar to the CD 10 will invariably
indicate mast placement at the point where the bows
flare into the hull—in other words where there
is buoyancy to support the sailing loads. In the Cape
Dory 10, this means somewhere near the center of the
forward thwart. Of course, moving the rig aft means
having to look into boat balance and CE vs. CLR. If
we are to have a sane workhorse, what is required,
in the words of John Glasspool (Open Boat Cruising,
Nautical Publishing Company, Ltd. 1973), is a workboat
mentality.
Conversion of the Forward
Thwart
The forward thwart is comprised of a floatation chamber
containing rigid foam floatation topped by a mahogany
seat board. The floatation chamber is made of laid
glass bonded to the hull with ½” thick
pads of Bondo type material. The chamber is supported
amidships by a pedestal, also of laid glass, bedded
in a ¾”-1” thick pad of the same
Bondo material.
 |
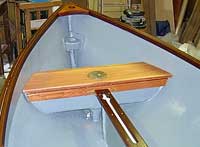
Forward thwart—note
pedestal |
Modification of the thwart consisted of converting
the pedestal to a mast step and the thwart cover board
to a mast partner.
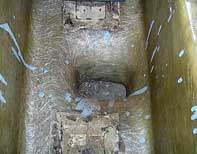 |
Interior view
of forward thwart/pedestal |
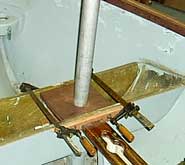
|
 |
Establishing mast rake and
alignment |
Taking angles off lines drawings of several different
dinghies and testing them against the “line
of beauty” by eye developed the initial mast
rake angle. The hull was squared and leveled and the
final angle was achieved by use of spacers. Mast was
positioned using plumb bob. All was clamped tight
when angles were fixed and the angles were recorded
for transfer to the doublers and the thwart chamber
marked with indexing marks for final assembly.
 |
|
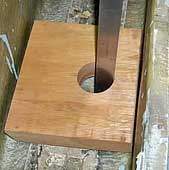
6/4”
mahogany filler block and 6/4” lower doubler—note
bury. Doublers were drilled on drill press with
2” Forstner bit to the initial rake angle. |
 |
Fitting the
upper and lower doublers to index marks |
 |
|
Lower
doubler and filler block bedded with thickened
epoxy. Thwart doubler glued and screwed—thwart
doubler was used as a drill guide for cutting
the thwart hole at the correct angle. |
|
Dry fitting
the cover board |
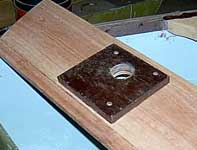
 |
3” bronze
cover plate let into covering board. |
Final fastening and alignment of cover board was
done with mast in place. Cover board was clamped down
and the mast was checked for binding. The mast holes
in the doublers were dressed using a drum sander on
the electric drill. Seat was adjusted prior to drilling
and running down screws so mast was properly aligned
to index marks and could be shipped or unshipped with
no binding.
From a structural point of view, the method employed
by Cape Dory to tie the thwarts and centerboard trunk
together was to use one #12 screw through the side
wall of the forward and amidships float chambers and
into the end grain of the centerboard trunk cover.
When fitting the new trunk cover, allowance was made
for the addition of a heavy trim board screwed and
bedded to the forward chamber’s sidewall. 90-degree
cast brass knees were then used to tie the thwart
and trunk together.
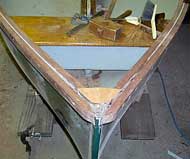
|  Completed
forward thwart—note the breast hook. The
original design was retained and boat is fully
convertible to the original rig. Also, foam
floatation was “custom” fit with
use of a band saw. Despite the loss of volume
due to modifications, more foam was fit during
the overhaul than had been originally installed. Completed
forward thwart—note the breast hook. The
original design was retained and boat is fully
convertible to the original rig. Also, foam
floatation was “custom” fit with
use of a band saw. Despite the loss of volume
due to modifications, more foam was fit during
the overhaul than had been originally installed.
|
Sea Trials Report
Failure of Initial Mast Step
Design
A little story here concerning the bottom
of the float chamber: close examination of the interior
photographs will show an uneven and slopping structure
around the opening for the pedestal. My first attempt
at securing the mast step employed thickened epoxy.
When fully set this appeared sound—permitting
the boat to be shaken and moved about using this piece
as a “handle”. Initial sea trials on flat
water and moderate breeze found no problems. However,
this design did not hold up when the boat was put
on Narragansett Bay. Given wave and wake, about an
hour and half into sailing north off the Jamestown
shore, at the passing (and the wake) of a large motor
cruiser, a loud crack was heard and the lower end
of the mast gained considerable movement. The postmortem
found that the epoxy bond with the thwart bottom had
failed. Despite a generous portion of thickened epoxy,
actual bonding contact was found to have occurred
in only three places. Clearly a rethinking was in
order.
All unevenness around the pedestal was taken out
using micro-light filler mixed with epoxy. This was
sanded and wiped clean with acetone. Three layers
of cloth were laid across the bottom, covered with
a sheet of plastic and the doubler laid in place and
weighted. When the glass had kicked, the plastic &
doubler were lifted to reveal a flat mating surface.
This foundation was lightly sanded and cleaned and
a coat of 5200 was spread on both mating surfaces.
The doubler was realigned to its index marks and weighted
until the 5200 cured. Four #8 bronze machine screws
were then run down, one in each corner, red Lock-Tite
was applied and all were drawn up tight with oversized
backing washers & nuts.
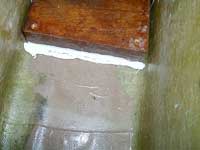 |
Faired and reinforced
thwart bottom, 5200 bonding. |
The modified rig has undergone four sea trails, two
preceding (includes the mast step failure) and two
subsequent to the step redesign. The order of trials
in both cases was a flat-water trial on Lake Tiogue
and a trial on Narragansett Bay. The only variable
in the later two was the addition of my 12-year-old
grandson as crew. Time duration of each trial was
approximately 2.5 hours and included all points of
sail.
Downwind performance is significantly improved, not
only is the boat stable she is very fast and well
balanced. This carries directly over to broad reaching:
here the boat is again stable and fast. Hard on the
wind the boat carries a bit more weather helm than
I would like. This is not a significant issue in light
airs but can be a little tiring in a good breeze (11-12
knots) if a lot of working to weather is required.
Jibes are smooth and safe enough given placement
of crew in the bottom and not on the stern sheets.
The boom tends to lift when running and thus does
not pose an issue with heads—the boom is merely
allowed to come in using a controlled turn, is caught
in hand, and swung across as the boat to complete
the turn.
Tacking requires the boat be carrying moderate way.
Rather than pinching up, I have found falling off
slightly to build speed, then putting the helm over
does very well. With two onboard tacking can be improved
by having the crew stand by the centerboard on “ready
about”. As soon as the bow crosses the wind,
raise the board and sheet home. Boat speed will come
up very nicely and the board may again be dropped.
Boom height. The only time the lower step/boom causes
an issue is when sheeted in hard. The boom at this
point is only slightly higher than the gunwale. This
does not impact the mechanics of tacking as the boat
is deep enough to allow even someone like me, in my
upper 50’s with arthritic stiffness to duck,
but does impact the ability to see well and forces
the helmsman to shift sides with each tack in order
to clearly see the luff.
Rig Remedies—Some Thoughts
Boom Height
Rig-Rite of Warwick Rhode Island carries all components
for the Spartan S-1 Spar System and offers a replacement
mast kit comprising both end fittings and a 12’
tube section. This is sufficient mast material (total
loss of step height being approximately 9”)
to offset the lower step and would, weather helm not
withstanding, allow maintaining the CD 10 one-design
sail.
A second alternative could be to lower the attachment
point of the halyard on the gaff. This would have
the effect of increasing the hoist of the gaff thus
raising sail and boom height while retaining all class
spars and sail. My only concern with this approach
is the increased length of unsupported gaff and; therefore,
the increased lever arm acting upon the upper mast
fittings and gear.
Weather helm: In close-hauled conditions, weather
helm can be improved to some degree with the centerboard
and outboard weight. Pivoting the board up moves the
center of lateral resistance aft while carrying weight
outboard at the rail lessens heel and therefore the
tendency to turn into the wind. This will not however
elevate the imbalanced induced by the aft movement
of the rig.
My thoughts at this juncture lean towards a complete
new rig, perhaps a lugger that would address not only
the boom but also the increased weather helm. In this
scenario mast height would be increased about 10”,
the main sail would be reduced slightly in size and
perhaps a small jib would be added. Keeping in mind
the tenderness of the boat when weight is placed forward,
sheet and halyards leads would need to be run aft
to allow single-handed sailing while maintaining weight
aft. This option, while the more costly, has the advantage
of offering sail reduction choices (given reef points
are placed in the new sail) and better tacking. It
should also improve windward performance by allowing
the boat to point higher. Even though US Sailing no
longer carries the CD 10 as an active class, class
compliance is retained with the old rig should a class
event pop up while, in the mean time, cruising performance
enhancements are offered with the new.
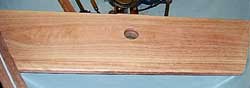
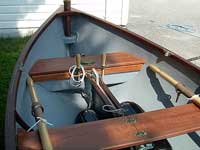 |
Completed thwart,
halyard, Cunningham leads |
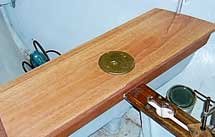
Alternative Use of the Original
Step
A close look at the original layout of the CD 10
will reveal a lack ground tackle accommodations. Here,
the advantage of retaining the original mast option
becomes manifest, there is now a 2” diameter
hole in the breast hook begging for attention. This
hole, with accompanying mast step, is ideally suited
for mounting a Samson post.
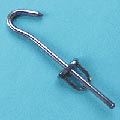
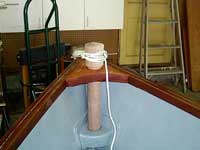 |
Samson post
in place |

|