| Recently someone
asked about alternative balance point arrangement
for Joe Tribulato's Epoxy
Balance/Ratio Scale.
I had printed off Joe's original version and carried
it around for a year or so never quite getting round
to making it. Well,a couple of months ago I found
myself needing to make up a small batch, no neat containers
around to make the 5:1 by volume ratio measurement
(I use SP Resins) and dusk coming so time was of the
essence. I grabbed a piece of cedar, ripped it to
a reasonable shape and made what I consider to be
my contribution to this device - I cut a slit at the
centre in the bottom with my lovely sharp and thin
Japanese pull-saw (from those folks in Alameda). I
cut about a quarter off one of those freebie and most
useful store cards (you know the ones they keep pushing
on you - loyalty cards or gift cards (before being
"loaded" with value of course)) etc. - and
this became the balance point.
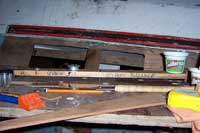 |
I grabbed a
piece of cedar and ripped it to a reasonable
shape. |
I think I will at some stage make a nicer, neater
version of this using some thinner but stiffer wood,
perhaps even carving some shape into the width, and
insert plastic card slices under near each end as
well to give a less sloppy action - or maybe this
ole thing will still be there serving its purpose
when they come to pick me out of the wood shavings
and cart me away.
I checked the accuracy of this device when I got
home - it is VERY accurate indeed. Since I started
using it I haven't had one bad mix, or even a worry
that one might be "iffy". In my case the
actual weight ratio is 100:18.
Instructions for use: As already
noted in Joe (and Tom
Hamernik's version) the method is to
- put the container (yoghurt
or Muller Rice pot or similar plastic container,
maybe even cut down milk carton but what about the
wax?) up against the end.
- adjust the balance weight to
get the scales "nice" ie balanced - a
little nudge on either end will make the scales
tip or bounce.
- put some suitable weight at
"R" for resin - I use 1,2 or 4 large washers
as needed - for small jobs anyway.
- Pour the resin in to the pot
until the beam tips. If it's cold and the resin
"glops" putting too much in the pot don't
panic - just add some small weights (a nail or something)
at "R" until it is nicely balanced again.
- move the weight (or weights)
from "R" to "H".
- pour (carefully) the hardener
into the pot until it starts to tip.
Maybe another solution would be to put a small container
at R and use water to balance the overpour of resin
- of course both the weights and the small container
must be moved from R to H for the next bit.
As I tend to do "wet on wet" or wet with
unthickened, then mix up some thicker for the glass
weave or a fillet, then another lot of unthickened
to finish off, I I am making batches every 30 minutes
or so - and so far I have had no problem re-using
the same yoghurt pot for the entire operation - however
the balancing weight does need to be adjusted every
time.
I have the rather overpriced dispensing pumps and
they are a pain for small jobs - need to be cleaned
regularly and I have had a few mixes where I pressed
the pump and got a less than complete dollop of liquid
- leaving me very uncertain about the accuracy of
the mix. Decanting from small containers is messy
and I feel inaccurate with all the resin and hardener
that gets left behind.
I really strongly recommend such an epoxy balance
- you'll never go back to pumps or decanting from
containers.
PS: that store gift card - I collect these - most
useful for spreading epoxy on flat surfaces, carving
to shape for epoxy fillets and so on.
Pat in Crosshaven.

|