|
A Simple Rudder Downhaul |

|
|
By Al Meyer - Texas City, TX - USA |
First, a confession up front. This article will not present any ingenious new idea, or reveal some lost secret of the ancient boatbuilder’s art. In fact, most boatbuilders likely already have their own favorite rudder downhaul systems. This is merely a greenhorn’s account of one step in a long journey on the learning curve.
A pivoting rudder blade is generally a good thing. I learned this lesson on my first sailboat. It had a pivoting rudder blade, but the previous owner had drilled and installed a second pin, in addition to the hinge pin, which effectively made the rudder a fixed blade type. This was not an issue until I ran hard aground on a submerged oyster reef. We had no idea the reef was there, so we were moving at a pretty decent speed when we hit. The centerboard rotated up into the trunk just like it should, but with the “fixed” rudder and the speed we were going, the force was enough to severely bend some fairly substantial pintles and gudgeons. I learned that lesson, and pulled the second pin, but the rudder blade had a nasty habit of “floating”, generally at inconvenient times.
When I built the Penobscot, the drawings showed a rotating rudder blade, but no details on how to keep it in either the up or down position. I decided “simple is best” and used a stainless steel bolt with a plastic-filled lock nut for the hinge pin. By using the right amount of torque, I had a friction fit between the cheeks on the rudder trunk and the blade. It could be manually moved to either the up or down position, and would stay there.
That idea worked well in theory, but not quite as well in practice. The transom on the Penobscot has a nice rake, so lowering or raising the rudder blade while underway meant sitting on the very back of the boat, reaching around and down to grab the rudder blade, and hoping that a gust of wind doesn’t do something funny because I’ve let go of the sheet and don’t have control of the sail while this is going on. There had to be a better, simple way.
The simplest option involved cutting a hole in the rudder blade and pouring in melted lead, such as is commonly done on centerboards. This option wouldn’t work on the Penobscot. With the raked transom and the pivot point located relatively far back on the rudder trunk, weighting the blade would hold it down, but directly below the pivot point and not parallel to the transom. Someone else suggested a piece of shock cord between the leading edge of the rudder blade and the rudder trunk; this seemed like a workable solution, but my own subjective (i.e., totally irrational) tastes didn’t like this approach on what I viewed as a traditionally-styled boat. As a third option, Iain Oughtred’s “Clinker Plywood Boatbuilding Manual” showed a rudder uphaul and downhaul system (Figures 7-52 thru 7-60) but my limited brain cells couldn’t figure out how the downhaul worked. Finally, a sketch in Wooden Boat on building the Caledonia Yawl answered the question (Wooden Boat No. 185, page 41).
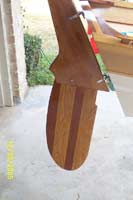 |
Figure 1 - Adding weight to the rudder blade would keep the blade from floating, but it would hang directly below the pivot pin, not against the transom.
(click images for larger views) |
|
I didn’t plan on needing an uphaul as raising the blade should not be an issue. The rudder blade should float on its own. I just wanted an easier way of keeping the rudder blade in the down position. I used a modified version of Oughtred’s downhaul. If experience dictates that an uphaul is needed, it should be simple enough to add later.
| Figure 2 - Before starting any project, make sure you have adequate supervision. Somebody needs to make sure that grandpa doesn't foul up! |

|
|
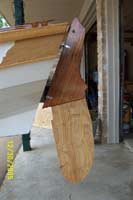 |
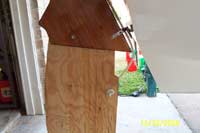
Figure 3 - In keeping with the "don't foul up" theme, a plywood template of the rudder blade is first used to test the idea. |
|
| Figure 4 - Here's the gist of the idea - a line with a stopper knot is routed from a hole near the leading edge of the blade, through the gap in the pintles, up to the tiller. It works! |
|
|
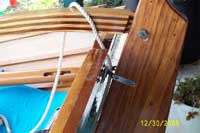 |
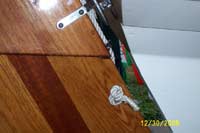
Figure 5 - A hole will be bored through the tiller to guide the downhaul. The tiller has a tenon where it enters the rudder trunk, which is a stress concentration, so the downhaul will be brought forward and the hole drilled near the location shown. |
|
| Figure 6 - Now that I know the system will work, I've installed the "real" rudder blade. An eyelet mounted on the bottom of the trunk keeps the downhaul aligned properly. |
|
|
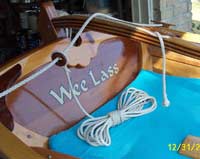 |
Figure 7 - The downhaul is secured with a jam cleat mounted well forward on the tiller so that it won't interfere with the traveler. The end of the line is terminated with a wall-and-crown knot, which won't allow the downhaul to slip through the hole bored in the tiller. |
|
As I stated earlier, this is certainly not a new idea, just one beginner’s solution to a common problem.

Al's article about building his Penobscot 14:
Wee Lass
Other articles about rudders:
|