|
Getting the Oars You Want |

|
|
By Jamie Orr - Victoria, British Columbia - Canada |
This summer I took part in North America’s first Raid, the Shipyard Raid from Silva Bay Shipyard School near Nanaimo, British Columbia,and finished at Port Townsend, Washington, just in time for the Wooden Boat Festival. We had a great time!
But what has this got to do with acquiring oars, you ask? Well, the raid is a series of sailing and rowing races – you must have oars to participate. However, since a Chebacco is a heavy boat by comparison to most rowing boats, and I have a perfectly good outboard motor, I’d never needed oars until now.
A Chebacco weighs some 1200 pounds, (by the designer’s estimate) has a beam of 8 feet and cockpit coamings 6 feet apart. No matter how I arranged things, I was going to need some longish oars. To see just what would work, I mocked up a pretend oar on the boat, on the water. I used a twelve foot piece of black plastic plumbing pipe, (cheap!) marked in two foot lengths. From this, I decided that twelve foot oars, mounted on the coaming, would work. At the time I thought I would do my rowing standing up, pushing – but more on this later.
I looked in the Boaters’s Exchange but they had nothing long enough. Next I tried the internet, but couldn’t find anything that was both long and cheap. The closest I came were the Seine Skiff oars from Barkley Sound Oar and Paddle Ltd, but they cost more than I wanted to spend. (I use a pair of their shorter oars for our elegant punt, that I like, so if you’re looking to buy your oars, call them.)
It didn’t take much time to decide on making my own. Pete Culler’s “Oars, boats and Rowing” has dimensions for nice looking nine footers. I found the same Culler design recommended in John Leather’s “Sail and Oar”, along with a good discussion of the proportions, so I used this as a basis for my twelve footers.
I wanted spruce for lightness and strength, but couldn’t afford spar grade (Sitka) so bought the best twelve foot 2” x 10” I could find at Home Depot. It wasn’t bad, only one flaw.
I used the 2 x 10 for the shafts only. I marked out four pieces tapering from 3” to 1 ½” and cut them out with the skilsaw. I placed them in pairs and glued them together, finishing with two blanks each 3’ thick one way, and tapering from 3” to 1 ½” the other. Pete Culler, in his book, says to weigh the pieces before gluing, and mix and match until the wood for both oars weighs the same. I didn’t actually weigh the pieces, but I hefted them and felt they were equal enough. When gluing up, I used ¼” diameter hardwood dowels to keep the pieces in alignment – these are available ready made and fluted to let the excess glue escape.
Once the glue (thickened epoxy) cured, I rasped off the squeeze-out then used the electric plane to smooth the tapered sides. I ripped a piece of spruce 2” x 6” (leftover from the mast) for the blades, and glued the pieces on to the tapered sides, again using dowels to prevent slipping.
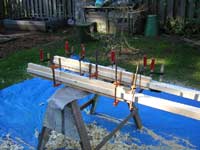 |
Here are the blades, glued and clamped. You can see that the shafts are thinner top to bottom than side to side. This is because the “flat” sides of the shaft haven’t been tapered yet.
(click images for larger views) |
|
And once that glue had cured and been cleaned up, I marked a centreline on the edges and ends of the blades, then used the electric plane to taper the so-far untapered profile to the same profile as the other, 3” to 1 ½”, followed by a little more taper on the blades so they ended just over 1” thick. I also used the electric plane to start tapering the blades the other way, towards the edges, which I left about ½” thick for now.
I drew and redrew one side of one blade until I was satisfied, then made a template of that side. I snapped a chalk line down the centre of one flat side on each oar and laid the edge of the template on that to mark out the blades. A quick check to make sure both oars looked alike, then I cut out the blades on the band saw. This was the last power tool operation, everything from here on was done by hand tools. (Except for a little random-orbital sanding on the blades later.)
So far I had a couple of heavy, oar-shaped objects with a lot of square corners and extra wood. I removed all the power plane marks with my jack plane, and put the final taper on the sides. Since I wanted to leave the thick ends (the looms) as they were to help balance the outboard ends, I didn’t take off any more wood than I had to, just chamfering the corners so they wouldn’t get dinged so easily.
|
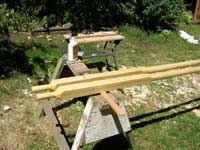 We’re getting a little ahead of the text here, but this picture shows the looms left full size and square. We’re getting a little ahead of the text here, but this picture shows the looms left full size and square.
By the way, I believe “loom” may mean everything between the handle and the blade, but I am using it to mean the part between the handle and the leather. The piece from leather to blade I’ve called the “shaft”.
(But no apologies to the purists. Go write your own article!)
|
|
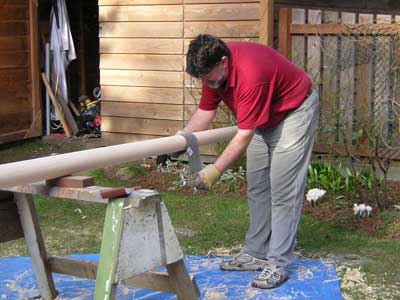
The shafts were still square so I used the planes to take the corners off and make the shafts eight-sided. Then the block plane and spokeshave were used until the shafts were reasonably well rounded. The transition from square to round, just above where the leathers would go, was made with chisel and spokeshave and a lot of care. To finish the shafts, I cut a sanding belt so I had a 24” long piece of sandpaper, took one end in either hand and sanded until the shafts felt smooth and round, working across the grain. I’ve read about using a drill and an inside out belt to power this operation, but have never tried it, finding that hand sanding with the belt is very quick, and doesn’t leave any deep marks. Either way, you must finish by sanding with the grain until the cross-sanding marks are completely gone. No skimping or they’ll show up again when you varnish!
 |
In this picture, I’m sanding a mast, not an oar, but it shows how I do it. It’s a good workout too, although the camera doesn’t capture that.
Just get a good grip on the ends, lean into them and go! |
|
The blades were tapered both longways and towards their edges with block plane and spokeshave, leaving a ridge running down the centre of the flats for strength. The ends finished about 7/8” at the centre and the edges of the blades finished about 3/8”. I kept this edge dimension, letting the angle to the ridge increase as the blade thickened towards the neck, until it naturally made a smooth transition to the round neck (where the blade narrows and blends into the shaft). The books say to make this oval, with the thicker dimension in the fore and aft plane, where the strain comes as you row, but mine came out round. I could have made them lighter and finer, but I was afraid to take off too much wood. In the end I relied on my eye and how they felt in my hand.
|
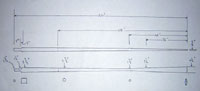 Here’s an almost-to-scale drawing with dimensions – these are within an eighth or so. I wasn’t near a scanner so I just photographed it with the digital camera Here’s an almost-to-scale drawing with dimensions – these are within an eighth or so. I wasn’t near a scanner so I just photographed it with the digital camera
The amount of oar inboard of the oarlock should be 7/25ths of the total length of the oar. That falls somewhere around the diameter marked 2 3/8” above, but the placement in the drawing is only approximate. |
|
The handles have a reverse taper, being wider at the end than where they leave the loom. I marked a circle on their ends, then sawed down at an angle at the other (loom) ends and cut away the excess wood with a chisel. This was fairly delicate work, as a miscalculation could have ruined a handle, so I took my time. The spokeshave soon came into play again, along with round and flat rasps – whatever would work, in fact!
I’ve spoken here as if I completed each part of the oar all at once. In fact, while I did most of each that way, I left enough wood in each operation so that at the end I was moving around, shaving down whichever part seemed to need it most. Also, I didn’t let one oar get too far ahead of the other, but kept switching back and forth so they were generally at the same stage of construction. I thought this might help them finish as a matched pair. I don’t know how necessary this was, but it worked – at the end I couldn’t easily tell one oar from the other, except for the flaw mentioned earlier. (It shows up in both oars, in the same place, but is a little bigger on one.)
The leathers. I had never sewn leathers on before, but there is an excellent “how-to” on Paul Gartside’s website. Go there and follow his instructions. For the Turk’s head, use the instructions in Brian Toss’ “Rigger’s Apprentice”, or your own favourite knot book. If you can’t find either, email me at jas_orr@yahoo.com.
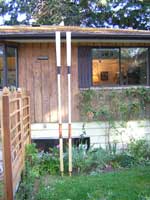 |
Here they are, finished and leathered. The black pieces at the neck are more leather, this time to prevent chafe when the oars are stowed along the gunwales.
|
|
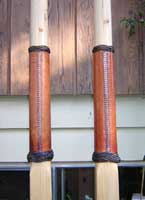
A close up of the stitching. Note the oars are standing blade end up, so the “top” of the leathers is down, i.e. the handles are below the picture.
|
|
|
It’s possible to nail a leather strip around the top of the leathers (to stop the oars sliding out of the oarlocks) although the nail holes may eventually let water into the wood, weakening it. For that matter, you can nail on the leathers themselves, or a plastic collar, but the sewn leathers and Turk’s head suit the traditional style of oar, as well as doing a good job. I found it a lot easier than I expected, the wetted leather stretched easily into place and Paul’s stitching method did a great job. Being too cheap to buy oarlocks to fit, I picked up a used pair for $12. These were on the big side, so I covered them with leather too, which brought them down to about the right size.
I varnished the oars, except for the handles. Culler says to leave these bare, as a varnished surface will give you blisters more easily. I wanted some protection on the wood, and happened to have some raw linseed oil on hand, so I used that on the handles. Four coats of varnish on the oars, and the same number of applications of oil were all I had time for, so that’s what they got.
The balance point finished up about a foot below the leathers. In practice this has worked well, only a little downward pressure is needed to counterbalance the weight of the blades. I mentioned that I had planned to row standing up – I do a little of this around the docks, it’s nice to see where I’m going, and I can maneouver well like this, but when it’s time to travel, I sit down and face backwards. For a seat I use a box on top of a floorboard mounted at seat height, the box is about 6” deep. I use other floorboards at seat height to brace my feet against, and find I can row for hours like this – it’s slow, but the ergonomics are good. I plan to use a dedicated board and seat in future, and build a frame-type foot rest that won’t take up all the cockpit space. This will store easily and I won’t have to tear up the floorboards every time I row. However, I won’t change the oarsman’s position.
For the oarlock mounts, I shaped and mounted oak blocks outside the coamings, giving a spread of about 74”. The oarlocks have a 5/8” shank – they didn’t come with any sockets, and I couldn’t find any in that size in the time available (the date of the raid was fast approaching) so I drilled 5/8” holes through the oak blocks, placing a large washer with a 5/8” hole on top of each block to stop the shoulders of the oarlocks digging into the oak. This worked well for the raid, I don’t know yet how it’ll do in the long term. I kept them well lubricated with vaseline, which I also dabbed liberally on the leathers and oarlocks. This was a big help, otherwise the oars would try to walk inboard on each stroke.
I didn’t come in first in the raid, despite my wonderful oars. A middle-aged accountant rowing a 1200 pound boat is not a good bet in that kind of race. However the oars gave a great satisfaction, not least because I had made them myself. If you’re thinking about trying your hand at making a pair, go for it. Find a pattern you like, or adapt one, it’s not rocket science. If you aren’t sure how to proceed, you could do worse than following the method above – it may not be the slickest, but it will turn out a handsome and serviceable pair of oars. If I do say so myself!
See you on the water!
Jamie
|