|
Glued Decking with Beveled Edging Boards |

|
|
By Barrett Faneuf - Seattle, Washington - USA |
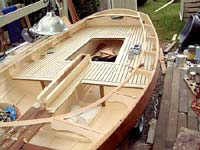
I recently had a lapse of sanity and decided to install
dressy glued planking on the seats of my Navigator.
Here’s how it went.
Let’s take a look at doing all the fiddly fitting
that’s needed if one is installing a laid-plank
style deck. One can cheat and simply run the planks
off the edge and then trim to fit, but I feel that
looks sloppy. For me a proper laid deck – whether
fastened or glued – needs edging boards. Those
edging boards need to be fitted into every nook and
cranny, and of course the places one can use a 45-degree
angle are few and far between on a boat. Furthermore,
I decided that all those edging boards needed to be
beveled together rather than just butted up against
each other. I don’t make it easy for myself.
I’d like to illustrate in particular how I
went about fitting those bevels. Doing an article
on this subject may seem like “well, duh!”
but I had to think about it for a while because it
was so obvious.
First of all, one needs a surface to work on. I have
decided to go with the glued-decking route on the
seats of my Navigator. The decks will be painted,
as I didn’t want to add much weight, and will
probably want non-skid
on the decks in the future.
 |
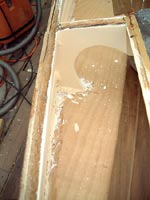
Here’s
what we begin with: the underlayment.
In my case this is 4 mm plywood glued
and ring-nailed down. In the cases of
the side and forward seats, this underlayment
is the real waterproofing seal for the
flotation chambers.
(click
thumbnails to enlarge) |
|
|
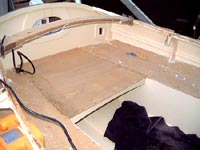
| Next, the edging boards
are fitted. I made the edging boards and
the decking from Ipe as an alternative to
teak. |
|
I have used a bunch of Ipe on this project, and
it is extremely tough and durable. It is quite heavy
as a downside, so I ripped and resawed my 1x4 planks
to 1.5” wide by 5/16” thick decking strips.
The edging boards wherever there is an overhang –
like the cockpit footwell – I milled wider with
a ¾” “grab” lip.
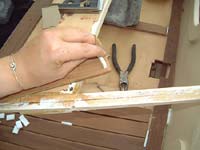
Next, find or make a big pile of spacers. The decking
planks will all be set apart with 3/16” spacers
for the seam compound to fill. This allows for movement
of the wood and just looks good. And we want it to
look good. I made all of mine from a chunk of solid
white Teflon. They pop free of the seam compound effortlessly.
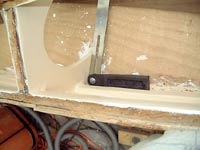
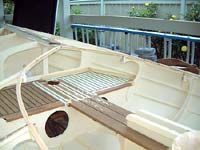
Fitting any of the edging planks goes like this:
First asses your area. Here we look at the finicky
bit between frames at the aft end of the cockpit.
|
|
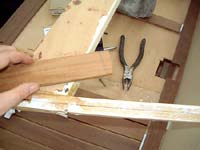
Looking
Aft |
Looking
Forward
|
|
Then, fit each edging board to the space individually
before cutting any bevels. In the above “Looking
Aft” picture you can see the aftmost edging
board has been fitted around the transom doubler.
The outboard end has not been beveled yet. Use those
spacers when fitting the edging planks – use
spacers to everything.
Fitting an edging board goes like this:
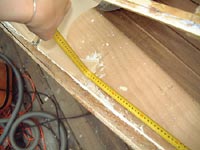 |
Measure
the space – this is the only time
I measure. I have figured out that with
the spacers I have a little bit of “leeway”
in the length of the board, but it’s
better to be too long and trim it back
to fit rather than too short. My board
stretcher isn’t working right now.
|
|
| Grab the
angle to cut. Cut a board to that length
and angle, and test fit. Trim as necessary.
I fitted all the curved edges as well. Fitting
the curved edges for me means setting the
board in place and tracing the curve along
it using a fixed with item, like a combination
square. Then I plane to the line with a
compass plane. Takes about 5 minutes per
plank. |
|
|
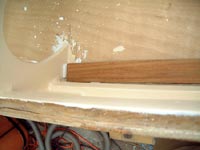 |
Once
your planks are both fitted, set them
in place. Don’t forget the spacers! |
|
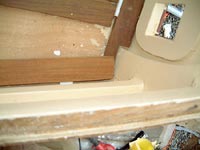
| Let the ends
that you’re going to bevel overlap.
|
|
|
 |
Mark
the points that they overlap –
both inside and outside corners. I usually
try to get the square points on the
outside lining up, because they are
hard to mark in spots like this. Whatever
works. |
|
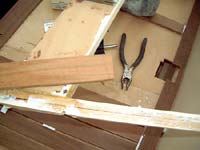
| Pull the
planks back out and connect the dots.
You now have a cut line if you were going
to have a tight bevel. But we’re
not, we have a spacer in there. |
|
|
 |
To
get the cut line with a spacer, I just
center a spacer on the line and trace
it. |
|
| Now you
have a second cut line. Cut to that. |
|
|
 |
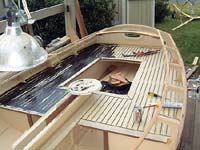
Now
all that’s left to do is drop
the planks back in! After the edging
is done, the internal planking is easy.
I followed the same “trace”
technique to get all the angled cuts.
|
|
Once All the planks are fitted, they
can be glued down. I used Sikaflex 291. I calculated
that I would need 6 tubes to glue the planking down
and 2 tubes to do the seams. I was wrong. I needed
5 to glue them down and *9* for the seams. Be warned.
Buying this stuff at the local yacht shop instead
of online because you are desperate is NOT the way
to save money.
Most glued decks use screws with washers
to clamp the planks down – insert the screws
in the seam gaps. With the 4mm underlayment I was
not enthused with that idea, especially since there
are some areas where the under deck can be seen,
albeit with some contortions.
Therefore, I used lots of concrete
paver bricks to clamp the planks in place. Gravity
is my friend. The Sikaflex 291 gels pretty quickly
– I didn’t use the Long Open Time formulation
– so take care to apply glue to one plank
at a time, set it in place, insert spacers, clamp,
and only then move on.
After the glue has set, sand the
planks to final smoothness. The Ipe can be splintery
on very sharp corners, so I took ran sandpaper down
every seam edge to round all the corners off slightly.
Now, it’s time to put in the
seam compound. It’s Sikaflex 291, too. Black.
Scary, black goop near the finished paint!
| Mask everything.
Mask the planks. Mask the edges. Mask
every surface adjacent to a seam line.
Mask your grandmother and your neighbor’s
cat. Mask everything. I am not joking
about this. If you think “I’ll
be careful and not touch/nudge/look at
that particular spot,” MASK IT.
|
|
|
 |
This
black goop has magical teleportation
qualities. As soon as you open the tube
it appears on the bathroom floor, the
kitchen, and all over your radio. Trust
me. Mask everything.
Use a very sharp craft knife to trim
all the gap-spanning bits of tape.
|
|
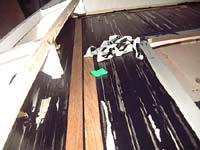
Now take a deep breath and pump all
that black goop into the seams. Smooth it out nicely
with a scraper. I found a cheap plastic scraper
works well. So does an old credit card cut in half.
Wear gloves and do not hesitate to change them frequently.
Consider a powered
caulk gun, I was wishing I had one.
Don’t go more than 2 or 3 seams without stopping
to smooth them out, because since the goop starts
to gel off fairly soon, it gets very hard to make
it smooth.
| See why
you need to mask everything? |
|
|
Now, Masking removal. There are two
ways to do this. One, do it *immediately*, before
the goop gels. This is very stressful because one
is panicking about getting wet tape smears on the
paint, planks, etc.
 |
Two,
relax and let the goop set up for a
day. Then come back and run a razor
knife down the seams before pulling
the tape. It takes more time, but that’s
what I ended up doing. Mostly because
there was no way I could get all the
seam compound in, smoothed, and tape
removed in 5 minutes. More like 5 hours
to apply and smooth the goop.
|
|
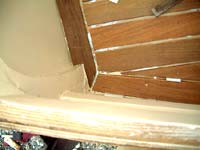
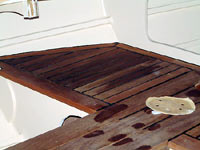 Finally,
give your planks a nice cleaning to take
off the last of the sanding dust. Apply
oil or finish if you’re going that
route. I’m not, these are bare planks.
The dark areas have had a swipe of cleaner
but not the whole plank yet. (This is
the area that taught me about Masking
Everything, so I needed to clean up some
goop spots). Ipe gets a very pretty dark
reddish brown when you clean or oil it. Finally,
give your planks a nice cleaning to take
off the last of the sanding dust. Apply
oil or finish if you’re going that
route. I’m not, these are bare planks.
The dark areas have had a swipe of cleaner
but not the whole plank yet. (This is
the area that taught me about Masking
Everything, so I needed to clean up some
goop spots). Ipe gets a very pretty dark
reddish brown when you clean or oil it. |
|
Be sure to check out Barrett's building
album.
|