|
designs by Warren D. Messer - Seattle, Washington - USA |
If
you like to build paper models of boats, you
will be glad to know that Mr. Messer has made
available a series of PDF files which can be
printed and cut out to make scale models. Here
are two new ones. |
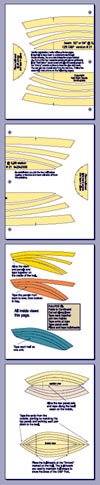
The O&P Pod
I have wanted to design a peapod hull
for a long time, and have started and stopped working
on the project several times during the past couple
of years. Each time ended in frustration with the
shape of the cutout models. Something was wrong with
the way I was approaching the design with the tools
and methods I used. I could come up with a hull by
using the free internet design programs, but none
of them gave me the flat panel printouts I needed
to test the design. I don't design boats that need
frames to be built on, and when you measure and loft
one of my designs on level plywood, they fit when
constructed. It wasn't until I started the multi-panel
Laura designs, that I was better able to work though
the relationships of the curved panels to each other
and the complete hull.
I took parts of the various Laura designs and copied
them onto a new drawing, and stretched and tweaked
them around to get closer to a final concept of what
I wanted. That took about eight models to get to a
workable (looked like one anyway) double ended hull
shape. Then I worked on it only in my spare moments
while building the Laura Bay. With building the Laura
Bay out of the way I had more time and a large supply
of "Red Baron" pizza boxes to make the models
from. Finding cardboard long enough can be a challenge
when I'm doing a lot of model making. The 15.5ft Wendy
Bay and 14ft Plyzar (both require matching up printout
pages) were even more of dilemma until I found some
6ply poster board at a local office supply store.
The O&P Pod took twenty one more printouts and
models after the first eight attempts, to arrive at
a final design that I'm happy with. But the model
I'm happy with now may have slight differences later
when the prototype hull is build, and again when the
plans go on sale.
The O&P stands for the Owl and Pussy Cat from
the nursery rhyme, and the first hull may be pea green
too. It's also a play on words from the standard term
of "peapod" for a small double ended hull.
It took awhile to get the sheerlines to fall in place,
and to get the volume I needed in the stern quarter.
Some of the traditional peapods had an equal distribution
of volume between the bow and stern halves. I wanted
to add more to the stern area for extra weight carrying
capacity for either a passenger while rowing or when
sitting in the aft section while sailing. At about
model number 15, I made major changes to the volume
of the hull and had to redo the fit and lengths of
all the panel sections. Visual changes to the overall
appearance of the bow and stern curvatures for the
"right look", were worked on at this time
too. From above the O&P looks like a baby Pacific
SeaCraft 37 or a Baba 30, but the stern is not as
full below the rail.
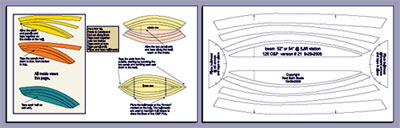
click image for model suitable
for printing on 14" paper.
I enjoy holding the O&P Pod model on the tips
of my fingers and just looking at it. This model is
the best fitting hull I have made to date and if you
follow the instructions for assembly that come with
it; you should have something to hold up and smile
about too. I did discover that in the conversion process
from program drawing file to PDF file, that the models
are smaller than designed. I almost went back to redesigning
the hull until I made some comparison measurements
between models from different file types; then I was
able to breath a sigh of relief. I like pizza, but
not every day. ;)
I am conflicted about which boat to build next; the
O&P Pod or the PUD-g. I have to wait until I expand
the barn to build either the 14ft Plyzar and the 15.5ft
Wendy Bay. But do not worry, both of the latter hulls
will have PDF models out soon to download, build,
and add to your growing fleet.
The 6.75 PUD-g
This design is a departure from what
I had told myself about not working on any more short
boats. Most people are looking for a boat somewhere
in the 10 to 14 foot range. This isn't even close
to that ideal. But I gave it a go anyway for the following
reasons.
The design came about
after I had gone up to Bellingham, Washington, to
look at a 34 foot steel sailboat. As I was waiting
for the broker to show up, I made a quick stroll up
and down the docks looking at the other boats sitting
at their moorings. As I walked along, I kept seeing
all the yacht's tenders stacked in their dock racks
in neat little rows. I then became more interested
in them than their mother ships.
There were prams, skiffs,
and dinghys; some homemade and some production boats.
I was amazed at how short they were and how little
volume they carried at their beams and ends. Some
of the more stylish ones had tiny little wineglass
transoms which carry no load until the boat is 6"
deeper in the water and freeboard is at a premium.
For a lot of them, twelve inches of freeboard sitting
empty was stretching the point.
I decided when I got
home to see what I could come up with that was small
enough to fit on the fore deck, but still carry the
captain and at least one crew member, plus supplies
from the docks to the mothership. I wanted to keep
it short, somewhat narrow in the beam, and with low
enough freeboard to be out of the way of either the
main boom or the headsail on the mothership.
A short narrow boat
needs it's volume where the hull meets the water so
to speak. So I made sure that I carried the volume
all the way down in the stern. A wine glass looks
pretty, but doesn't carry the weight well when more
than one person is in the boat. I puffed out the volume
in the bow area to give more displacement forward
to keep the nose up and the extra flare helps lift
her up in waves and keep some of the spray out. I
also gave her some freeboard to keep the seas out
when loaded down with crew and supplies. Sitting on
the dock, her height at the beam is about 16"
and this should help keep her dry. There is enough
"V" to the bottom that I don't think she
will need a keel strip to keep her going in a straight
line. If you want to add a short one along the last
two feet of the keel, be my guest as it can't hurt
and can only help. It looks like six foot oars would
work very well and could be stored in the hull with
no overhangs.
I did rake the transom
a little, and put a bit of a curve in the sheer. Nothing
says she has to be practical, and homely. To get the
most useful room out of the hull, I'm going to use
the moveable middle seat with double oarlock stations;
and maybe add a sailing option using the thirty six
square foot Optimist rig. You should be able to find
"slip sleeve" sized tubing at www.onlinemetals.com
to make the mast, boom, and sprit into take-a-part
sections.
Let me know what you
think of the boat after building the model. If I get
enough interest, I will construct the prototype and
make it a full series of stories as I did with the
Laura Bay.
Thanks again for your
comments and ideas.
Warren Messer
Red Barn Boats
P.S. The PUD-g stands for Personal Utility Dingy-model
g. ;)
Plans for Warren Messer's
designs are available from Duckworksbbs.com

|