|
Patricia Ann - a 12 ft. Pocket Tug |
|
Allow me to introduce you to my stitch and tape together
12-foot pocket tugboat. She can be built as a compact
yacht or a crusty workboat. Whatever your taste, she
is fun to build and a hoot to command.
Ive always been in love with tugboats. Designing
a salty little pocket tug to parade around and explore
the Southwest Florida coastal islands has always been
a dream. After raising two sons, one a law school
grad and the other now at the University of Florida,
I returned to my love of designing and building small
boats. I dusted off the drawing board and went to
work.
It is my opinion the artistry of boat design is much
like the anatomy of a beautiful woman. The most attractive
parts are the front and the back. My tugs bow must
have nice sweeping lines that are pleasing to the
eye. Her stern must be full and attractive. Everything
in the middle should be well proportioned, gracious
and charming. If you wish, the tug can be adorned
with brass and bronze nautical jewelry if that is
your style. The commercial fisherman-type builder
may like cast iron, galvanized hardware and grey house
paint. She is an attractive lassie no matter how she
is decorated.
What developed is Patricia Ann, my 12-foot tugboat
named after my wonderful wife Pat. She loves afternoon
picnics on the water and the tug is a comfortable
ride.
I never wanted a full-size tug. The cost, responsibility,
upkeep and headaches would far exceed my boundaries.
Over the years I studied small tug designs. Few designs
are out there...
... are wonderful concepts. However, I wanted something
simple, easy, quick to build yet not a toy or a huge
project. I couldnt find a design that fit.
My tug needed to be the largest possible boat in
the smallest possible package. I wanted her to be
big enough for several hefty adults. I like to stand
and move around without falling overboard or feeling
uncomfortable. I do not want the crew limited to sitting
or crouching. The design needed to be large enough
for an occasional overnight excursion. When not at
sea, she must be easily dry-docked. Most of all, she
must have salty appeal. I didnt want her to look
like one of the cookie-cutter, boxy, popped-out plastic
look-a-likes. She must have nautical charm.
I created the lines for Pocket Tug with the thought
that she should be very straightforward with no frills.
However, once I started assembly, the hull had more
volume than I anticipated. With a little creativity,
a builder could add a small doghouse forward and include
a six-foot V berth under the fordeck for Spartan accommodations
for a friendly couple.
Pocket Tug is easily constructed in a reasonable
workspace. It is important that she go together quickly
using minimal pieces without sacrificing structural
integrity. I like to use affordable, readily available
lumberyard materials. I do not want to spend retirement
savings on a boat project. I need to stay out of the
marine supply stores. I can be addicted to buying
boat things. Funds evaporate quickly in those places.
Searching for second hand marine bootie at garage
sales, marina junk piles, thrift stores, flea markets
and E-Bay is great fun. Some of the older, more traditional
boat designs require almost as much lumber to build
the strongback and building jig as it does to build
the boat. I didnt want that.
My pocket tug shall be powered by a small outboard
motor. Five to eight horsepower will work well. Going
fast is no priority. On E-Bay I found an old ships
wheel equipped for cable and pulley steering and a
bollard (Samson post) from an old Chris Craft to adorn
my tugs fordeck. Most other gear I purchased from
Duckworks or fabricated from discards.
Water surrounding the Southwest Florida coastline
is very shallow. Patricia Ann must navigate skinny
water on my search for secret fishing spots or that
perfect picnic anchorage. Most importantly, the tug
MUST be fun, quick and easy to build, attractive and
a little yacht I will be proud of. I demanded a lot
but I think Pocket Tug fits the bill.
Quarter-inch luan ply that cost less than $10 per
sheet at most lumberyards is my material of choice.
Forced, curved panels make this tugs hull stronger
than the plywood itself. PVC plumbing pipe sliced,
relieved and fiberglassed into the hull, forms an
I beam structure at the rubrail, thwart and keelson
to give Patricia Anns hull and wheelhouse incredible
stiffness and strength. The PVC will never be a maintenance
issue and makes good conduit for running electrical
wires if desired.
Some boat builders hate luan. I enjoy working with
it. Over the years I built several luan boats. It
is my opinion that maintenance is the key to a boats
longevity. Good epoxy application, quality paint and
reasonable care and storage will give a luan boat
a long lifetime. Keep in mind this pocket tug can
be built from quarter-inch AC or marine grade plywood
if the builder wishes.
When Home Depot people see me coming, they start
mumbling. Im very selective choosing lumber for my
boat projects. I pick and chose wood like an old lady
shopping for melons. Less epoxy products, Patricia
Anns hull can be roughed out for less than $200.
If you use Okume or high quality marine grade materials,
cost can be tenfold.
The big advantage to stitch and tape construction
is the speed at which Pocket Tug goes together. Panels
are cut to shape, bent around bulkheads and stitched
together with #16 copper wire. Very simple. No assembly
of ribs, jigs, frames, stringers, strongbacks, gussets,
stems, etc. There is not a single screw, nail or bolt
in the tugs basic hull. This makes Pocket Tug a joy
to build. Anyone who owns creative juices, a jig saw
and the ability to read offsets can build her. Ive
built many models that were more difficult.
I consider myself a hopeless romantic, especially
when it comes to boat design. I find myself gawking
at my creations like they are works of art. Not good.
This slows progress and I catch myself admiring hull
curves and symmetry way too much. Its a disease.
My schedule allows me to work on the tug an hour here
and an hour there. Large blocks of time are difficult.
If I turn off my cell phone, stay on task and stop
gawking, progress is swift. I feel the greatest tool
needed to build a boat is your eye. Studying curves,
sweeps and lines will tell you if Pocket Tug goes
together correctly. If your eye tells you something
does not look right, it probably isnt.
The first order of business is to purchase the dozen
4x8 sheets of luan and begin lofting hull panels to
offeset dimensions. Accuracy is important. I like
to put two sheets of luan together, end to end, to
form a 4x16 blank. Duct tape works well. You need
only loft three panels - the hull bottom, lower hull
chine panel(s), upper hull chine panel(s) and sheer
panel(s). Duplicates of the lower chine hull panel, upper chine hull panel and sheer panels
can be stackcut so you have a port set of panels and
a starboard set of panels. The stackcutting process
helps insure a symetric hull. It is important to scribe
all station lines boldly on both sides of all panels.
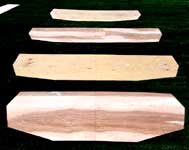
After cutting the panels, I like to splice the respective
pieces together using several layers of four-inch
pieces of fiberglass cloth epoxied to both sides of
the panel. This works well for me. It is quick, easy
and eliminates complicated scarfing and awkward splice
blocks (see photo of hull pieces).
Years ago I purchased several
discarded hospital gurneys. They are the most useful
items I own. The large wheels allow great mobility
and I can roll them inside, outside as workbenches
and rolling storage tables.
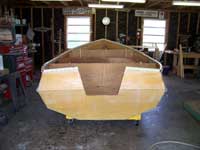
You can build the hull flat on
several workbenches or sawhorses. I put several 2x4s
together atop one of the gurneys on which I assembled
the hull. I placed the bottom panel on the 2x4 rails
and temporarily screwed the three bulkheads into position,
using scrap blocks and strips of wood to hold them
erect, stiff and aligned in place. I emphasize it
is important to scribe all station lines boldly on
both sides of all panels. This will help the entire
construction process as you progress. The prototype
Pocket Tug went together very nicely. The lower chine
panels are stitched to the bulkheads and floor panel.
Care should be taken to make certain all offset lines
are correct and aligned.
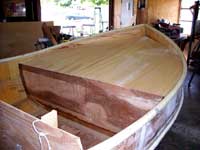
The trickiest part building Pocket
Tug is stitching together the lower bow. This Tug
is plump at the bow, to say the least. The return
of the plywood panels from station #3 bulkhead to
the bow stem is severe and tortures the plywood to
the point of fracture. Cutting longitudinal slits
in the lower, forward chine panels allows the panels
to bend and stitch into a round bottom without fracture.
This may seem difficult and confusing but it is easy.
I approached this part of construction as if I was
performing surgery on a patient. I try to be cautious,
skillful, methodical and very precise. Surgery was
successful.
With Pocket Tugs excessive seven-foot
beam, I opted to tape and epoxy the bottom and lower
chine panels together to all the bulkheads and transom
before stitching the upper chine and sheer panels
together. The hull is so broad I didnt think I could
reach the bottom seams to tape and epoxy with the
entire hull structure stitched together. I would kill
my back and fall into the hull.
Once you epoxy and tape panels,
there is no going back to make adjustments. Epoxy
welds everything together. It is important to check
and eyeball several times before applying the epoxy
and tape. At times the hull is unstable and like a
wet noodle. The more you stitch and epoxy panels together
the stiffer the hull grows.
After the lower chine panels
are epoxied and taped to the bottom panel, bulkheads
and transom, it is time to sew the upper chine panels
and sheer panels to the structure. It only takes a
few hours before the tug takes shape.
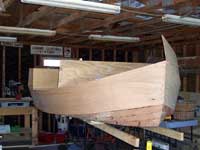
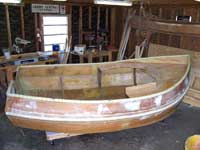
Once the hull panels are aligned
all interior hull seams get epoxy fillet, tape and
locked together. I used two layers of four-inch tape
and epoxy on all junctions and seams. This welds the
hull together so all wire stitches can be cut loose
and sanded flat. I purchased two block and tackles
($7 each and Harbor Freight) and drilled holes in
the bulkheads to place small pieces of rope to hoist
the hull into different positions for epoxy seam work
(see photos).
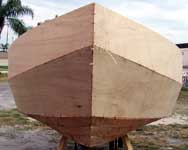
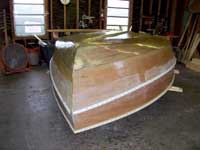
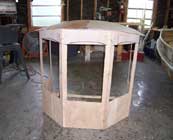
With Pocket Tugs hull formed,
I ran PVC pipe through the table saw to cut a slot
in it lengthwise to slide over the hull sides like
a cap. Relief cuts must be sliced half-way-through
the PVC every 2 inches to allow the pipe to be flexible
enough and make the needed bends. The PVC forms the
cap rail and slides over the luan nicely. It is epoxied
into place with two layers of cloth. This makes the
hull sides very strong and rigid.
The hull is flipped upside down
and placed on a simple rolling cradle build from scrap
2x4s on casters. With the hull upside down, it is
sanded and all seams get a 2 and 4 tape and epoxy.
The entire hull then gets two layers of glass cloth
and epoxy. I like to use 38 cloth. It is a convenient
size to work with. My goal is to totally encapsulate
the luan hull in epoxy and cloth.
One thing concerns me about Pocket
Tug. She is a 12-foot boat that looks and feels like
a vessel much larger than she really is. She can easily
seduce you into a false sense of security. This boat
is designed for protected waters and not created to
take on the wakes of big yachts or blue water adventuring.
Pocket Tug is designed to patrol quiet waters and
parade around the harbors and mangrove islands of
Southwest Florida. I think of her as a big, fat dinghy.
She is no sissy but not a blue water cruiser.

|