|
The Optimist Dinghy |

|
 
This design has one of those histories
that sound like a lot of fun, the designer, Clark
Mills, is said to have done the design drawing on
a scrap of paper. This was around 58 years back and
he lived until just last year, to see his single design
out sell all the other dinghy classes combined. He
also gave his design to the world and never charged
a design fee, allowing what was to become a world
wide Optimist Association to run and control the class.
That first boat was made from two sheets of ¼”
waterproof, or marine, ply plus some Meranti cleats
and screws and glue to hold it all together. It was
either clear varnished or painted with house hold
lead enamel paint. The class grew and grew. The boats
lasted for years and many of those old boats still
exist. Then came what was to be a very large change
in the class rules. The allowance and introduction
of GRP (fibreglass) which more or less sent the older
wooden boats into history; why?
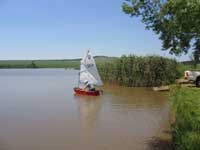
 |
A modern
Epoxy/Plywood boat from one of our kits.
It raced in the SA Nationals in 2005.
(click
images to enlarge) |
|
When our daughter was learning to sail, she was about
12 or so. We took her to the Imperial Yacht Club,
which sails and races dinghies on a lake near our
home. There we saw the old plywood Optimists but also
the newer GRP boats. All the top kids wanted to sail
one of those, saying they were better boats. If more
money buys better they had to be. Prices for those
Imported boats went as high as R40,000 I was told,
that’s US$6666, it sounds impossible I know
but fully imported boats have to be shipped and when
they arrive a high rate of local import duty has to
be paid.
At the time I had an idea to make a plywood Optimist
for Janet as she was proving to be a fine little sailor.
Plans were freely available from Hans who was in charge
of the association here in the Cape. So asking my
good friend Andy, of the local North Sails loft, what
he thought about the difference he simply told me
the GRP boats were better as they were stiffer.
Asking why I was shocked to hear that the GRP boat
has a foam sandwich bottom! I said it was easy for
me to construct a plywood boat in the same manner?
That he said would not measure so would not be allowed
to compete. As I could not afford the expensive GRP
boats and there was little point in building a plywood
boat that was not competitive, so at that time it
was the end of the story where plywood was concerned.
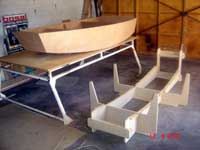
| The finally
developed CNC plywood Optimist kit, panel
set. We include all the timber solids, glues,
glass tapes, screws as well as our twelve
page builders instruction guide! |

|
|
Well, all is not quite as it seems: I was not the
only one who had assessed the situation and in 1997
a group was formed to re design the plywood boat -
enter THE PLYWOOD/EPOXY BOAT! They started with selecting
very light Occume Marine Plywoods; one sheet of 12mm
and one sheet of 6mm. This was a large departure from
the previous plywood construction. The 12mm sheet
became the bottom and in a stroke of good design they
had equalled the foam sandwich stiffness. By not using
as many Meranti wood cleat and all the screws but
just epoxy and glass tapes they saved lots of weight
and now we had a boat that was both light weight and
stiff.
The wood/epoxy Optimist as a complete kit
Enter CKD BOATS
We were more than pleased to be asked to accept an
order from the Knysna Yacht Club, which is a round
250 miles North East of Cape Town. The original minimum
of five boats went to seven, then nine by the time
we closed for the annual December holidays. There
was a catch with the order, of course. The RSA Optimist
nationals were in mid December - we had around six
weeks to develop the design but also leave the mums
and dads enough time to build the five kits required
for the event.
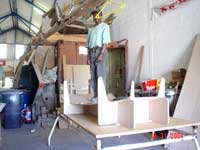
Most of our other work was shelved while we got stuck
into the program. The official plans arrived; the
plan of action was to have our CNC shop man, Sean,
enter all available sizes off the drawings into his
PC while the rest of the kits materials were being
completed. This includes pre shaping all of the Meranti
wood parts - making the assembly a lot simpler.
We cut the first set of panels in a lower cost exterior
ply, reasoning that if we found mistakes we would
not waste valuable marine grade plys. This was just
as well. The boat you see here had to be taken apart
some five times, as the plans do not match the strict
specifications. One dimension was out by 14mm (5/8”).
Each time the trial boat was rebuilt it was then measured
again, any changes were then given to Sean and he
changed his CNC files to suit our changes. It’s
hard to understand that the plans do not match the
specifications laid down by the class rules!
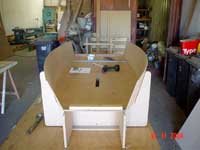
 |
Mike,
using his body weight to shape the 12mm
lower panel into our specially designed
builders jig. |
|
Once we thought we had things right we had the boat
measured by an Optimist official who found it correct.
| Note,
we advise that before anyone glues up the
boat, they remove it from the jig in a dry
condition, measure it and when your sure
it is right, put it back in the jig and
then glue it together. |
|
|
This is quite simple: you unscrew all the hull sides
from the 12mm thick lower panel, lift off the top
of the boat as the four sides in one unit, apply glue,
then screw it back together. You then glue and screw
each corner, one at a time.
| The only person
who ever had problems was a guy who later
admitted he never read the plans. |
|
|
The fully detailed instructions we supply give you
a step by step system to build with. The only person
who ever had problems was a guy who later admitted
he never read the plans. We sent him twenty pictures
instead - the pictures are in the builders book anyway.
Once the boat is glued together, the inside panels
go in. We supply extra bulkheads as spacers. These
are later removed but only when all the Meranti Joinery
and side rails are fitted.
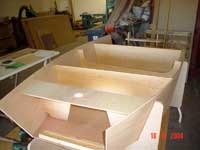 |
The removable
bulkheads are either side of the lower
central and fixed bulkhead. |
|
We made the Knysna Yacht Clubs handover deadline
with a day or so to spare, then the rush was on for
mums and dads, helped by their kids to make up five
of the kits, as they had already sent in their entries
for the SA Nationals at Hermanus Town, about 100 miles
north east of Cape Town. They went into the Novice
section and the CKD Boats kit boats finished four
out of the first five places. We missed out on third
place!
One really great thing that came out of the event
was that our boats on average were all 750 grams lighter
than the far more expensive GRP Dragon boat from China.
As the new wood/epoxy is as stiff as a plastic one
and our boats weigh less, there is nothing to be gained
by spending more on the plastic boats?
An indication of prices at that time.
CKD Boats kit, complete with Optiparts Mast, Harken
Deck Pack, North Sail…….R8450
The same gear but a Dragon GRP hull…….R17,500
Which in US$ terms is around U$1408 and a massive
U$2917. With our option you have to get your hands
dirty a little though!
Lots have now been built and we have happy customers
around the country!
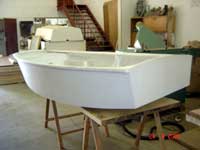
| A kit finished
and in primer. |
|
|
These boats are lightweight, fast and stronger than
any GRP type boats. They are easier to repair as well.
 |
Vince
trying his kit build out. |
|
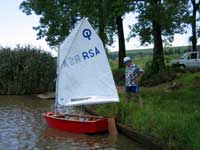
| Inspection
time and happy sailing. |
|
|
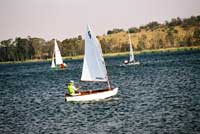 |
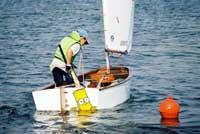
Racing
- as they were meant to do.
|
|
Roy Mc Bride - Founder - www.ckdboats.com
email - kits@ckdboats.com
Cape Town
South Africa

More articles by Roy McBride:
|