
How to Scarf-join Plywood
by F. O'Brien Andrew
Putting a plywood skin on a boat isn't as easy as it looks. Because most boat are
longer than a piece of plywood (And good board stretchers are too expensive) boat builders
frequently need to join two pieces of plywood together. There are several options
for this, and the scarf-joint is one of the most common.
The basic idea of a scarf joint is to take the two ends you want to join and shave them
down at a regular angle. Then glue them together like this.
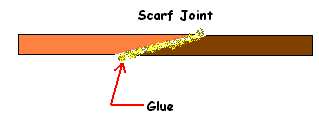
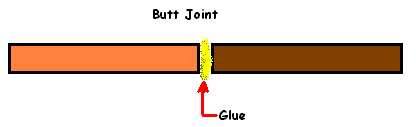
This is a much longer glue line and a much stronger joint than just attaching the two
ends in what is commonly called a 'Butt Joint'.
So you got the idea and it sounds easy, but it isn't. If you shave down the
angles differently on the two pieces of wood, they don't fit up. You end up with gaps that
make for a weak joint overall. You want them to be a perfect fit. How do you
get the two angles to fit as closely as possible?
There are lots of ways, this is how I did it when building my little sailboat, FoxFeathers.
First I clamp down the piece of plywood I want to shave, with the edge to be cut along
the edge of a work surface. It's important to pick a work surface you can damage, cuz this
can get ugly...
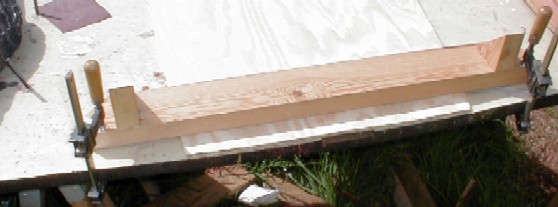
Not only do you want a work surface you can cut without concern, but you want to have a
clamping surface you can cut into too. I'm using a scrap of 2X4 and a couple of
clamps on each end. Be sure to clamp it down TIGHT. You don't want the plywood
to shift when you are cutting.
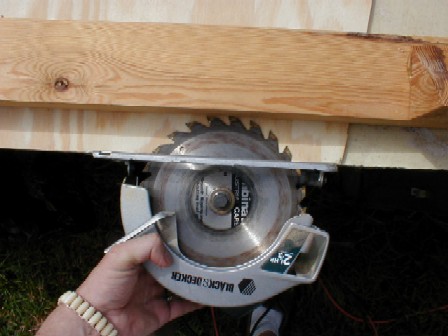
Next, I take my circular saw and line it up with the plywood. I want to angle the blade
so that it will just nick the 2X4 that I have holding down my plywood. I don't want to cut
into the 2X4 more than 1/32 of an inch. Any more would just damage the 2X4, wear the blade
and make it all hard to control. Besides, I'll need the 2X4 in good shape for the
next scarf.
Then I start the slow process of slicing the plywood at a long, straight angle. This is
a little like cutting a piece of plywood that's 3 inches thick so go slowly.
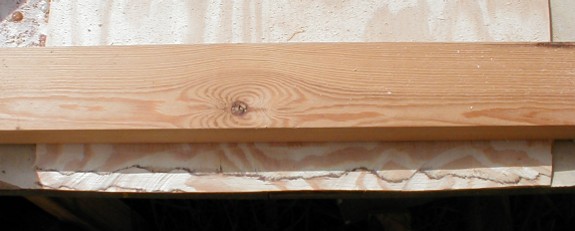
When I'm done with the initial circular saw cut, I have the start of my scarf. It's not
that flat and could use a lot of cleaning up.
Notice the dark line in the shot below, that's a glue line between layers of wood in
the ply. When that line is straight, that means the angle runs smooth and tapers evenly.
An uneven taper will create wild squiggles. Below you can see that the initial cut from
the circular saw left a pretty un-even surface. That's ok, because the next step is to
clean that up.
To fix up that rough cut scarf, I use my belt sander and a heavy-grit belt.
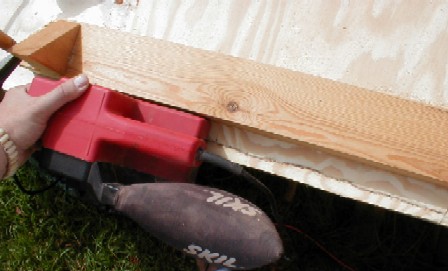
I keep the 2X4 in place as a guide. Check out that glue-line. It's starting to
straighten out already.
Here it is, the first piece of the plywood skin on the bottom of the boat.
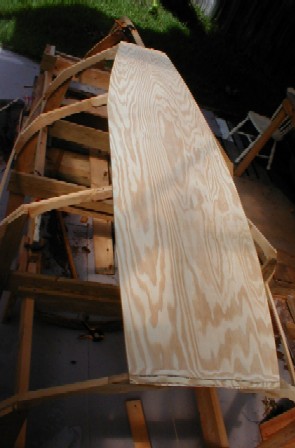
That's half a scarf. The next step is to repeate the process on the next piece of
ply that touches this one. Then place it on the frame, clamp-glue-n-screw it all in place
and and drink something in the air conditioning while the glue sets up.
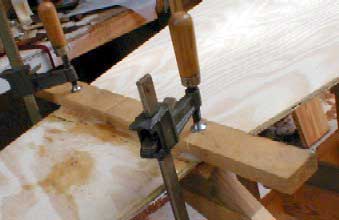
As you can see above, I use a board and clamps on top of the screws while the glue sets
up. This keeps the glued joint nice and flat. When you cut plywood very, very thin, you
can end up with a soft edge that will curl up when some kinds of glue come in contact with
the wood fibers. This board helps keep it all down where it belongs until the glue
hardens.
I could have set up a jig that would keep the initial scarf cut smooth and clean so it
needed little or no sanding, but I didn't have very many scarfs to make for my little
boat, so for me, that kind of setup would probably not pay itself back in time saved.

Inverse Scarf Joint
If you are using very thin plywood, say 1/4 inch or less, you might not want to make a
scarf. This is a matter of opinion based on the strength of the scarf joint, the use
of the wood, how much stress the joint will be under, etc... If you think that the
scarf on a thin piece of plywood won't be strong enough, but you still want a fairly
smooth connection, you can use an inverse scarf joint.
The idea is similar to a scarf joint. The two pieces of wood are cut at a long
angle, but before they are joined together, they are flipped over, like this.
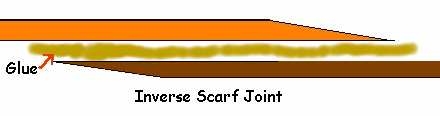
This generates a lot of surface area for glue-contact and will make a very strong
joint. The tapering edges make for a fairly smooth transition from one piece of wood
to the next and can be sanded after the glue has set to make it even smoother.
To the right you see the end of my 1/4" ply after I've finished cutting the scarf
and cleaning it up with my belt sander. In this case, the sanded edge will be
outside, and the other side of the ply will be glued, just like in the drawing above.

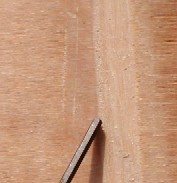
And here it is, all glued together.
The black stick is pointing out the glue line - it's nearly invisible.
The inverse scarf joint doesn't produce a perfectly smooth transition from
one piece of plywood to the other, but with a little creative belt-sander work, you can
make it fairly smooth and it is a much stronger joint when working with very thin pieces
of ply.
Happy boat building,
-- Frank Andrew
F. O'Brien Andrew lives and builds in New Orleans, where he is hard at work on FoxFeathers, a small sailing dory and typing
furiously on his latest novel.
All photos and text copyright F. O'Brien Andrew, 2005 and are published by the
good folks at Duckworks with permission.
Any additional use of text or photos requires written permission of the copyright
holder.
Use as educational material by schools, non-profit and governmental organizations
is hereby granted. All others, contact Duckworks or F. O'Brien Andrew through his web site.