Teaching Old “Dogs” New Ticks
by Pat
Patteson
Like many of us, I don’t have a lot of
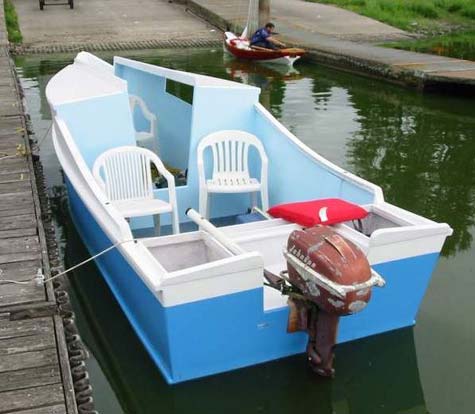
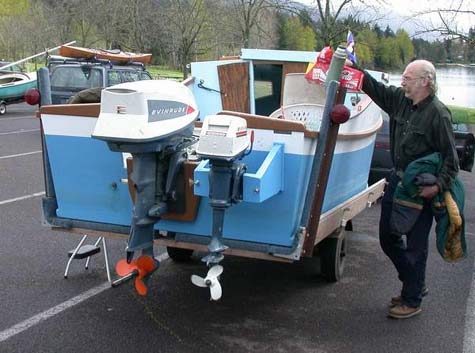
money and when it came time to Power my “PK-20”
Power Cruiser I would have loved to just go out and buy a Brand
New 4 Stroke Honda. But the cost was off by about a factor of
10.
I had originally hoped to power the boat with
a trusty old 1956 15HP Johnson Seahorse that despite much abuse
and very little maintenance would start on the second pull every
Spring. The little old Johnson did push this 20’ boat
to an exhilarating 12MPH on the maiden voyage, but after adding
all the amenities and an extra body the little motor was just
not up to the task.
John Kohnen, a good friend of mine, told me he
had a friend with a 1965 33HP Evinrude that was still in pretty
good shape. John told me he no longer needed the motor and was
just looking for a little quick cash. As a bonus I was told
the motor had “Electric Start”.
Now this was Just what I had been dreaming about.
A New Motor (well newer than my ‘56) that would have plenty
of power to push my now Fully loaded and overweight “Cruiser”
at blistering speeds and, I assumed (you all know what that
means) if it had “Electric Start”, it Must have
a little generator hiding somewhere under the cowl to recharge
the battery after the starts.
I was hoping to have some electronics on the boat,
or at least something other than oil lamp running lights and
candles for cabin lighting, so a little electric was good.
I told John to tell his friend it was a deal,
sight unseen. John’s friend had to drive to Portland on
business soon and could stop by my place on his way and deliver
the motor. I didn’t even have to leave my house. Great.
After waiting and dreaming about my New Motor John’s friend
showed up in my driveway in his little old Pickup and introduced
himself.
He opened the back of his truck and there was
My New Motor. He told me all he knew about the motor’s
history and said it had been running just a little while ago
and seemed to be OK. The motor was not quite as pristine as
I had dreamed, but it looked like most of the exterior parts
were there so I paid him the money and he helped me drag the
motor out of his truck, next to my boat, near my shop.
I discovered one thing immediately, this motor
was a Lot heavier than my little old 15. The next discovery
I made was the Cowl, which had been rattling around when we
unloaded the motor, would not latch securely. A part on the
motor casting was broken and the hook had nowhere to hook. Maybe
just the ride in the truck, I thought. That was a fairly easy
fix and with an eyebolt and a little metal sculpture the cowl
would lock on and stay in place.
The next discovery was a little more disappointing.
There was a Place for a generator, but a generator wasn’t
there. Starter on one side, but only a Place for generator on
the other.
But, since I had not paid much for the motor,
I was a little disappointed, but not too. The starter Was there
and when I touched the wires to a battery there was a click
and a whir and the flywheel went round and round. That was Good.
One good thing about buying one of these old Johnson/Evinrude
motors is there were a Lot of them made and many of the parts
are interchangeable, not only between Models, but between Makes
and replacement parts are still available. My old Johnson 15
has several Evinrude parts on it.
I made a call to a local outboard salvage company
and was told they had several generators that would fit. I drove
to Portland to pick up the starter the same day I called and
not only did they have the starter sitting on the counter, but
a voltage regulator and a mounting bracket I hadn’t realized
I would need. The fellow also handed me a little flat belt that
is supposed to drive the generator from some teeth on the flywheel.
That belt didn’t look like much more than a big rubber
band, but since I didn’t even think or know about all
the other parts he had sitting there I trusted at least one
of us knew it would work.
Installation was fairy straight forward and luckily
none of the bolts were frozen, so it was just a matter of taking
the bracket I didn’t need off my motor, installing the
bracket I hadn’t known I needed, bolting on the generator
and slipping that little rubber band, “Belt” over
the appropriate pulleys.
Well, it didn’t go quite the quickly and
smoothly the first attempt. I found there is an order in which
all these parts need to be installed to get it all on but I
did finally get it all together and became quite proficient
in several of the steps.
After a little shimming and bending, when I turned
on the starter the flywheel went round and round and the little
belt turned the generator with nothing rubbing.
I felt pretty proud of myself and I Now had that
New Electric Start Motor And the Generator I had hoped it had.
I was never actually Told it had a generator,
just that it was “Electric Start”. I had been told
the used generator worked when I bought it, but, always the
pessimist and not wanting to be surprised after I had it installed
and at the lake, I took the generator to a local auto electrical
shop near me. The fellow was working on something else, but
I must have looked desperate and maybe he was intrigued to see
a Generator rather than an Alternator, for a change.
Unfortunately he wasn’t as much help as
I had hoped. After fiddling with it for a while he eventually
hooked it up to a battery and the Generator started spinning.
He handed it back to me and told me it “Motored”
OK, so it should work.”
He searched around his cluttered shop and tore
off a little piece of paper from an old pad. The paper had schematic
diagrams for 3 different voltage regulators. He said, “Just
see which one of these matches the regulator you have and hood
it up like it says.” Apparently he finally realized he
didn’t know much about this generator and didn’t
change me anything for his “Services”.
I also had an old Evinrude manual with a couple
of Schematics for generators.
Unfortunately, none of the 3 schematics on his
paper Or the ones in my manual seemed to be exactly like my
regulator. But, I was learning a lot about generators and regulators,
so I finally took all that “Knowledge” and hooked
up the wires the way I Thought they ought to go.
Again I turned on the starter, everything spun
and Nothing happened.
That’s good, I thought.
No smoke or sparks.
It wasn’t until a couple of weeks later
that I was able to get together with my original friend John
who has an Ohm Meter. We determined the generator Was generating,
I have had no fires and the battery always starts the motor.
I’m still not Sure it is all together Right, but it does
Seem to work.
I didn’t do Anything to the motor other
than install a new set of spark plugs, replace the gear oil,
and make sure I had the gas oil mixture correct. Up until then,
that had been about the extent of my Outboard Motor expertise.
The motor seemed to run OK and I had learned from
my old 15 that turning the carburetor adjusting screws sometimes
makes a difference in the way the motor runs.
On one of my firsts Messabouts with the boat and
my New Motor I was pleasantly surprised by the performance.
With the electric start it was very easy to get running, and
once running the motor was able to push my now greatly overloaded
boat into the high teens MPH.
I was as happy as a clam. A new electric start
33HP motor and electric running lights.
But, things were not as good as they could have
been. While the motor would wind up nicely and the boat would
scoot across the water the motor had what seemed to be a nasty
“Miss” at high speeds.
I am no outboard mechanic, but I Knew something
wasn’t right. I took a few of my friends for rides and
twisted those little knobs on the carburetor (about all I knew
how to do), but nobody could tell me exactly what they thought
it might be.
Finally, after listening to the advice of all
my friends I decided it must be an electrical miss of some sort
because of the very brief duration of the miss.
Running running running, bang, running running,
running, bang.
I had been told (I’ve been told a lot) that
one of the few week points of these old OMC motors is the ignition,
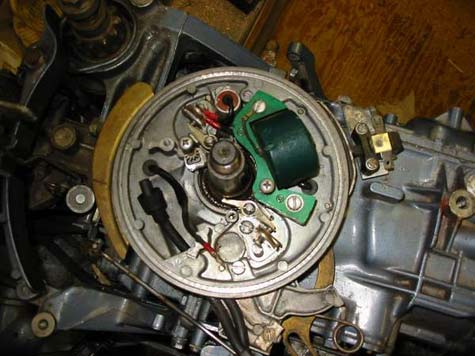
and particularly the coils.
At the time, I knew there were coils, but I wasn’t
sure exactly what they were, Or did. But, if it Was an electrical
problem, then new coils, points and plugs should solve the problem.
I called my local NAPA Auto shop and, after explaining
to the person who answered the phone they did, in fact, carry
ignition coils and points for this 40 year old Outboard motor,
I gave them the part numbers for 2 coils, 2 sets of points and
2 condensers. (I’m still not sure what condensers do,
but I do know they should be replaced when the other stuff is
replaced.)
While I was waiting for my parts I had decided
to see what and where all those parts were and how they were
attached. With a few copied pages from an old library Johnson/Evinrude
repair manual in hand I started working my way down from the
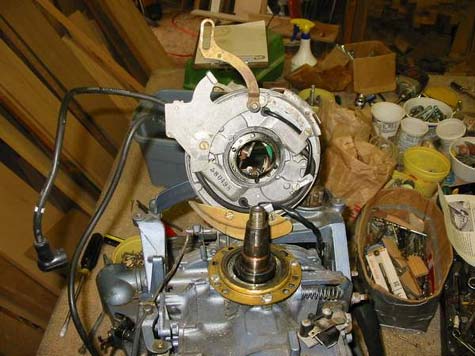
top. By now I was a pro at removing and installing the generator,
parts of which I discovered had to be removed to get the flywheel
off. The flywheel itself was held on by a large nut that was
slightly recessed, so I could get a good bite with my trusty
pipe wrench or anything else I had.
As I said, I’m no mechanic, so I didn’t
have a wrench that would fit that nut and all the attempts at
removing it with any tool I did have failed, so it was off to
town to buy a proper sized socket that would fit that nut. I
found the right sized socket, but then discovered it did not
come in a 3/8” drive size, the only size driver I have.
I had to buy an adaptor, which cost nearly as much as the socket.
But, I kept telling myself I was saving a Lot of money by doing
the work myself, And I was learning Way more about this old
motor than I wanted.
After wedging a block of wood between the flywheel
and a non-movable part on the motor I put the ½ “
adaptor and big socket on my little 3/8” wrench and pulled.
Nothing moved except the flywheel. A few more whacks against
the wood block and the flywheel didn’t more anymore, but
neither did the nut. I sprayed the nut with WD-40 and slathered
it with anything I had I thought might loosen it up a little,
but even after waiting a long time for the oils to do their
magic, still no movement.
Finally, in desperation and remembering the Sears
Lifetime Tool Guarantee, (this was the replacement for a wrench
I had broken years before) it was finally time for my Big Pipe
“Helper”. I slid the 3’ long 2” pipe
over the little wrench handle, stood out of way of any potential
flying parts, closed my eyes and pulled.
Bang!!! Something had happened, I wasn’t
hurt and the little wrench still seemed OK. Yes! The nut spun
right off.
I was ready to look under that flywheel and see
those parts.
I Only had to pull the flywheel off the shaft.
Well, most of you know, the nut is the Easy part.
More WD-40 and other magic oils to no avail and even I knew
banging on the threaded shaft or using that pipe or a crowbar
would probably turn this motor into junk, so this time I decided
to make the trip to town Before I wasted a lot more time and
really broke something.
I bought a proper puller from my regular auto
parts store and with that I was finally able to hear another
rewarding “Bang” as the flywheel finally parted
from the shaft.
Much to my disgust, I found the same puller at
Harbor Freight for a third the price I had paid at the auto
parts store, but, at the time, it was still worth every penny
and I will have it (if I can find it) when I need it again.
My Outboard Motor Tools collection is growing.
Well, there they were. All those parts I would
soon become so intimate with.
After taking a lot of digital photos, so I would
know where everything was when I stared, I began taking things
apart, one side at a time. I figured, that way, I would have
the other side as a reference when I forgot where everything
was suppose to go.
To my untrained eye the all the parts Looked to
be in OK shape with no obvious parts missing, broken, rusted
or badly corroded, But I had come this far; everything that
could be replace would be replace.
Two days later I got a call from my the NAPA store
telling me my parts were in. (NAPA and These old OMC’s
are great.) With the new parts in hand and one side still intact
as a guide I replaced the points and condensers and coils.
So That’s where the other end of the spark
plug wire goes. And, replacing everything I could, it was another
trip to town to buy some new copper core spark plug wires.
Replacing the spark plug wires meant going deeper
into the motor than I had hoped and figuring out how to get
the new contacts and boots on the end of the wires was interesting,
but I finally got them in place and hidden away.
Replacing the points was fairly straight forward,
but, not having a meter, or knowing how to use one if I did,
I adjusted the points the same way I had on the old, pre electronic
ignition cars I have had.
After many attempts I had the points adjusted
as close to what the specs said as I could. Any more attempts
could only make it worse.
But, those Coils? How does one measure the “Air
gap” between the coil and the inside of the flywheel?
The manual gave a part number for a special gauge, but that
would mean having to Find that gauge. I didn’t know if
or where.
So, knowing they should not touch the flywheel
I moved the coils to about where the old ones had been and put
several layers of tape over part of the coil that is next to
the flywheel and built it up about as thick as I thought the
gap should be.
I moved each coil out so the inside of the flywheel
just touched the tape when the flywheel was tightened down.
(Now I had socket that fit the nut.)
When each one just touched, with the tape on,
I decided that was as close as I was going to get and after
checking the point gap one last time and removing the tape,
I closed it up and much to my delight, it Ran.
I was later told that “Tape trick”
Is a way of setting the gap.
Surely my “Miss” would be gone and,
with all new electronics under the flywheel, the motor would
run like a top.
It did seem to run well, but that “Miss”
was still there.
Oh well, at least I had all new stuff in there.
Eventually I’d have an all new 1965 33HP motor, one part
at a time.
I had become very frustrated with not being able
to figure out what the problem was and finally decided this
motor was just Too complicated for Me, the non-mechanic to fix.
After all that time and money I was still going to take it to
a Real Outboard mechanic and just live with the cost of the
repair. I called the mechanic and was told I could make an “Appointment”
about 3 weeks in the future. I decided that was an omen. I had
one Last chance to figure out the problem and fix it. I might
not be a good mechanic, but I am stubborn.
In the mean time I had decided rebuilding the
carburetor couldn’t hurt and by now I was getting pretty
getting confident in my mechanic skills, so with another call
to NAPA (they now know me and know that they carry this stuff)
a carburetor rebuild kit arrived. This kit contained fewer Parts
than I had hoped, but I replaced everything I could and cleaned
every nook and cranny. After putting it back together I was
again pleasantly surprised when the motor actually started and
seem to run better.
There are only so many things that could cause
this “Miss”. (Little do I know.)
I now had new ignition and new carburetor. Gas
and Spark.
That’s all there is, isn’t it?
Off to the local lake again.
I had lots of new stuff on my motor, but I Still
had that same Old “Miss”. It was time for a totally
new approach to what might be causing it. I had noticed when
the “Miss” occurred the shift lever on the side
of the motor jumped a little. And, when I held the remote shifter
hard forward the “Miss” did not occur as often.
All this time, had I been looking at the wrong
end of the motor?
Maybe it wasn’t a “Miss” in
the motor after all. Maybe it was something in the lower gears.
I had learned a lot about the “Motor” end of my
motor, but knew nothing about the bottom end, other than how
to take off and put on the prop and change the gear oil. But,
since I had done everything I could to the motor end and the
shifter was jumping, Maybe the problem Was in the Gears.
I still had the “Appointment” with
the mechanic, so it was now only a mater of how many of my mistakes
he had to correct. I decided to Learn about the gears on a 65
Evinrude 33.
Earlier I had been concerned the water pump on
a motor this old might be about ready to fail and leave me stranded,
but not being a Mechanic then I had the water pump impeller
replaced by the same mechanic with whom I now had the “Appointment”.
I sent an email to our old buddy and outboard
motor Guru, Max Wawrzyniak asking for help. Max sent me words
of encouragement (which I really needed at the time) and diagrams
of the lower unit of my motor.
I had mentioned my intentions work on the gears
to another friend and old OB motor mechanic, Charley Vader,
and he assured me fixing the lower unit was easier than rebuilding
the carburetor.
I really didn’t believe him but with his
encouragement and Max’s help I decided I had nothing to
lose.
Charley told me the “Shift dog” could
cause the problem, but there must be a reason it was slipping.
His suggestion was to replace the bearings and, since they were
relatively small and inexpensive, true to my plan so far, if
anything could be inexpensively and easily replaced, it Would
be replace.
I had heard the mention of a “Shift Dog”
in relations to outboard motors, but again, really didn’t
know what it was or how it worked, but, by now, Anything I could
repair or replace that Might solve the problem seemed doable.
After studying Max’s diagrams and reading
his emails many times the big screw drive and wrench came out
again and before I knew it I had the lower unit of my 33 clamped,
upside down in one of my woodworking sawhorse/vices.
(I Am a Woodworker by trade.)

I very carefully removed the bolts holding the
gear case together and peeked inside through a crack. There
were lots of things in there, so again I took lots of digital
pictures before and while I was taking it apart.
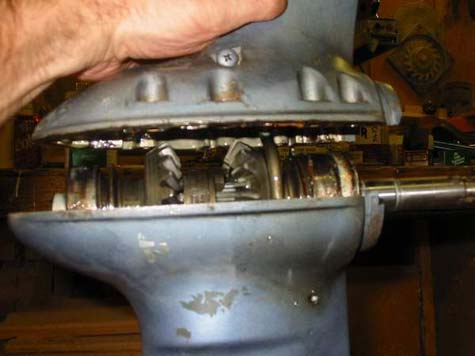
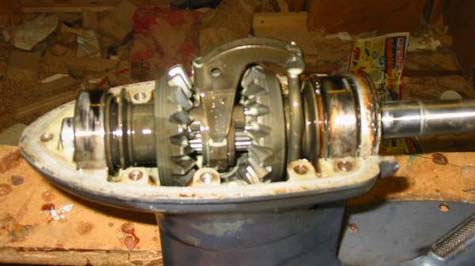
The shift lever and rod were a little complicated
coming apart but finally I had the bottom gear case and gears
sitting on a table. Thankfully, it looked a lot like Max’s
diagram and I finally saw that Old Dog, right in the middle.
A couple more pictures for assurance and then out of their safe
cocoon.
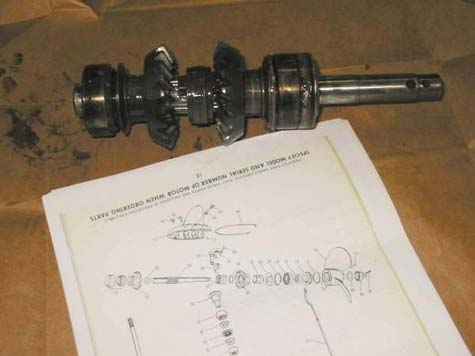
I was able to get the numbers off the bearings
and after a little searching, NAPA was able to find them and
have them for me the next morning.
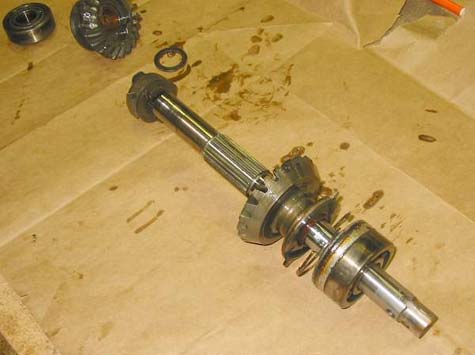
I carefully pulled off each bearing, washer and
gear and was finally able to examine that Shift Dog. The forward
end, the end that engages when the motor is in forward, was
a bit rounded over where it engages with the gear.
Before I took everything apart I had asked if
it was possible to just turn the Dog, end for end and have it
work. The consensus was that since the dog is the same on both
ends that should work and since it would be more inclined to
pop out when under high strain that any problem would be less
likely and less damaging and important if it were controlling
the reverse gear.
When I got the new bearings I slathered them with
gear oil, turned the gear dog end for end and put everything
back the way I thought it should go, but it would not go back
into the housing correctly. I carefully examined each part and
realized I had one washer on the shaft backward, and when I
turned that around it all fit perfectly.
The “Spaghetti Gasket” that seals
the case looked fairly good, but I smeared a little RTV silicone
on any suspect spots and at the end where it meets a bearing
race.
Again, it took a little playing around to get
the shift rod in place and the shifter pin inserted.
I discovered another way of screwing up (literally)
when, after all that work, the motor would not shift into forward.
When I put it back together I hadn’t gotten the end of
the shift rod completely in the connector, but with that right,
all seemed good.
The next day I took the boat to the Willamette
for the test run, feeling I had the problem finally figured
out. But, Very Much to my chagrin, after smelling something
hot, I discovered there was no cooling water coming out of the
back of the motor.
Back on the trailer and back home, I still did
not know if I had the shift problem solved. Even though I got
back after dark I had to know what was wrong and even though
I had previously had the mechanic replace the water pump impeller,
I was now ready for Anything and had the lower unit off in short
order, examining the impeller.
Apparently somehow in my work on the gears I had
knocked it loose from the little drive pin.
I made sure it was secure and reassembled the
lower unit once again, making sure I got the shift rod all the
way in this time, and sealed it all up once again.
The next day I was back at the river early. When
I started the motor there was lots of cooling water coming out
the back. Yes.
With fingers and everything else crossed, I headed
upstream and hoped for the best. When I opened the throttle
something seemed unusual. The motor was Not “Missing”.
I had gotten so used to “The Miss” that it seemed
Unusual to Not have it popping. Gaining confidence by the second,
I finally turned around, headed downstream and ran for nearly
an hour at almost full throttle and 20MPH.
The motor didn’t miss a beat, the whole
trip.
After almost 2 years of trying to diagnose and
fix this elusive “Miss”, I Think I may have the
mysterious problem solved and finally have the New Motor I was
dreaming about. I Still have only a few hundred dollars invested,
and a great, if unplanned education.
And, even with all the new parts, most of this
motor is still 40 years old, and I have become the “Mechanic”.
I decided a newer (1969 4HP Evinrude) little motor might be
a nice addition too, Just in case.
It Is possible to teach an “Old Dog”,
like me, new tricks and it Is possible to teach An “Old
(Shift) Dog” new tricks too.
Unfortunately, Winter is here and because of the
motor problem I did not used my “PK-20” nearly as
much as I would have liked to.
But, Spring Is Just around the Corner, so Look
out, here we come.
Pat Patteson
Molalla, Oregon